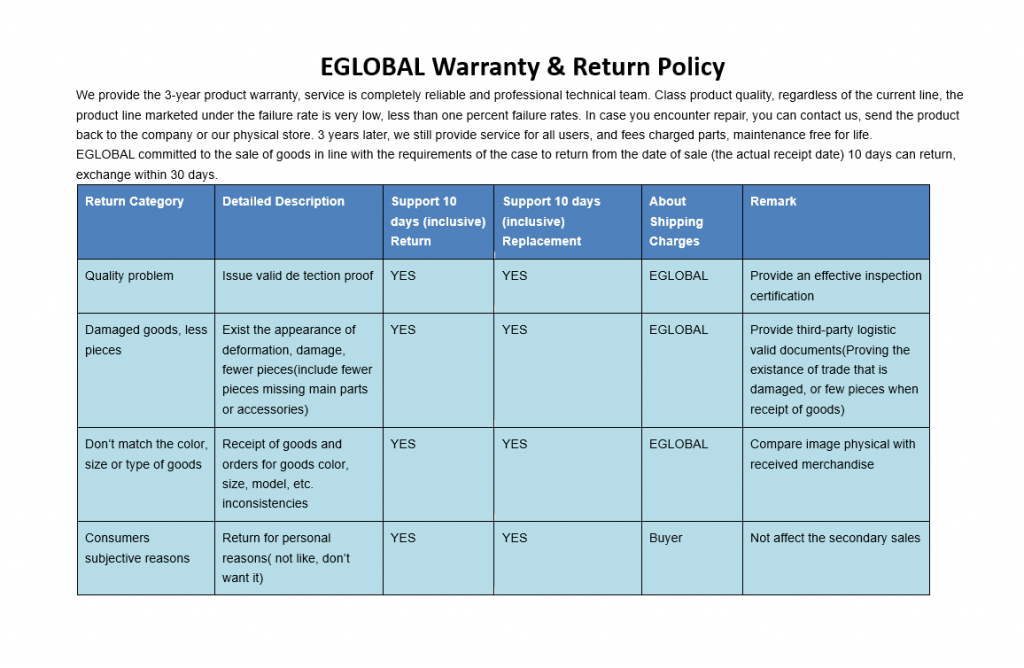
Thanks a lot for our customers’ support. Of course we provide 3 years warranty for Eglobal Mini PC. Details about our Warranty Policy here:
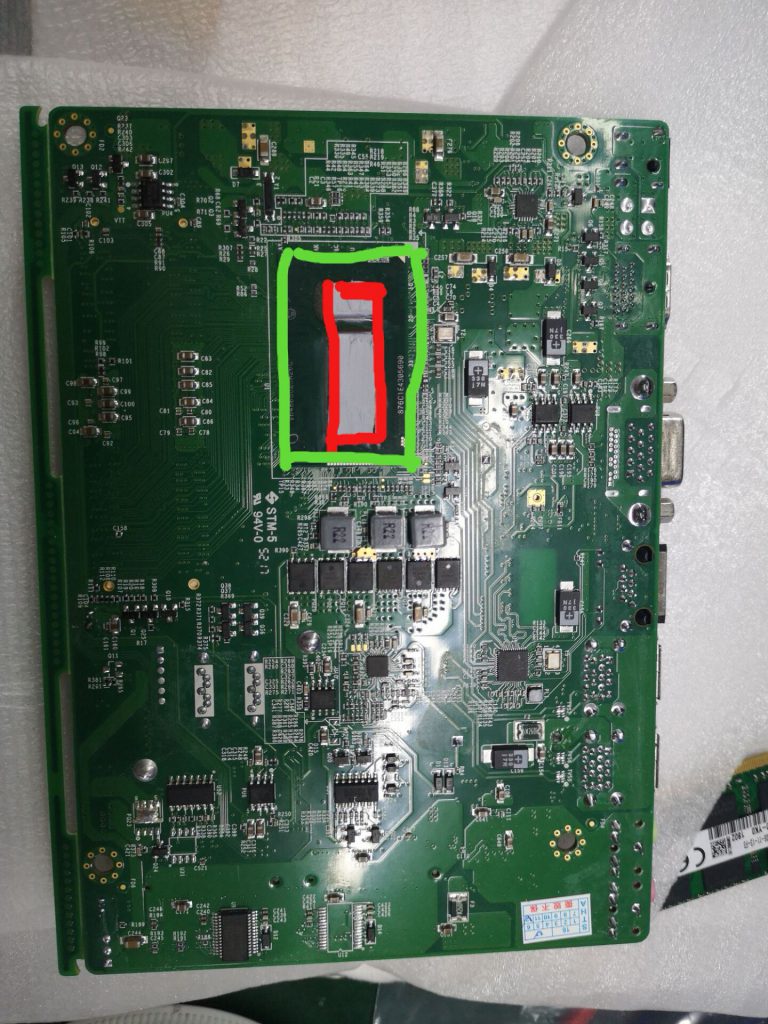
But we received
some defective motherboard operated wrongly by our customers because they don’t
apply the thermal paste on the motherboard correctly.
Here is the right
tip referring to the picture of motherboard:
CPU onboard is
back of the motherboard and located in the green line, it is CPU lens in the
red line. The thermal paste cant cross the red line and not too much or thick
when you apply. Otherwise it will cause a short circuit on the motherboard. So
you must evenly apply the thermal paste on the CPU lens.
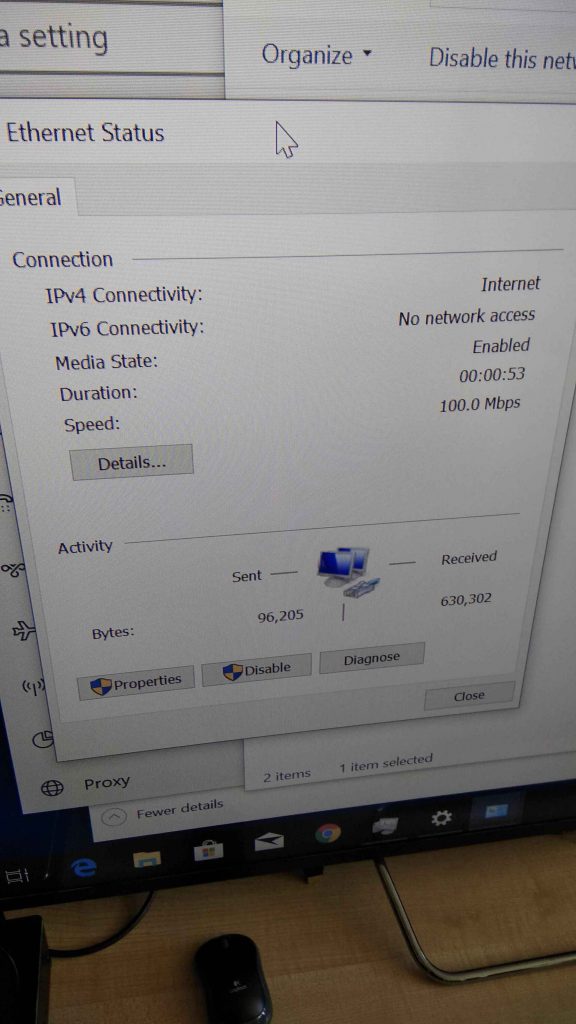
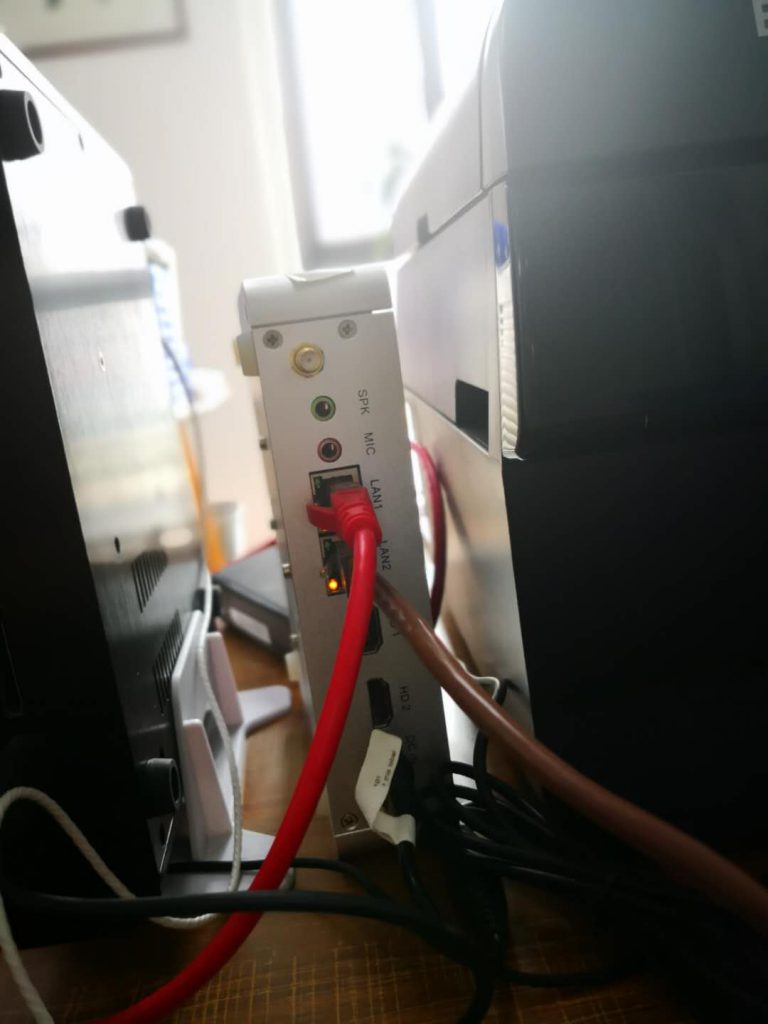
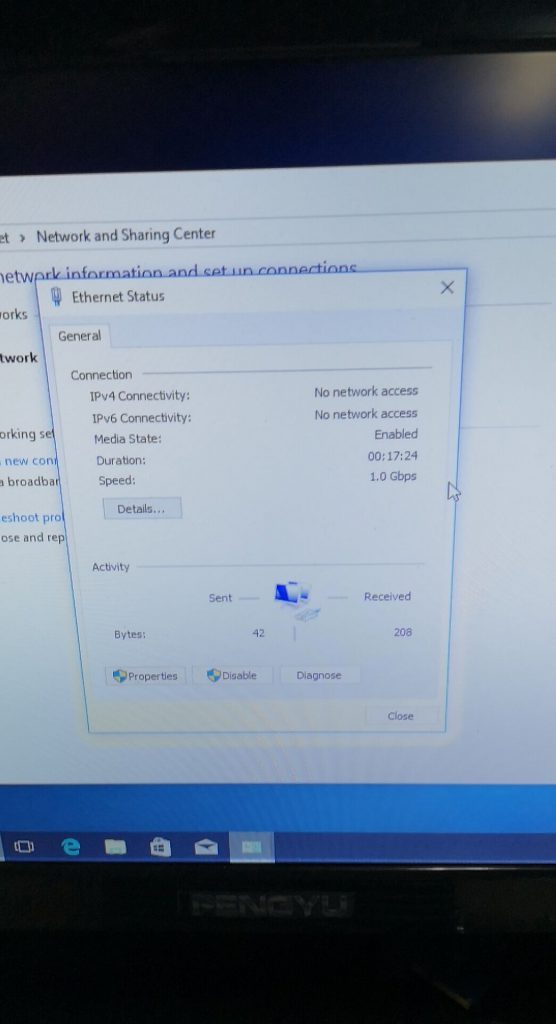
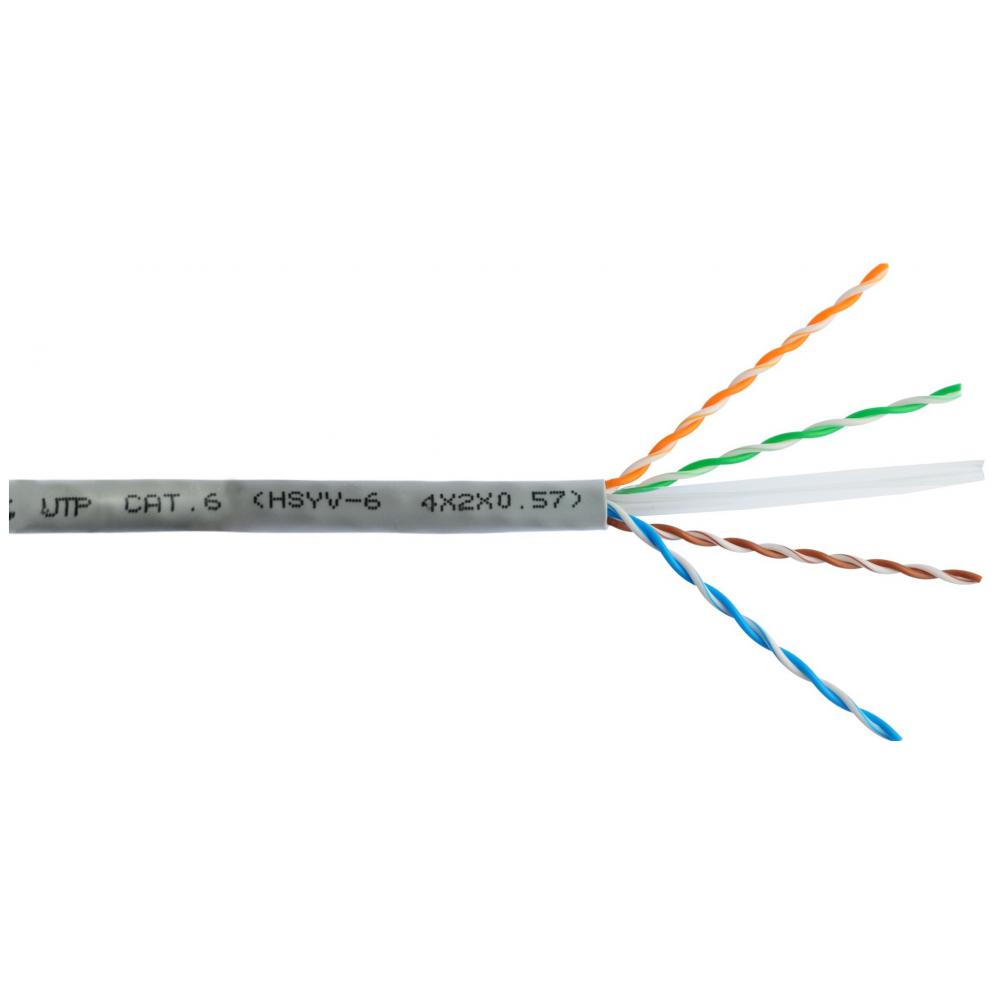
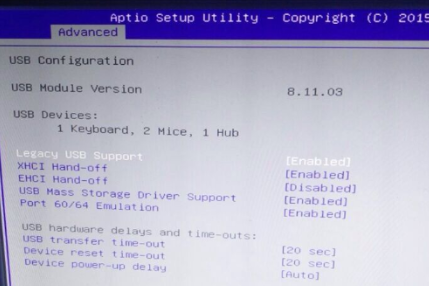
Have you ever encountered such a problem, why my mini computer network card speed is always 100 Mbps, and it refuses to work at 1 Gbps Speed, just like the following picture(example for S200):
There are some way to let you know what went wrong.
Method 1: If the lan network card support 1Gbps, you
may use at least CAT5E or CAT6E network cable.
Method 2: Connect your cable directly to the network port of the mini PC. This method can test whether it is your computer problem or router problem. If the machine connected to the network cable can reach 1 Gbps, then consider whether your router is compatible. If the router is not compatible, you need to change it.
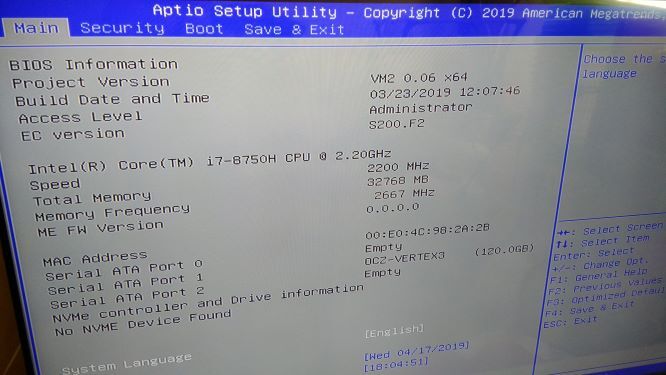
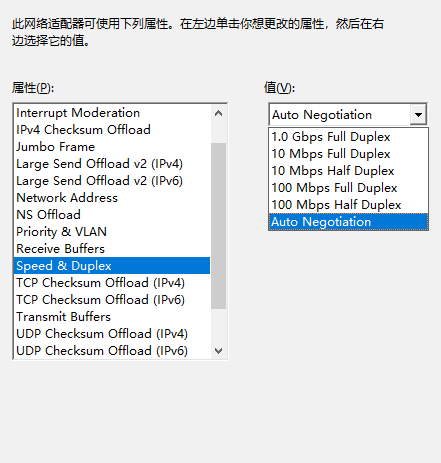
Method 3: select ” Auto Negotiation ” as the
picture we attached:
Under normal circumstances, our computer will
automatically adapt to the network speed, no need to set, but in this case, you
can set or check here.
If there is no problem with the above points, the
network speed problem still exists, then contact us, we will help you solve it.
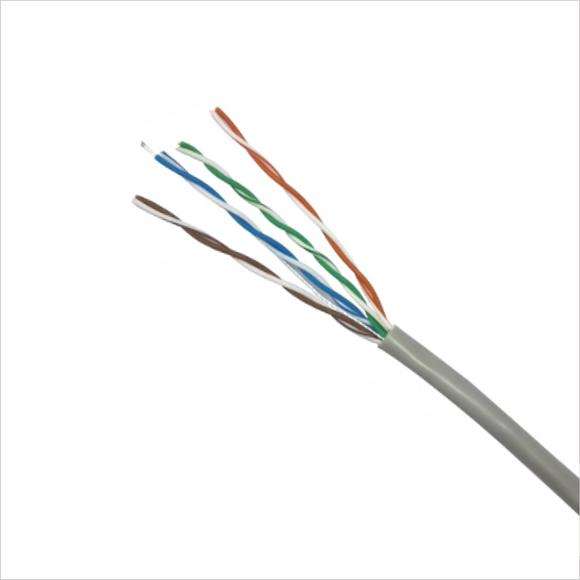
At
present, in the twisted-pair this family, Cat.5/CAT5E/CAT.6/ CAT6e cable types of these twisted-pair lines are
the most widely used, CAT.7 are also followed, then what are the differences
between them?
What are the Cat.5 and CAT5E?
CAT5, this type of cable increased the winding
density, coat a high-quality insulating material, the outer skin will be
labeled “CAT5”, transmission bandwidth of 100MHz, for voice
transmission and the highest transmission rate of 100Mbps data transmission,
mainly used for 100BASE-T and 10BASE-T network. This is the most commonly used
Ethernet cable. “CAT7” refers to the CAT5E of unshielded twisted pair
(Utp-unshielded Twisted Pair), non-shielded twisted-pair cable is composed of
many pairs of twisted-pair wire and a plastic sheath, the outer skin labeled
“CAT5e”; transmission bandwidth up to 1000Mb/s, However, it is often
necessary to rely on the support of expensive special equipment. As a result,
it is often used only in Fast Ethernet of 100Mb/s to enable desktop
switch-to-computer connectivity.
CAT5
The difference between CAT5 and CAT5E.
The identification of class five lines is “CAT5”,
bandwidth 100M, suitable for networks below hundred megabytes, the
identification of super five lines is “CAT5E”, bandwidth 155M. CAT5 can
meet the increasingly popular 100M/bps Ethernet, CAT5E is mainly used in
gigabit network, but now also common applications in the LAN. CAT5 transmit
signals with a maximum rate of 100MHz and are widely used. Ultra CAT5 transmit
signals with a maximum rate of 100MHz, better performance than five lines,
improved metrics such as NEXT, PS-ELFEXT, Atten, and support for duplex
applications.
CAT5E
CAT5E mainly used for communication companies or network
companies to deploy outdoor short distance links. The maximum effective
communication distance of the CAT5 is 100M, and the maximum communication
distance of the CAT5E is 300M. And the outer protective layer has a much longer
service life than the CAT5. Most of the lines connected to your router or
switch from the small zone gateway or the entire building network are CAT5E.
While super five types of unshielded twisted-pair wires can also provide up to
1000Mb/s transmission bandwidth, they often require the support of expensive
special equipment. As a result, it is typically applied only to 100Mb/s Fast
Ethernet, enabling desktop switch-to-computer connectivity.
The difference between CAT5E and CAT6.
As people’s need for
higher bandwidth and faster speed networks continues to grow, CAT5E and CAT6
are increasingly being used in people’s lives. At present, in the twisted-pair
line of this family, compared with CAT3, CAT5 and CAT7 and other twisted-pair
lines, CAT5E and CAT6 two twisted-pair lines are the most widely used range.
Although the status of CAT5E and CAT6 is at hand, this does not mean that CAT5E
and CAT6 can replace each other. Consumers still need to master the
characteristics of each of the two, in order to make a better purchase
according to their own network needs. So what are the differences between CAT5E
and CAT6? First of all, the biggest difference between CAT5E and CAT6 is the
difference in their performance. While both the CAT5E and CAT6 systems can
transmit gigabit networks, the standard used by the CAT5E system to transmit
gigabit networks is 1000Base-T, while 1000BASE-Tx is the way CAT6 systems work.
From this point of view, the CAT5E system is only “able” to support
Gigabit Ethernet, and the CAT6 system is a “truly guaranteed” use of
Gigabit Ethernet.
CAT6
As a
result, the CAT6 system is better adapted to the current building environment,
especially in places where a large number of twisted-pair wires are
concentrated and have many sources of interference, such as rooms with many
electrical appliances (computers, telephones, various production equipment,
etc.), devices, adjacent to power lines, lighting wires. Secondly, in the structure,
there are obvious differences between CAT5E and CAT6. The CAT6 adds an
insulated cross skeleton, placing four pairs of twisted-pair wires in four
grooves of the cross skeleton respectively, and the cable has a large conductor
diameter, small torque and a thicker outer diameter. This central cross new
production process is also designed to avoid crosstalk between cables when
applied to 1000BASE-T networks.
The difference between CAT6E and CAT6.
CAT6E
Since
the release of the TIA-568C.2 standard in 2009, CAT6E has been widely used in
various wiring systems. Compared with traditional CAT6, CAT6E has a higher
transmission frequency and rate. In general, the bandwidth of the CAT6 is
250MHz, and the bandwidth of the CAT6E is twice times that of it, which is
clearly a very good solution for a data center with high network bandwidth
requirements. As the CAT6E of the current cabling system darling, supply will
make a comparison with the traditional CAT6. At present, the number of 10G
network ports in the data center is increasing, in the 10G Ethernet interface
mode, 10GBase-T four pair of twisted wire is one of the most familiar ways we
currently know. CAT6E is now used in data centers, with the further expansion
of data center construction, the scale of use of CAT6E will be further
expanded. It should be noted, however, that although CAT6E has a superior side
to other cables, it also has its drawbacks and shortcomings. In the wiring, not
blindly according to the performance of the advantages and disadvantages to
choose, but according to the actual situation to choose the appropriate wiring
system for their own.
What is the Cat.7
The
CAT7 standard is a set of standards that support up to 600MHz bandwidth
transmission wiring on a 100 ohm twisted-pair line. CAT7 is a 8-core shielding
line, each pair has a shielding layer (generally metal foil shielding DINTEK),
and then 8 cores outside there is a shielding layer (generally metal braided
screen shielding DINTEK), the interface and the current RJ-45 is not compatible.
CAT7
The difference between CAT7 and CAT6.
There
are many notable differences between CAT7 and CAT6, most notably bandwidth,
cat5e has a higher transmission bandwidth (at least 600MHz) compared to CAT4,
CAT5, CAT6, and CAT7, The CAT6 channel provides at least 200MHZ of
comprehensive attenuation to crosstalk ratio and overall 250MHZ bandwidth, and
the CAT7 system can provide at least 500MHZ of comprehensive attenuation to the
overall bandwidth of the crosstalk ratio and 600MHZ. Another difference between
the CAT6 and CAT7 systems is their structure. CAT6 can use both UTP and STP,
while CAT7 is based only on shielded cables. Each pair of lines in the CAT7 has
a shielding layer, and the four pairs of lines together also have a large
public shielding layer. In terms of physical structure, the additional
shielding layer allows the CAT7 to have a larger line diameter. Another important
difference is its ability to connect hardware, the parameters of the CAT7
system require the connection head at 600MHZ when all line pairs provide at
least 60DB of integrated proximal string winding, while the CAT5E system only
requires that the value of 43DB,CAT6 in 250MHZ be provided at 100MHZ as 46DB.
Finally,
it needs to be explained that regardless of the use and purchase of that
product, it is necessary to understand the principle of the barrel, that is, the
use of the network rate of the online is how much, remember that
high-performance products can be backward compatible, in turn not. Then home
use of the network speed limit is the rate of the network card, in other words,
the rate of the network card is how much, the network line is how much.
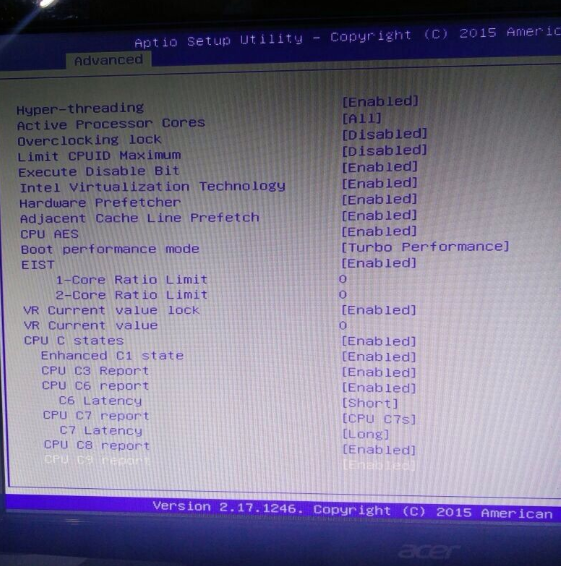
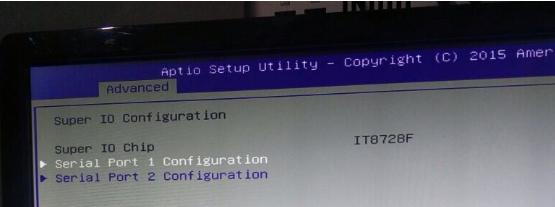
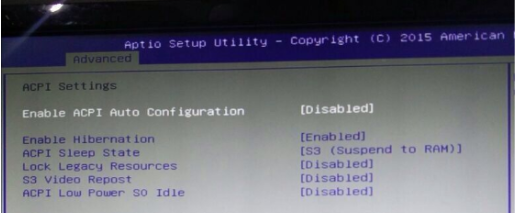
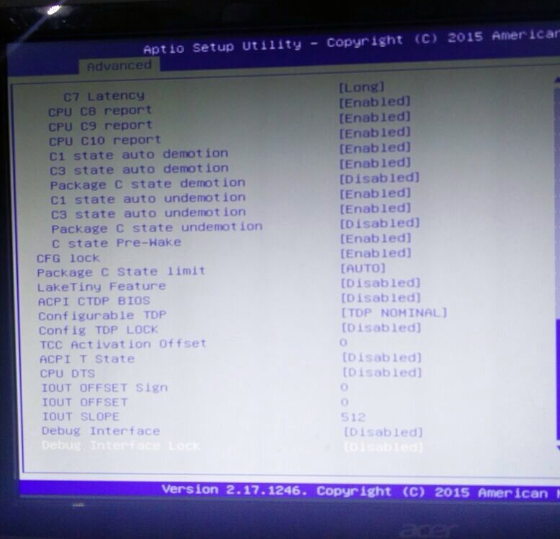
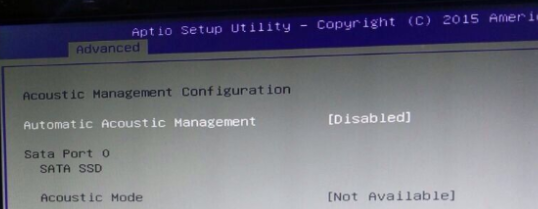
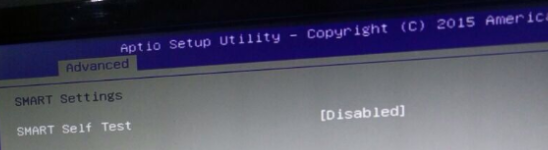
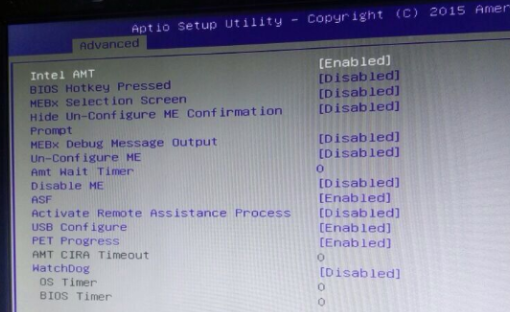
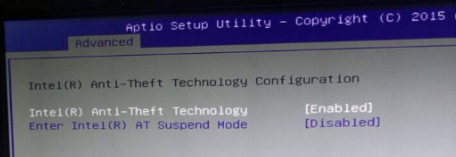
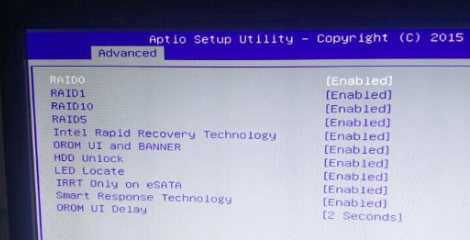
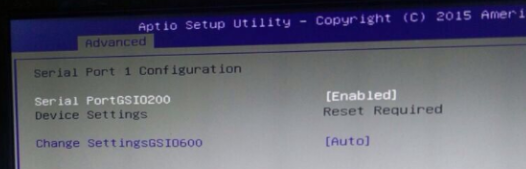
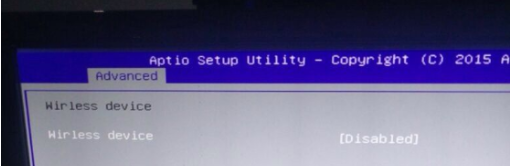
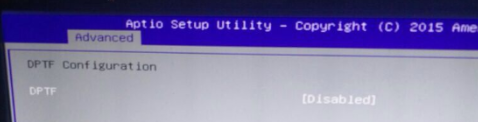
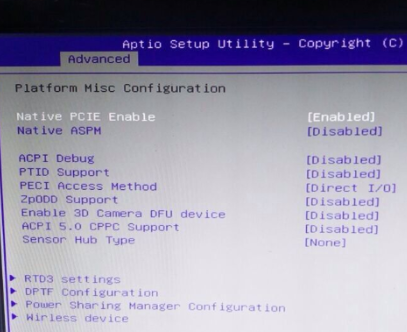
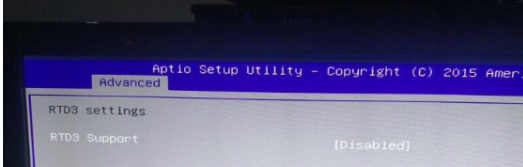
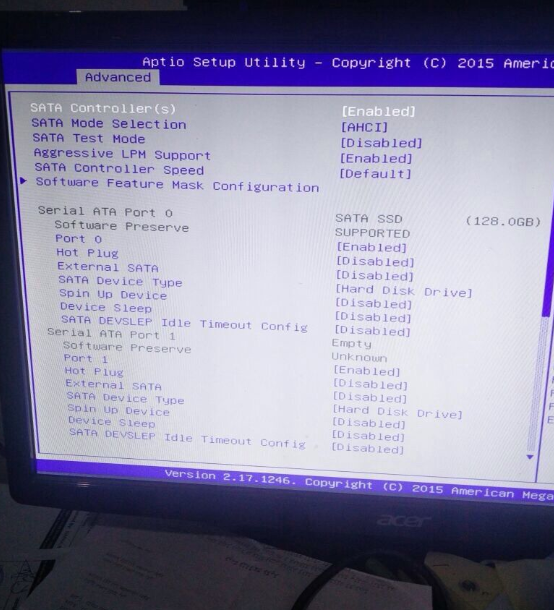
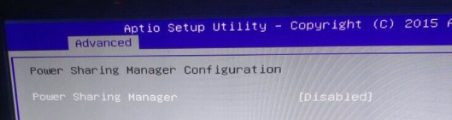
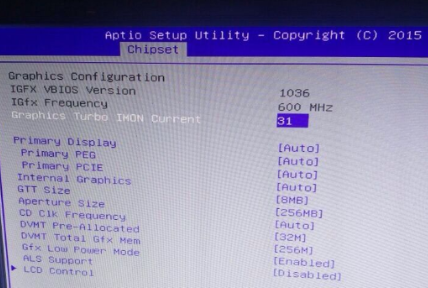
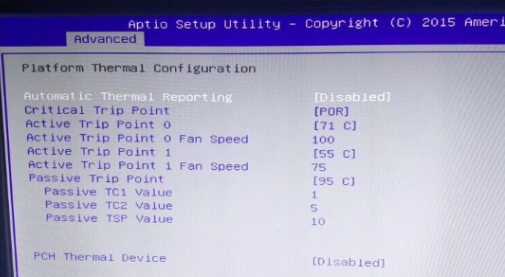
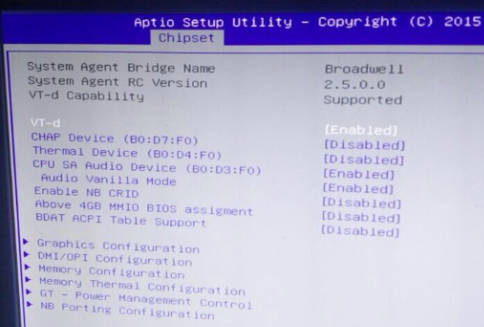
Please go the BIOS and configure BIOS settings as the following pictures: If you don’t know how to into the BIOS, please refer to our previous blog content, which contains the process of how to enter the BIOS.
The instructions below are for Windows
Vista, 7 and 8 installed on the Eglobal Micro PC you use.
To install a microphone in Windows 10, first click the search icon
(magnifying glass) in the bottom-left corner of the screen. Then type:
“Set up a microphone” and push enter. Then follow the instructions.
Now back to the
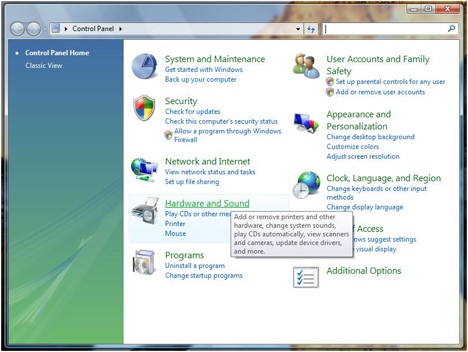
Windows Vista, 7 and 8 instructions. In Vista and Windows 7, open the Start
Menu and click on Control Panel.
In Windows 8: take your mouse cursor to the upper-right corner of the
screen, when menu pops up, click search. Type: “Control Panel” in the
search box, and then click Control Panel.
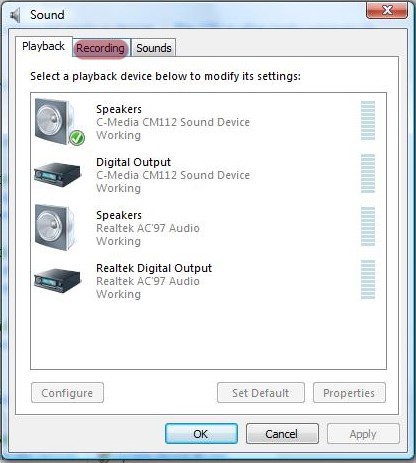
Once the Control
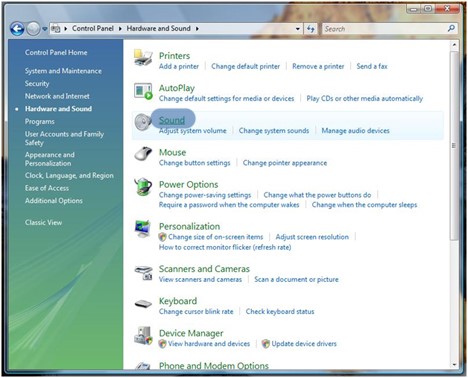
Panel window opens, click on Hardware and Sound.
When you are in the Hardware and Sound list,
click on em>Sound.
In the Sound window
you have three tabs: click on the Recording tab.
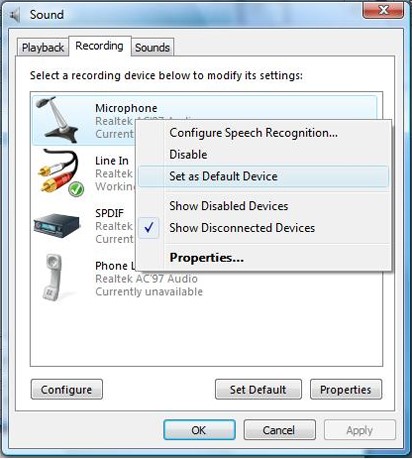
Once you are in
the Recording tab, right click on the microphone device you
just plugged in and select the ‘Set as Default Device’ option.
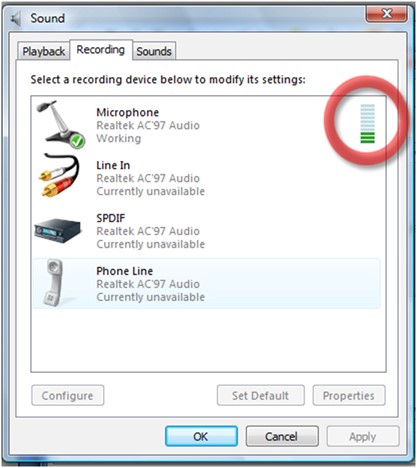
Now, to test and
see if it really works, tap the microphone with your finger a few times. In
the Sounds window, the empty lines next to the default
microphone should fill up with a green color.
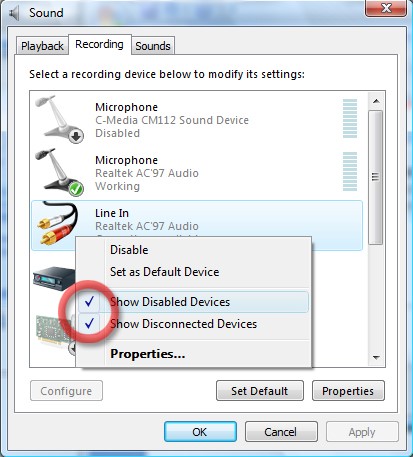
If you are in
the Recording tab and you can’t see your microphone device,
right click on any device shown in the Recording tab. In the
contextual menu, click ‘Show Disabled devices’ if it isn’t
marked with a check sign.
If you still
can’t see your microphone, you might have not plugged it properly or you need
to install a driver for it to work. In the first case, check to see if you have
plugged it properly into your computer, plug it again or, if it is on a USB
port, plug it in another USB port. As for the second case, use the drivers from
the manufacturer’s site or from the CD that came along with the product.
Read the text
aloud
At this point
Windows Vista may still not recognize that the microphone has been activated.
So we need to make Windows Vista aware of the tone and sound of our voice.
Important: The
following steps will be also done in the Windows Speech Recognition article so,
if you came to this article from that one, you can now go to that one and
continue reading from there.
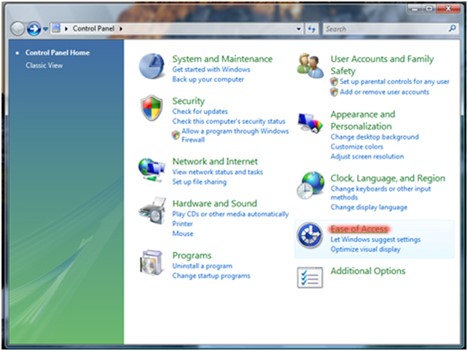
Open the Control Panel window
and click on Ease of Access.
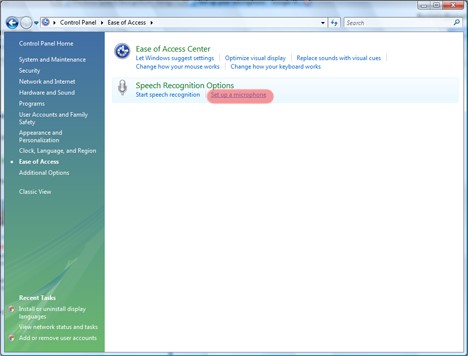
Now, in
the Ease of Access window, click on Set up Microphone.
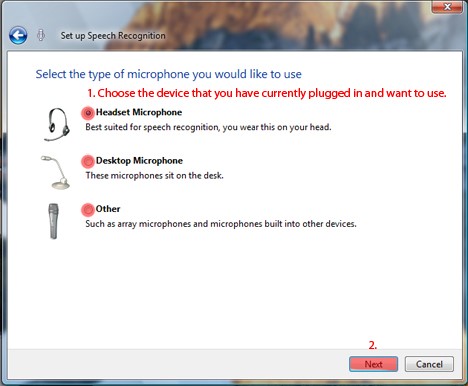
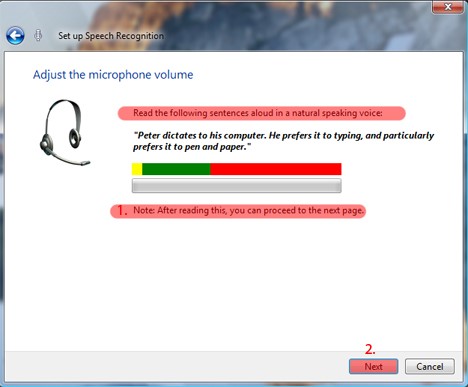
Choose the
microphone device that you currently use and click on the Next button.
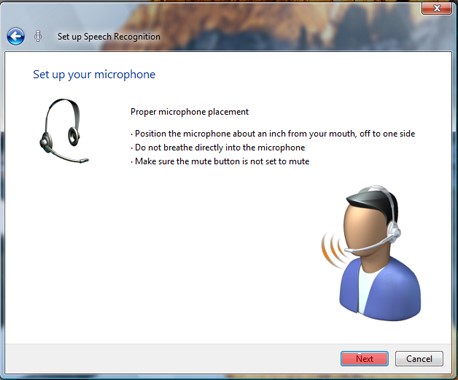
A few
indications are given and, if they are followed, will give a better user
experience. In my case, since I have selected the Headset microphone the
indications are as shown in the image. Once you have read the advice given,
click on the Next button.
If you
accidentally selected the wrong device or want to go back to a previous page of
the setup, click on the blue Back arrow positioned in the top
left corner of the setup wizard.
Read the given
text aloud and, afterwards, click on the Next button.
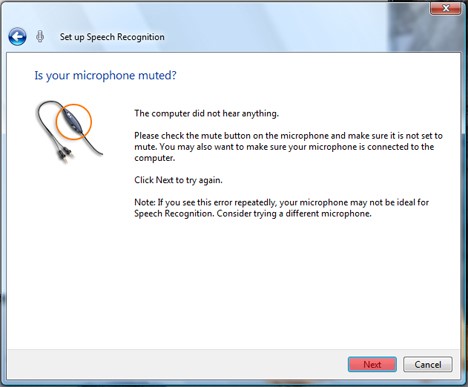
In some cases the microphone does not work in the wizard setup, although it might be enabled and functions properly according to the Recording tab. If this happens, close the wizard setup and, after you checked to see you have the correct microphone device enabled, open the setup wizard again.
In my case, for
example, I have activated the microphone on the headset only when I got to this
step and it doesn’t seem to work. A few taps on the microphone shows me that it
works in the Recording tab, but does not work in the setup wizard, so
I must restart the wizard setup.
Now, assuming
you read the text and clicked on the Next button, the wizard
setup will tell you that the microphone has been set up and also you will be
prompted about setting up the Speech Recognition by pressing
the Finish button.
1. Make sure the VGA Cable/HDMI cable between
the PC and display is well connected.
2. If that doesn’t work, change a
VGA/HDMI cable for trial.
3. Make sure the memory you use is the same kind as per Eglobal
mini computer requirement.
4. Close the power and try to open the mini computer case carefully, check if the memory plugged correct or loose, unplug the memory and wipe it up by nonwovens then insert it on the mini computer, connect power adapter and re-start it.
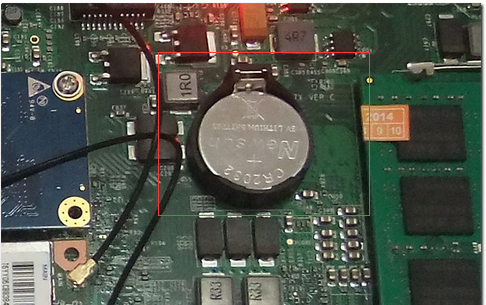
5. sometimes the problem
comes due to CMOS battery problem, the CMOS battery remember some error
information and make the computer no display, you can remove and try it again.
If your computer is losing
its time or date settings, or you are receiving a message CMOS Read Error, CMOS
checksum error, or CMOS Battery Failure, or lost display, for example, some
users using Eglobal mini computer and find all indicator shows correct, RAM
also correctly plugged in, but totally no display, it may due to the CMOS
problem, it remember some error and shows nothing on hardware, you will need to
remove your CMOS battery and try it again.
Before opening your
computer, make sure you are aware of ESD and its dangers: ElectroStatic
Discharge, ESD is one of the few things you can do to damage or destroy your
computer or parts of your computer. Much like the shock you receive when
rubbing your feet on the carpet and touching something metal, ESD can occur
when working in your computer and can cause components you touch to no longer
work properly. ESD can occur without the user feeling a shock and only occurs
while working on the inside of the computer or handling an expansion card or
other hardware. The best method of preventing ESD is to use an ESD wrist strap,
grounding mat, or grounding workbench. However, because most users do not have
access to such items, we have included the steps below to help reduce the
chances of ESD as much as possible.
For our mini pc, after
remove the CMOS battery, you can plug power adapter and turn on the mini pc
again, this time it will shows normally and confirms the computer has no
hardware problem. After that, power it off and remove power plug, then put the
CMOS battery back again, after CMOS battery back work, everything will runs
normal now.
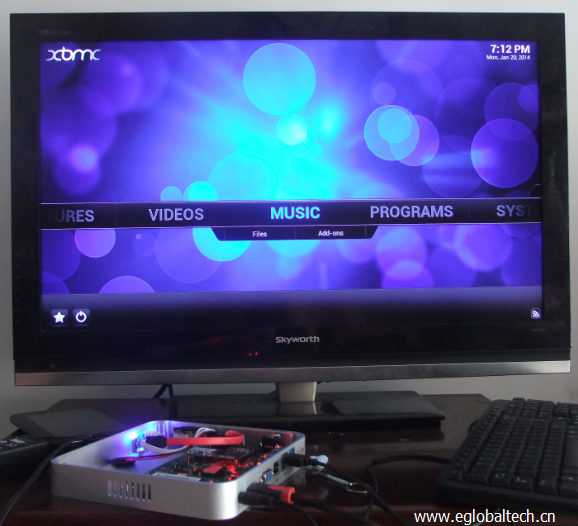
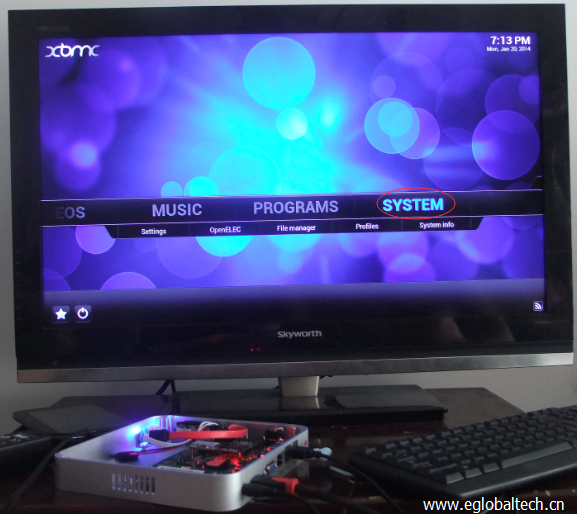
When first time connect the
mini pc (XBMC with Openelec pre-installed) to TV by HDMI, you should select the
correct HDMI device if it didn’t have any sound.
The following pictures to
teach how to set sound on XBMC System:
Step 1: open the Mini HTPC
computer and go to its homepage as this picture:
Step 2. Click “System “
button and go into system setting
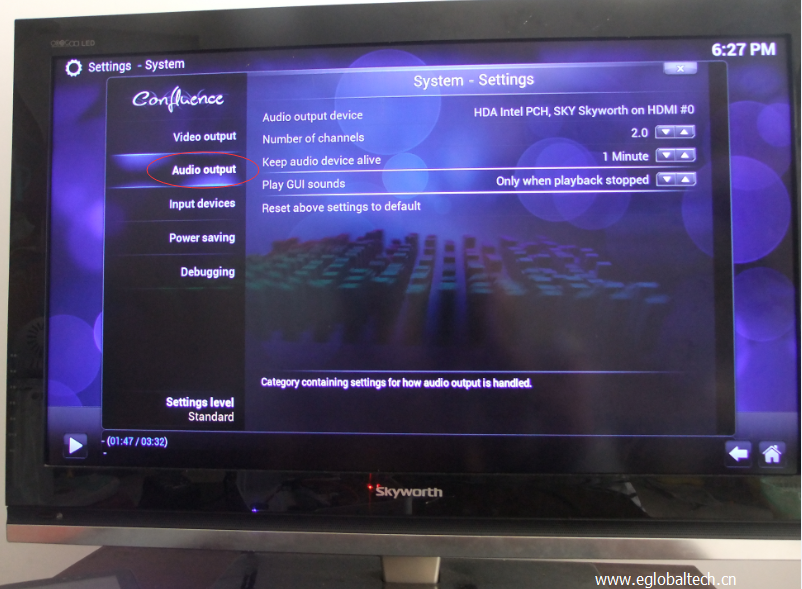
Step 3. Click “system”
button
Step 4.Click “Audio Output”
Step 5. Select the right
audio output device from the list shows there:
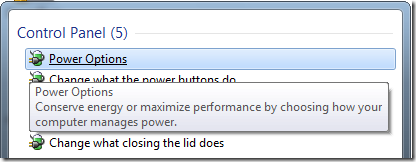
After
set the Mini PC to “Stand by” mode, I cannot wake it up directly by
touch keyboard or mouse, no matter long press the power switch or short press
the power switch, the mini pc will restart directly instead of wake up, does
you mini pc have this problem? And how to solve it.
To wake up the computer
directly via mouse or keyboard, you should not close your hard disk when the
computer goes to “stand by” mode, go to Power Options and set the
hard disk never turn off will be ok. Operate step by step as per the following
picture:
If you are using Win7 OS: First, click on the battery icon and go to “Power
Options”, you can also find “Power Options” from “Control Panel”.
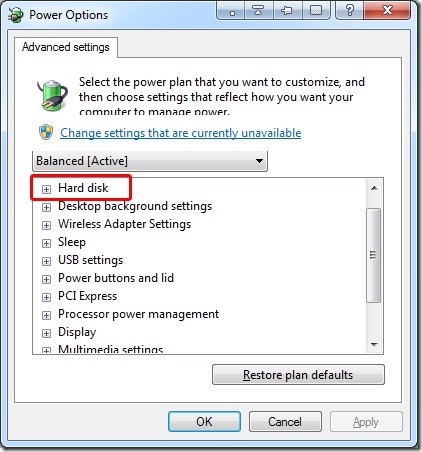
Secondly, click the > Change advanced power settings link in the
bottom left.
Hard disk: Set it never turn
off the hard disk in sleep mode.
If you are running XP: Open the Control Panel and switch to Classic View (if not
already selected), Select Power Options and adjust the settings in the power
scheme, select never turn off hard disks,choose ok to save your changes.
Some customers ask: The
system is installed on Eglobal mini pc computers. But there’s only one partition.
I don’t want to reinstall the system to re-partition. Is it possible to create
another partition?
This might be a problem that troubles many users. Generally, some third party
software can provide such features. However, now Windows 7 enables you to make
some certain degree of adjustments towards current partition sizes.
Let’s check the How-to:
Preparation
An essential
requirement of this operation is that your file system must be NTFS. FAT32 file
system doesn’t work.
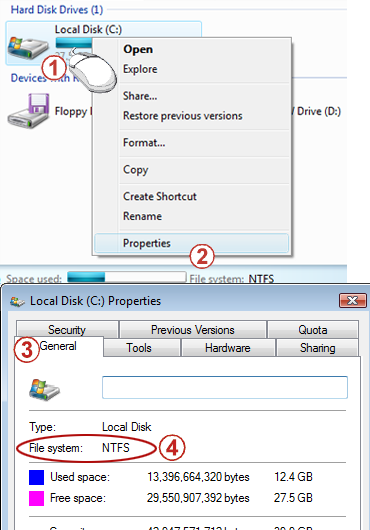
Right click the drive -> Property ->
on the General tab
-> File
System will display your file system.
If it is FAT32
system, it can be converted to NTFS.(Alert:
Converting to NTFS will bring some trouble. For example, if there are two
systems installed on the computer, and one of them is an earlier system like
Windows 98 or Windows ME, then the older system will not be able to recognize
NTFS’s drive letter.)
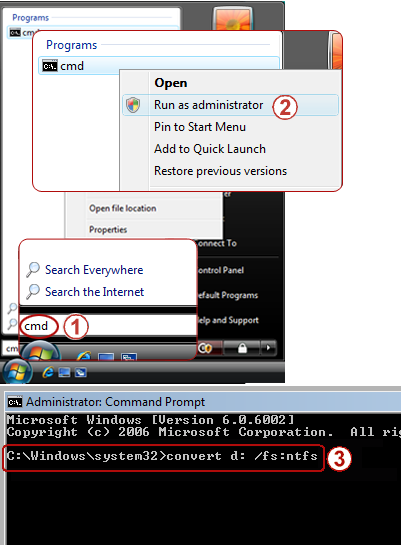
Start -> In Start Search, type cmd, -> and right click cmd in the result list at the top – >Click Run as administrator. If you see a message saying Windows needs your permission to continue, don’t be surprised. Just click continue to confirm.
Type the following command, and press Enter to run it (x represents your drive letter, and it should be replaced with you specific drive letter). convert x: /fs:ntfs
3.Wait for a few minutes, and don’t close the window until you see the confirm message.
To
create a partition or volume (the two terms are often used interchangeably) on
a hard disk, you must be logged in as an administrator, and there must be
either unallocated disk space or free space within an extended partition on the
hard disk.
If there is no unallocated disk space, you can create some by shrinking an existing partition, deleting a partition, or by using a third-party partitioning program.
Open Computer Management by selecting
the Start button. The select Control Panel > System
and Security > Administrative Tools, and then
double-click Computer Management.
In the left pane, under Storage,
select Disk Management.
Right-click an unallocated region on your hard
disk, and then select New Simple Volume.
In the New Simple Volume Wizard,
select Next.
Enter the size of the volume you want to
create in megabytes (MB) or accept the maximum default size, and then
select Next.
Accept the default drive letter or choose a
different drive letter to identify the partition, and then select Next.
In the Format Partition dialog
box, do one of the following:
If you
don’t want to format the volume right now, select Do not format this
volume, and then select Next.
To format
the volume with the default settings, select Next.
Review your choices, and then select Finish.
Notes: When you create new partitions on a basic disk, the first three will be formatted as primary partitions. Beginning with the fourth, each one will be configured as a logical drive within an extended partition.
Warning: Formatting a volume will destroy any data on the partition. Be sure to back up any data you want to save before you begin.
Open Computer Management by selecting
the Start button. The select Control Panel > System
and Security > Administrative Tools, and then
double-click Computer Management.
In the left pane, under Storage,
select Disk Management.
Right-click the volume that you want to
format, and then select Format.
To format the volume with the default
settings, in the Format dialog box, select OK, and
then select OK again.
Notes
Notes: You cannot format a disk or partition that is currently in use, including the partition that contains Windows. The Perform a quick format option will create a new file table, but will not fully overwrite or erase the volume. A quick format is much faster than a normal format, which fully erases any existing data on the volume.