Ten skills of mini computer you shall master

In fact, a lot of cumbersome operations on the computer can only be done with just a few keystrokes. If we don’t understand these shortcuts, when the computer encounters problems, it will often make people very crazy. In this issue, I will share 10 for you. The most common use tips.

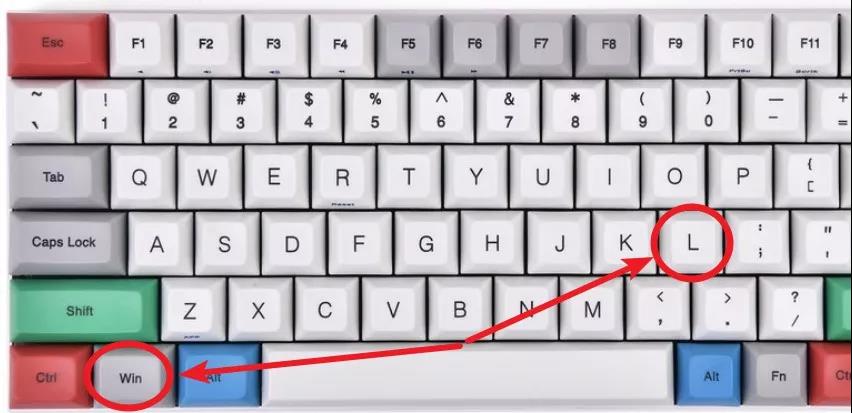
Tip 1: Quick lock screen

Quick lock screen: Win+L

Whether in the Internet cafe or office, sometimes you have to leave the computer to do other things, and do not want others to peek at your computer, may wish to hold down the windows key, then press the L button, the computer will directly lock the screen, so don’t worry The data of the computer is leaked!
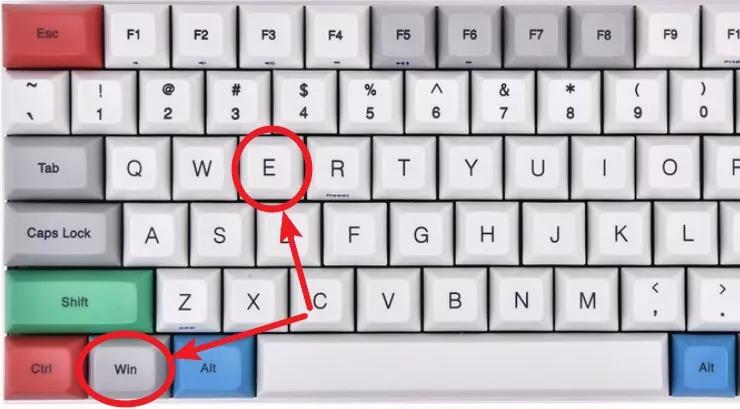
Tip 2: Quick access

Quick access shortcut: Win+E

Sometimes we have a lot of icons on the desktop, it is difficult to find “this computer or computer”, and even some users have no “computer or this computer” icon on the desktop. At this time, we can press the key on the keyboard and then press the E key to open the resource manager of the computer directly.

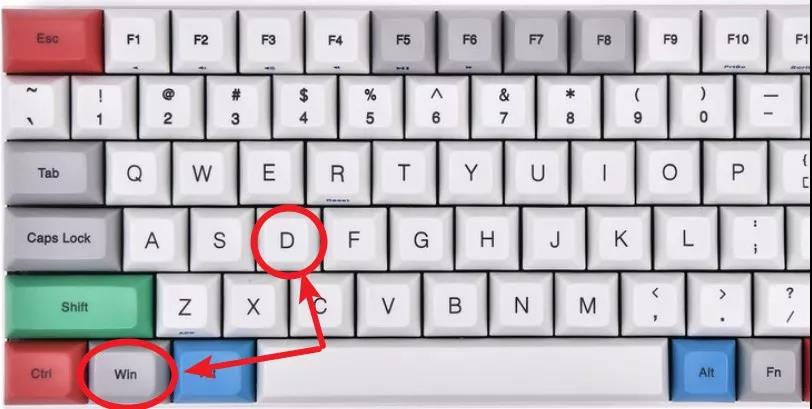
Tip 3: Display the desktop

Show desktop shortcuts: Win+D

Sometimes the computer gets stuck or opens a lot of things. If you want to quickly return to the desktop, we can press the windows button on the keyboard and press the D button to display the desktop directly.
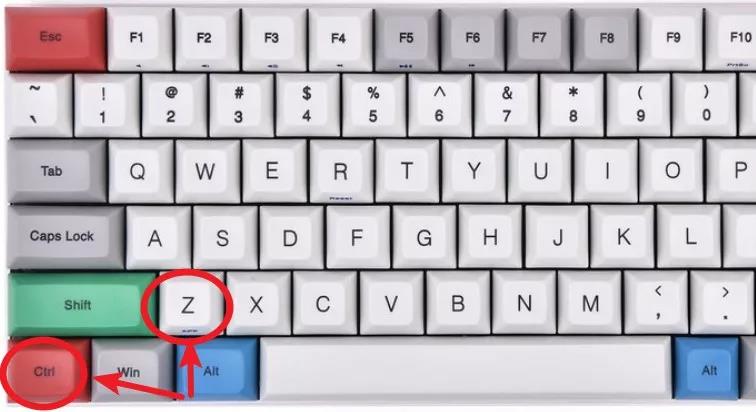
Tip 4: Cancel

Undo shortcut: Ctrl+Z

There is no regret in life, but computer operation can regret it. The shortcut key Ctrl+Z can help you undo the previous step, which can be used in many applications.

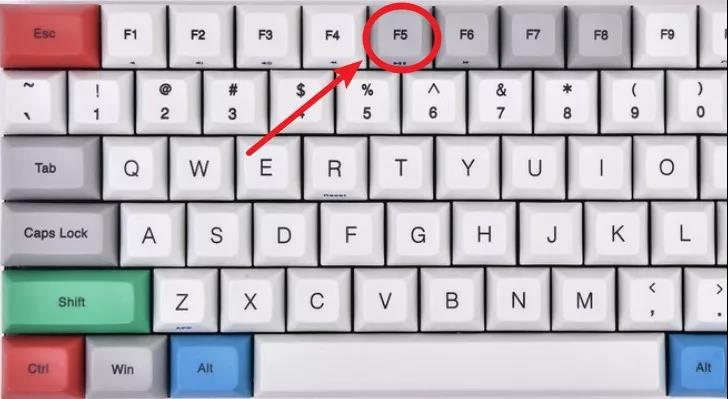
Tip 5: Refresh button

Refresh shortcut: F5

F5 is the refresh key used to refresh the contents of the current window in the IE or Explorer. This is a very convenient shortcut!
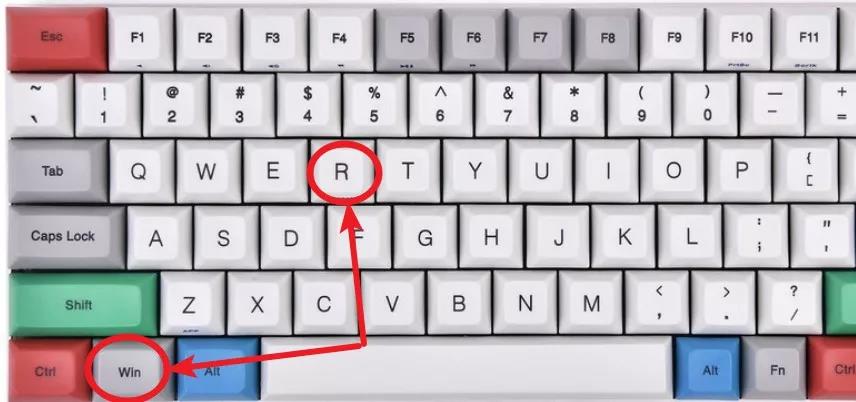
Tip 6: Quick start

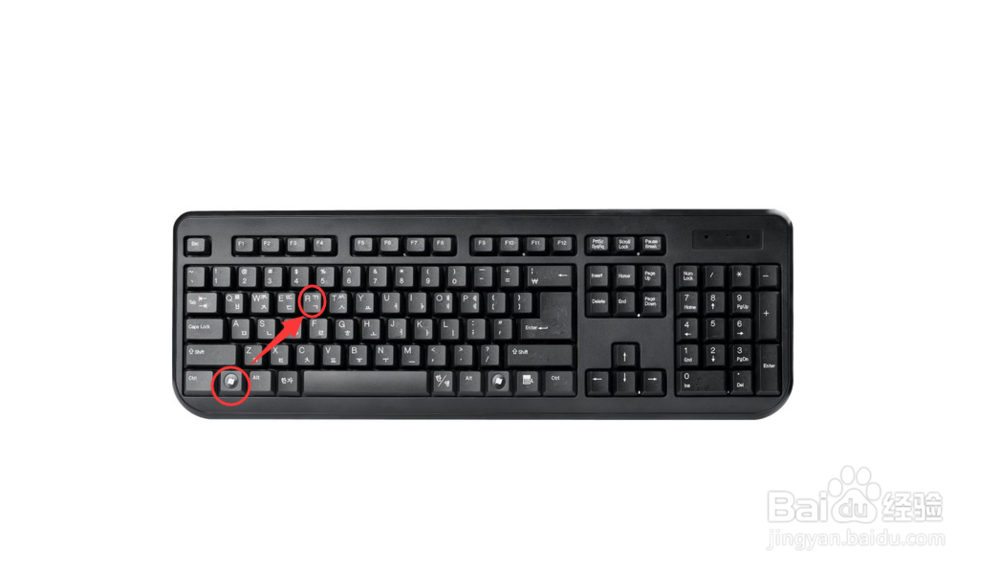
Quick start shortcut: Win+R

This shortcut is a native feature of Windows that comes with everything from XP to Windows 10. After using this shortcut key, you can open the system search, which is a relatively quick command input method. The system will pop up a small window for you to enter the command. After the carriage return, the command will be executed immediately and the run window will be closed.

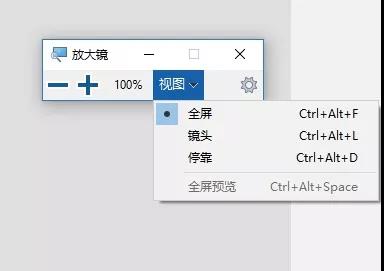
Tip 7: Magnifying glass

Shortcut: Win + +

If you can’t see the text on the display then you definitely need an amplifier. The shortcut key windows++ enlarges, whether it is a browser or word, ppt, excel can use this shortcut to zoom in. You can also use the CTRL+ mouse wheel.

Tip 8: Switching tasks

Shortcut: Win+tab

This shortcut key is similar to alt+tab. After using this shortcut key, you can switch tasks, making the switching task faster and more efficient, and win+tab can click the task compared to alt+tab. Choose the task you want to do faster.

Tip 9: Quick Screen Recording

Press Win+R, type psr.exe and click “OK” to open the recording function that comes with Windows, and then you can start recording. After the recording is completed, a save dialog box will pop up, where we can save the recorded file as a zip archive. After extracting the zip file, we see that the recorded file is not a video file, but an MHTML report file. Open the file, we see that we have a screenshot of each step on the screen, and highlight the mouse click area, and support to view as a slide, and finally generate a compressed MHTML report file to send to the help object Recorded issues can support slide shows.

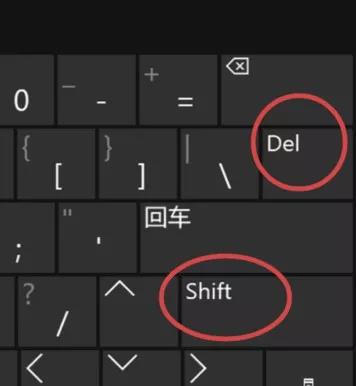
Tip 10: Permanently delete

Permanently delete: shift + delete

Shift + delete delete is unable to restore deleted files using the restore operation, that is, the files deleted by this method are not through the recycle bin.

How to improve the Minicomputer Boot Speed?

It is a very common problem that the minicomputer is booting slowly. When the computer is turned on, some default software will be started. There are many factors that affect the speed of computer booting. In this issue, we will explain how to speed up the minicomputer booting.

First, disable the useless start-up items:

Disable the programs that are not needed or rarely used, which can effectively speed up the boot.

Operation method: Right click [task bar] to select [Task Manager], click [Start], and select the corresponding program.

Second, modify the registry to reduce boot pre-read items:

Super pre-reading is very intelligent, can improve system performance, speed up program startup, and is essentially to improve memory utilization, make full use of memory to improve system performance without affecting the operation of other programs.

Operation method:

1. Press the [Win+R] key on the keyboard, enter [regedit] and click [OK].

2. Expand step by step in the registry to the following directory location: HKEY_LOCAL_MACHINE\SYSTEM\ControlSet001\Control\Session Manager\Memory Management\PrefetchParameters

3. Double-click “EnableSuperfetch” and modify its value to “3”, which can effectively speed up the boot.

Third, through the installation of third-party tool software to help us optimize the boot project:

The computer is equipped with security software such as “XX Computer Manager” or “XX Security Guard”, and these third-party security software basically have the function of boot acceleration. Therefore, we can use them to help us optimize the computer boot items to save the boot time.

Key points: This kind of third-party software itself is also the boot-up item, which will take up the computer boot time. And the more such software is installed, the more cards are stuck, the slower the boot is, and it is enough to install at most one.

Fourth, computer cleaning:

Dust in the computer can easily accelerate the aging of the components, resulting in slow operation of the hardware, and even some of the poor contact can not be started properly. For example, if the fan is not cleaned in time, the temperature of the computer is too high, and it is easy to start the computer slowly. It is also necessary to clean the computer in time.

How to find the minicomputer NIC Driver and install the NIC driver

How to find the minicomputer NIC Driver

Method 1

1.Right click on My Computer Select Management – if there are some simple systems, click Device Manager directly if there is a device manager option, or select Manage if there is no Device Manager option.

2.Click Device Manager

3.Click the arrow on the left side of the network adapter – expand, you can view the NIC Driver, if it is an exclamation mark, it means that the NIC driver has not been installed. If it is displayed normally, it means that it is installed (normal).

Method 2

1.Right click on my computer to select properties

2.Directly click on the device manager to directly view the network card driver

Method 3

1.Using the hot key, win+R key combination

2.A command window pops up in the lower left corner, enter “devmgmt.msc” in the address bar and press Enter to pop up the device manager window.

Install the NIC driver

Method 1

Under the premise, the minicomputer has an optical drive and a network card drive CD, directly put the CD and click to install the driver file.

Method 2

View the NIC driver model, download the driver file of the corresponding model on another networked minicomputer, download it to the U disk or move the hard disk, and transfer it to the minicomputer for installation.

How to turn off ACPI on your minicomputer

ACPI is actually a power management standard. ACPI is an acronym for Advanced Configuration and Power Interface. It is generally translated into advanced power management. It is a power management standard jointly developed by Intel, Microsoft and Toshiba.

What is the use of ACPI?

   ACPI is part of Windows (starting with Win98). It helps the operating system to properly control and allocate the power of computer hardware devices. With ACPI, the operating system can shut down different hardware devices as needed according to the actual situation of the device. For example, in Win7 or Win8 system, when the system sleeps, the system stores the current information in the memory, and only keeps the power of several key components such as memory, so that the computer is in a high power saving state.

ACPI is powerful, enabling device and processor performance management, configuration/plug-and-play device management, system events, temperature management, embedded controllers, and SMBus controllers.

ACPI indicates that the advanced configuration and power management interface ACPI can achieve the following functions: 1. The user can make the peripheral switch at the specified time; 2. The user who uses the laptop can specify that the computer enters the low power state under low voltage to ensure Important applications run; 3, the operating system can reduce the clock frequency when the application time is not high;

4, the operating system can allocate energy according to the specific needs of peripherals and motherboards; 5, when no one uses the computer can make the computer into a sleep state, but to ensure that some communication devices are turned on; 6, plug and play devices are inserted

How to copy large files to a USB flash drive?

Do you have such an experience? I want to copy a large file to a USB flash drive. It is obvious that there is a considerable capacity in the USB flash drive. When copying, it always prompts that the file is too large to be transmitted. Today I will teach you how to copy large files into a USB flash drive. Two methods are introduced. The first method will lose the data in the USB flash drive. The second method will not lose the data in the USB flash drive.

Key points: The format of U disk is commonly FAT, FAT32, NTFS and exFAT. The default format of the USB flash drive is FAT32, and the FAT32 format does not support storing a single file larger than 4G, so we only need to convert the format of the USB flash drive to NTFS.

The operation method is as follows

Method 1

1. Right click on the U disk and select “Format”

2. Select “NTFS” at the file system.

3. Click on “Start”

4. Click “OK”.

5. Click “OK”.

6. Copy large files to the U disk now.

Key points: This method is easy to operate, but all the contents of the USB flash drive will be cleared when formatting.