Common ways to solve Minicomputer blue screen

In the process of using the computer, the most annoying color is the “blue”. Sometimes the sudden blue screen is just a crash. In fact, the computer blue screen is also a common phenomenon. There are many factors that cause the blue screen of the computer. Today I will give the corresponding solution for the common blue screen of the computer. I hope that it will help everyone, and I hope that these codes will give you some inspiration, so that you can prevent the blue screen of the computer in time.

Blue screen code 1: MACHINE-CHECK-EXCEPTION

Cause analysis: The CPU is too overclocked.

Solution: Start the auto-repair program and restore the CPU to the factory frequency after fixing the system error. Don’t overclock, it’s best not to use software with too much capacity or software that tests CPU overclocking.

Blue screen code 2: 0X0000007E、0X0000008E

Analysis of the cause: Generally, it is caused by viruses, memory damage or poor contact.

Solution: Press F8 to enter safe mode, the system will be disinfected, or you can try to re-plug the memory. Generally, the memory damage probability of this code is not large.

Blue screen code 3: 0X000000D1

Analysis of the cause: Generally it is related to the graphics card, which may be caused by the damage of the graphics card or the installation of a less compatible graphics card driver.

Solution: Try to download a graphics card driver installation on the official website. If it still doesn’t work, the host has an integrated graphics card, try it with an integrated graphics card, or directly unplug the graphics card.

Blue screen code 4:0x0000001A
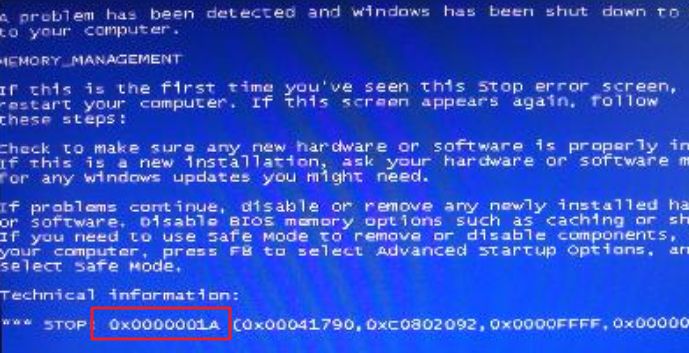
Analysis of the cause: Some of the brand-name memory modules are heated.

Solution: Change the memory stick to solve.

Step 1: to eliminate hardware failures and memory failures, starting from the memory stick, in the case of ensuring that the memory is not damaged, remove the memory strip and wipe it, then plug it in again to solve;

Step 2: If you are using two memory modules, you can try to unplug one of the memory modules.

Step 3: If it has not been solved, check whether the hard disk is faulty, check if there is a problem with the data cable, and then try to format the hard disk. In addition, if the video card is damaged, it may also cause.

Blue screen code 5:0x0000007B

Cause analysis: Error due to system boot.

Solution: You can try to change the hard disk mode, or go to the PE to repair the system boot.

Step 1: restart the computer, press the shortcut key F1, F2 or Del key after the boot screen appears (different computers enter the bios shortcut keys are not the same, the general boot interface will prompt) enter the bios startup item setting interface, through the keyboard Use the left and right arrow keys to move the cursor to “Advanced”, then press the up/down direction key to select “SATA Configuration” and press the Enter key to confirm.

Step 2: A mode selection window will pop up. Here we use the up and down arrow keys to move the cursor to select the “AHCI” mode, and then press the Enter key to execute.

Step 3: After completing the above two steps, just press F10 to save the changed settings. When the computer restarts and enters the system loading screen again, we will find that the blue screen error code 0x000007B is no longer displayed. Most of the problems with this blue screen are caused by the non-compliance of the hard disk mode in the bios settings with the current system.

Blue screen code 6:0x0000000A

Analysis of the cause: There is a conflict in the computer driver, and there are more problems with the graphics card and the chipset.

Solution: Enter safe mode, delete the latest updates and installed graphics card and motherboard drivers.

Step 1: Return to the desktop interface of your computer, then right-click on the desktop computer icon and select Manage Options from the Sliding menu.

Step 2: In the open computer management interface, click Event Viewer – Manage Event Summary in the left window to determine which driver is the fault. After determining the faulty driver, manually uninstall the driver. That’s it. If it is a computer compatibility problem, we can use the system diagnostic tool to check whether the hardware and driver are compatible with the system, and then re-set its compatibility.

Blue screen code 7:0x00000074

Cause analysis: Indicates that the registry has an error. This error can occur if the system module is corrupted. This error can also occur if some of the registry’s key key values are missing. This may be the result of manually editing the registry.

Solution:

(1) At startup, press F8 to enter “Enable Debugging” for debugging.

The system is shut down, press F8 when booting, enter the advanced startup interface, “Troubleshooting > Advanced Options > View More Recovery Options > Startup Settings > Restart”, then the page will jump to the “Startup Settings” interface, press F1 “Enable” Debugging, the system enters the system in debug mode and can then be debugged.

(2) If it is invalid, please backup the data in advance, then press or press F10 at boot time to restore the computer to the factory state by using the system to restore the factory function.

Blue screen code 8:0X000000ED

Analysis of the cause: The fault is mainly related to the hard disk and the system. The probability of system damage is large, and the probability that the hard disk is really bad is relatively small, and there may be a problem with the volume.

Solution: Reinstall the system / replace the hard drive.

The above is a more common computer blue screen solution. In short, the blue screen code is tens of thousands, safe to use the first! If you don’t have any blue screen code above, then please contact our after-sales staff.

How to change the minicomputer desktop path?

The default desktop path of the minicomputer is usually on the C drive, and we especially like to put the files on the desktop, because the desktop is convenient and easy to find. For a long time, more and more desktop files will be available, and the C disk space will become smaller and smaller, which will slow down the system. How to set the system desktop path to a non-C drive? This tutorial will be explained for everyone.

1. Double-click “Computer or this computer” on the desktop

2. Right click on the “Desktop” and select “Properties”

Key points: If you are a Win7 system, please find the user folder on the system disk (C drive), and find the desktop folder under the folder of your own username. The default path is C:\Users\Administrator\Desktop

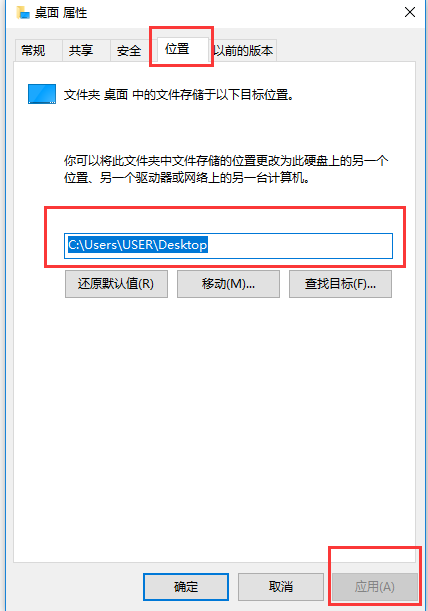
3. Click on “Location” to change the disk placed on the desktop (I want to place the desktop on the D drive, change C directly to D) and click “Apply”.

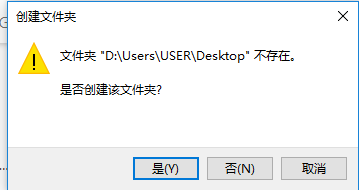
4. Click “Yes”

Key points: If you are a Win7 system, please find the user folder on the system disk (C drive), and find the desktop folder under the folder of your own username. The default path is C:\Users\Administrator\Desktop

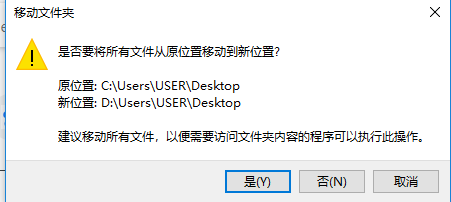
5. Click “Yes”

6. We smoothly moved all the files on the desktop to the D drive, so that we can safely save the files directly to the desktop.

Key points: In fact, the space in the C drive only affects the running speed of the computer system, because our system is installed in the C drive, but it doesn’t matter if the computer card is not stuck!

Is the mini pc crashed related to C drive capacity?

Is your mini pc always deadlocked? We have already written some articles about “cleaning the C drive and speeding up the mini pc”, but after all, it can’t solve the problem of the mini pc. This issue is mainly to provide a professional answer to the questions that everyone is generally concerned about. It can be said that it is a guide to avoid pits, and we hope to help everyone.

Q: If there are too many files or other things in C Disk, will the system be stuck?

A: Yes! There is a certain relationship between the system card and the remaining capacity of the C drive. We must ensure that the capacity of the C drive is not less than 1G (the XP system must not be lower than 500M). If the capacity is too low, it will be stuck, and even the system will be in a state of paralysis. Because the system needs cache space, this 1G is available. The space requirements, too much does not make sense.

Q: Is the mini pc crash related to the remaining space of the C drive?

A: It doesn’t matter (when the remaining capacity of the C drive is greater than 1G), the mini pc can find the problem from the running speed of the mini pc. This running speed is determined by multiple accessories inside the host. The decisive factors are the CPU (determining the running speed), the memory (determining the mini pc operating system, the smooth running of the program), the graphics card (determining the screen effect and smoothness of the game), and the hard disk (the read and write speed of the hard disk affects the mini pc). The use of fluency), so that if the performance of your mini pc’s main accessories is not strong, even if the capacity allocated by the C drive is large, reinstalling the system every day, cleaning the disk space every day is not helpful, how to card or so card .

Q: How is the SSD partition suitable?

A: SSD partition does not affect the service life and performance of SSDs. When we use a mini pc, it is inevitable that there will be a mini pc crash and poisoning. Separate a drive letter for the system and put important data on other disks. Will result in the loss of data from other disks. The hard disk capacity can be divided into 2-4 zones, and the data is classified for easy management. However, if the hard disk capacity is small (120G or less), one partition will be fine. However, there are a few points that you need to pay attention to. First, don’t divide too many areas. You can divide 2-4 areas according to your needs. You are not allowed to divide too many areas because the more space you waste, the more space you have. Too many partitions will also cause partition misplacement, which will have more impact on the performance of SSDs. Second, if the storage of each partition of the SSD is getting fuller, it will cause its performance to decline. After the small-capacity SSD is divided into too many areas, the partition will be more easily full, and the usage of a certain partition will exceed 90% for a long time. The state of the SSD will cause the SSD to crash more easily and affect the speed of a hard disk, so it is more suitable to divide the two disks.

Q: Which disk is the software installation path suitable for?

A: If your mini pc is a pure solid state drive, you don’t have to worry about the software installed on the C drive affecting the speed of the mini pc. You can install it directly on the C drive. If it is a pure mechanical hard disk, do not install it on the C drive (system disk). If it is a hybrid hard drive (solid state drive + mechanical hard drive), try to install the software on the solid state drive, and the file is stored on the mechanical hard drive. This will greatly improve the smooth running of the software.

Key points:

1. Not the larger the remaining space of the C drive, the faster the mini pc runs faster. As long as the remaining space of the C drive is greater than 1G, the running speed of the mini pc is only related to the mini pc configuration. The remaining space of the C drive is less than 1G, which will affect the system operation.

2. SSDs are not recommended to be divided into too many areas, generally two areas can be, one is the system disk and another disk that stores important information.

3. Path to install the software The mechanical hard disk is recommended to be installed on a non-system disk. The solid state drive can be installed directly under the solid state drive.

How to change the EGLOBAL minicomputer desktop path?

The default desktop path of the minicomputer is usually on the disk, and we especially like to put the files on the desktop, because the desktop is convenient and easy to find. For a long time, more and more desktop files will be available, and the C disk space will become smaller and smaller, which will slow down the system. How to set the system desktop path to a non-console? This tutorial will be explained for everyone.

1. Double-click “Minicomputer or this minicomputer” on the desktop.

2. Right click on the “Desktop” and select “Properties”.

3. Click on “Location” to change the disk placed on the desktop (I want to place the desktop on the D drive, change C directly to D) and click “Apply”.

4. Click “Yes”.

Key points: If you are a Win7 system, please find the user folder on the system disk (C drive), and find the desktop folder under the folder of your own username. The default path is C:\Users\Administrator\Desktop

5. Click “Yes”

6. We smoothly moved all the files on the desktop to the D drive, so that we can safely save the files directly to the desktop.

Key points: In fact, the space in the C drive only affects the running speed of the minicomputer system, because our system is installed in the C drive, but it doesn’t matter if the minicomputer card is not stuck! I decided to tell you about the relationship between C drive, mechanical hard drive, solid state drive, C drive space, etc. in the next issue.

How to turn off the Minicomputer useless service to improve the running speed

Our minicomputer will run a lot of services and programs after booting up. The more loads and services we run, the more the minicomputer will be stuck. In this issue, I will give it to his family to close some services that we can’t use to improve the speed of the minicomputer.

Note: Our minicomputer does not need any settings, some services we do not need at all, choose officers and soldiers, you can properly increase the speed of the minicomputer.

  • Right click on “This Minicomputer” and select “Manage”
  • Click on “Services and Applications”

  • Click on “Services”
  • Right click on the service you want to close and click on “Properties”
  • Start type select “Disable”, then click “OK”

Note: The above describes how to turn off the minicomputer service, but not all services can be turned off, some services are turned off and some features are not available. We have summarized some services that can be closed and explained the functions of the service. Users can choose to close the unneeded services according to the above methods.

Recommended closed service

Minicomputer Browser: Can be replaced by the network discovery function of the network and sharing center, set to manual.

Distributed Link Tracking Client: Individual users generally do not use, set to manual

Distributed Transaction Coordinator:Individual users are generally not used, and are also vulnerable to remote denial of service attacks, set to manual

Remote Registry:This service is one of the must-stop services, set to disabled

Secondary Logon:For multiple users, you can assign temporary administrator rights to a user, which is generally not used. Set to manual.

SuperFetch: I/O operation is frequent, if it is not needed, set to disable

TCP/IP NetBIOS helper:If the network does not use NetBIOS or wins, set to manual

Windows Defender Service: I/O operation is frequent, if it is not needed, set to disable

Windows Search:I/O operation is frequent, if it is not needed, set to disable

Security Center:Windows Security Center service, you can disable

Fax:Send and receive faxes using available fax resources on your computer or network.

Windows Backup:Provide Windows backup and restore capabilities. Windows backup and version recovery features have been bad, can be turned off

Windows Error Reporting Service:No one likes mistakes. For you and Microsoft, the error report is not useful in the past. You can turn it off.

Services that can be turned off depending on the situation

Netlogon:If it is not in domain management, set to manual

Print Spooler:If you do not need to connect a printer device, set it to manual (you can turn it off without a printer, but some software requires this feature)

Server:Set to manual if files or printers are not shared

Smart Card:If you do not use a smart card such as a U-Shield, set it to disable

Windows Update: Set to manual if you don’t need automatic updates

Bluetooth Support Service:Can be turned off without using Bluetooth

Diagnostic Policy Service:The Diagnostic Policy service provides diagnostic support for Windows components. If the service is stopped, the System Diagnostics Tool will not function properly. If the service is disabled, any other services that depend on the service will not function properly. The default mode of operation of this service is automatic. Vista or IE7 sometimes pops up a dialog box asking if you need to help it find the cause of the failure. Only 1% of the time it will help fix the problem of Internet disconnection, you can turn it off.

Diagnostic Service Host:This is the service that does the specific thing for the above Diagnostic Policy Service. It will be turned off together with the above service.

Diagnostic System Host:Basic and Diagnostic Policy Service/Diagnostic Service Host are the same, can be turned off together

Home Group Listener:Provide receiving services for family groups. The default mode of operation of this service is manual. If you do not use family groups to share picture videos and documents, then the service can be disabled.

Windows Biometric Service:If you are not using a biometric device, such as a fingerprint recognition system, this feature can be safely disabled, otherwise it remains the default.

Windows CardSpace:Personal identity management like Smart Card, a WCF programming model provided by .NET Framework 3.0. The average user can close.

Windows Firewall:Windows Firewall doesn’t have to say anything more. Disable if not needed.

Focus: According to your own situation, choose whether to close or not. If you can’t close it, keep it default. After the setting is completed, restart the computer.

How to Improve EGLOBAL MiniComputer Performance

Many people are very puzzled, they bought a high-profile minicomputer, whether it is playing games or running software, the minicomputer is still stuck. Today we teach you a way to quickly improve the performance of your minicomputer.

This method has a significant effect on the user with high minicomputer configuration. If the configuration of your minicomputer is not very high. It will be improved after the setting, but it is still impossible to achieve perfect condition.

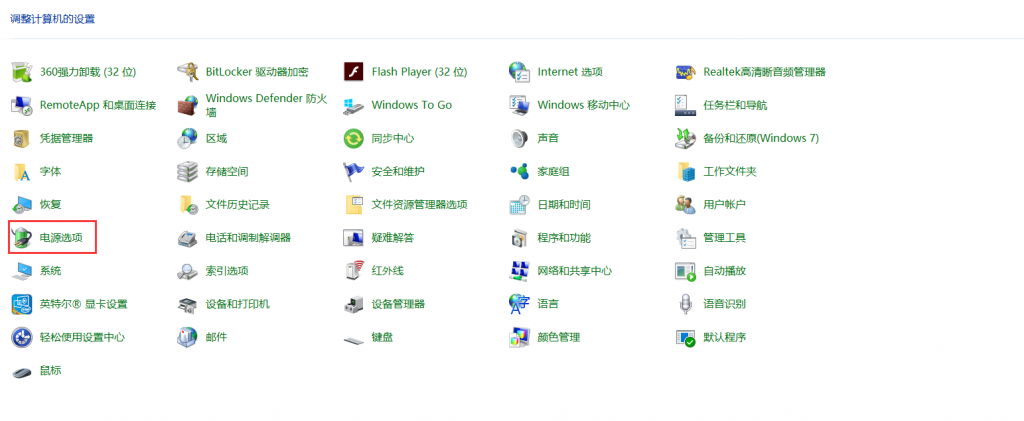
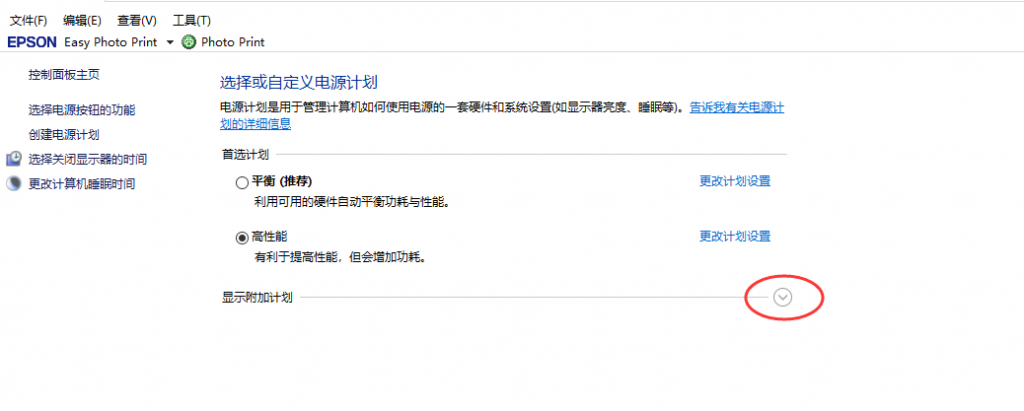
1. Go to the “Control Panel”.

2. Select “large icon” at the view mode.

3. Find and click to enter “Power Options”

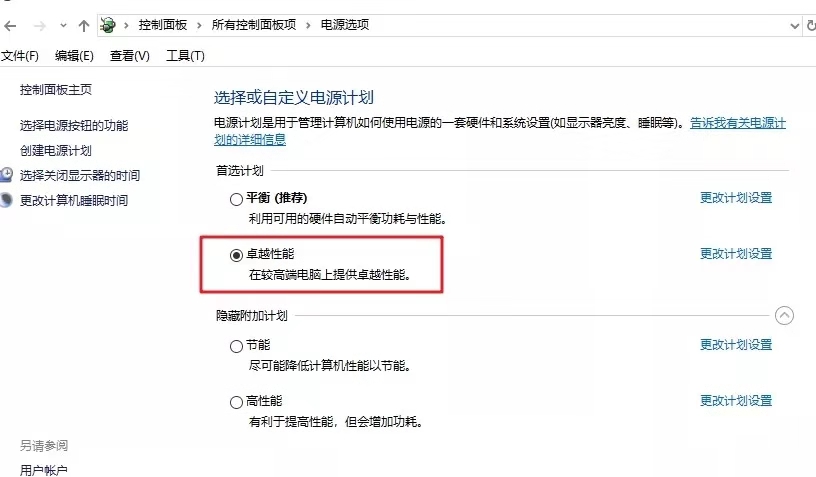
4. Click on “V” to expand the hidden option

5. Select “High Performance”

Note: High-performance mode: the firepower is fully open, the CPU runs at high frequency, and it works with a discrete graphics card. This mode is suitable for playing games, drawing, etc. The reaction is fast and the operation is smoother. Ordinary mode: CPU low-benefit operation, independent graphics card idle, use integrated graphics to work, this mode can cope with general office and entertainment, or some small games that do not require high hardware, can save power, generally in use You can switch to this mode when the battery is in use. If your computer configuration is high enough, you can choose “Excellent Performance”.

6. If you don’t have the “High Performance” option, you can create one yourself.

7. Select “High Performance” and fill in the plan name and click “Next”

8. After setting up, try it.

How to properly clean up the C Drive from EGLOBAL Mini PC

The Windows mini pc operating system is usually installed in the C drive of the disk drive. Once it runs, it will generate a lot of junk files, and the C drive space will be smaller and smaller to some extent. The longer the mini pc works, the more often the C drive will indicate that its memory is insufficient. So what is the impact of insufficient C drive capacity on our mini pc?

The space of the C drive is too small, which will greatly affect the running speed of the system. Your mini pc will naturally become stuck and crash!

So, how to properly clean the C drive? Next, pour everyone three ways to quickly clean the C drive.

Method 1: Disk Cleanup

By freeing up disk space, you can improve your mini pc’s performance. The Disk Cleanup Tool is a utility tool included with Windows that helps you free up space on a disk. The tool first identifies files that can be safely deleted and then allows you to choose which files you want to delete partially or all.

Cleaning method:

1. Click “This Mini pc” on the desktop of the mini pc, right click on the “C drive” and select “Properties”

2. Click on “Disk Cleanup” and click on “Clean System Files”

3. Check the files you want to delete, click “OK” and then click “Delete Files” to immediately release 3.69G disk space for the C drive.

Method 2: Turn off hibernation (for Win10 systems)

Close method:

1. Right click on the icon in the lower left corner of the mini pc and select “Windows Power Sell A”

2. Enter “powercfg –h off” (note the space) directly in the page that appears, then press “enter” on the keyboard.

3. Now there is no “hiberfil.sys” file in the C drive, and immediately released 3G disk space for the C drive.

Method 3: Turn on automatic cleaning (for Win10 system)

Opening method

1. Click “Start”—–“Settings”—–“System”

2. Select “Storage” and set “Storage Awareness” to “On”. The mini pc will automatically clean up and no longer need to manually clean it every time!