The Difference with RS232/RS485/RS422 COM Port on the Eglobal Mini PC

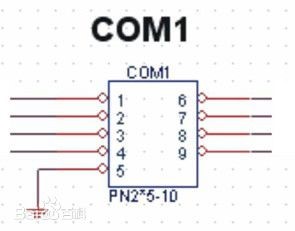
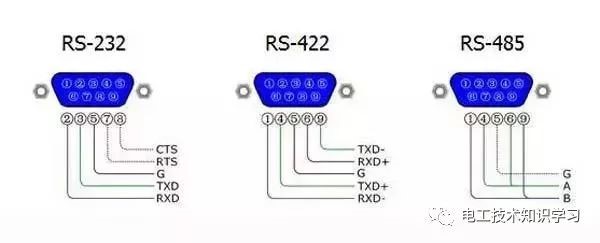
RS232 is a standard interface, which is a D-shaped 9-pin. The signal definition of the interface of the connected device is the same. The RS422/RS485 is a non-standard interface, generally a 15-pin serial interface (also a 9-pin interface), and the pin definition of each device is different. RS232 is a 4-wire system with full duplex mode. RS485 is a two-wire system with half-duplex mode.

RS232 is designed for point-to-point communication (that is, using only a pair of receiving and transmitting devices). The driver load is 3~7kΩ. Therefore, RS232 is suitable for communication between local devices. 422 and 485 serial interface standards, RS232 and RS422/RS485 are different. The data signal adopts differential transmission mode, also called balanced transmission. It uses a bunch of twisted pairs. In the early PC communication, the maximum transmission distance of RS422 is more common. 4000 feet with a maximum transfer rate of 10 Mb/s.

The basic knowledge of RS232 communication: RS232 communication is also called serial communication mode. It refers to the way that the computer uses the serial port cable and the single device (controller) to communicate through the RS232 international standard protocol.

Communication distance: 9600 baud is recommended within 13 meters.

Communication rate (baud rate): The default is 9600 bps, and the common ones are 1200 2400 4800 19200 38400. The larger the baud rate, the faster the transmission speed, but the shorter the stable transmission distance, the worse the anti-interference ability.

The basic knowledge of RS485 communication: The basic communication mechanism of RS485 and RS232 is the same. His advantage is that it makes up for the shortcoming of RS232 communication distance and can not carry out network management of multiple devices at the same time.

The computer connects multiple 485 devices (access controllers) in turn through the RS232 RS485 converter, and polls the devices on the bus in turn.

The wiring label is 485+ 485-, which corresponds to 485+ 485- of the link device (controller).

RS422 has longer distance and faster transmission rate than RS232 transmission. The transmission rate is up to 10Mbit/s. At this rate, the cable length is 120 meters. If the transmission rate is lower, such as 9000 baud rate, the maximum distance can reach 1200 meters. .

RS422 uses two signal lines per channel, if one is in a logic “1” state and the other is a logic “0”. The circuit consists of a transmitter, a balanced connection cable, a cable termination load, and a receiver. It is stipulated in the circuit that there is only one transmitter and there are multiple receivers, so the point-to-point communication method is usually adopted.

Basic knowledge of RS422 communication: His communication principle is similar to RS485. The difference is that his bus is two sets of twisted pairs (4 lines), which are respectively labeled as R+ R- T+ T-. The disadvantage is that the wiring cost is high and it is easy to make mistakes. It is used less now.

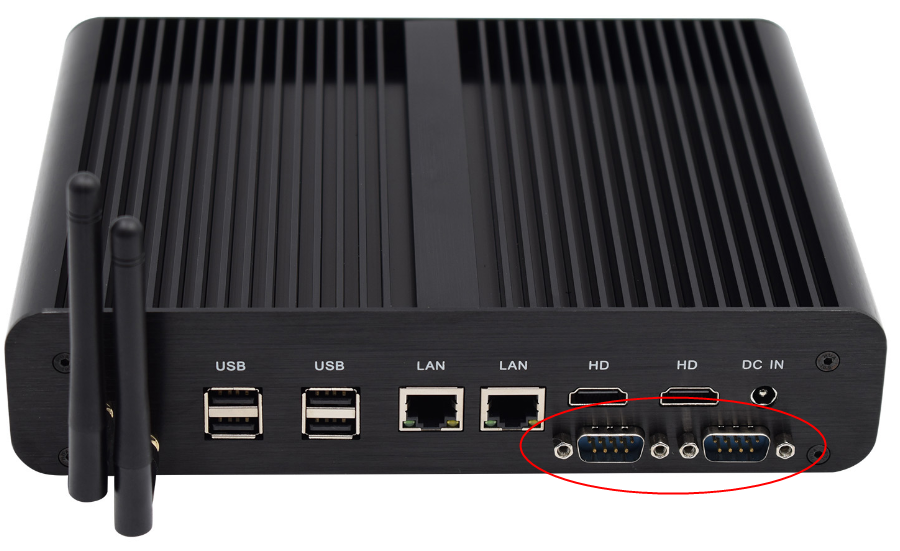
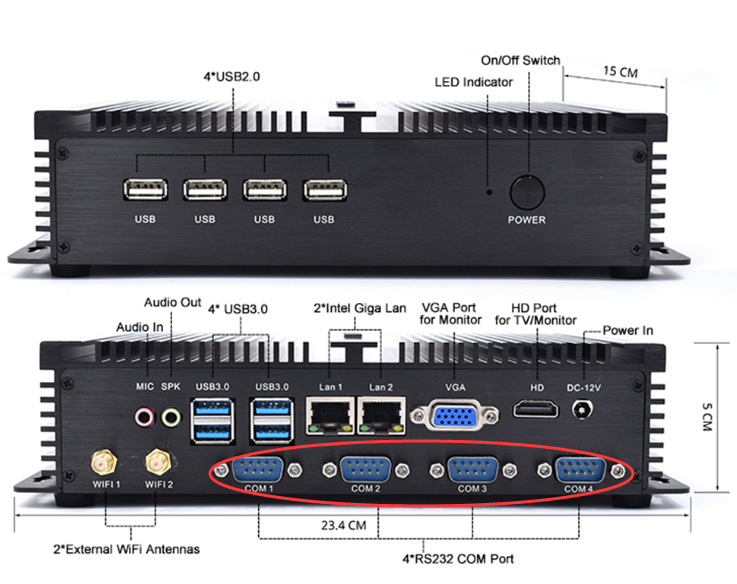
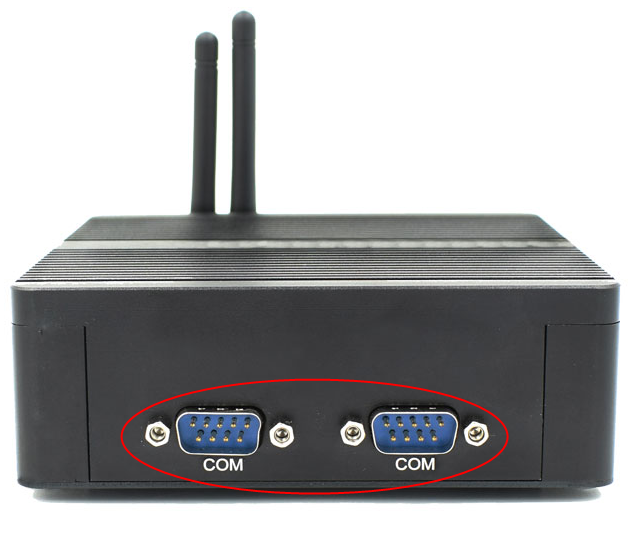
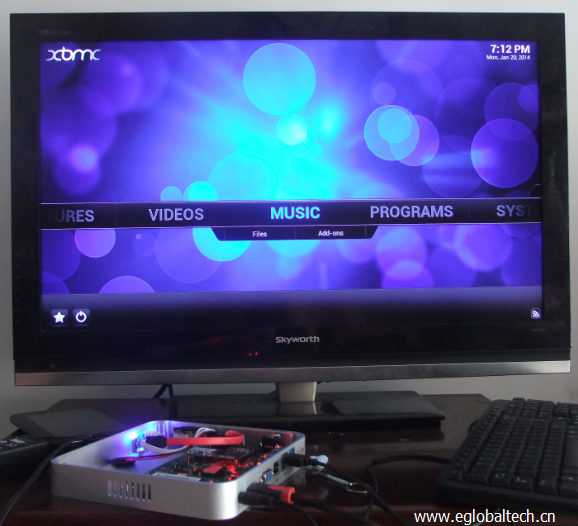
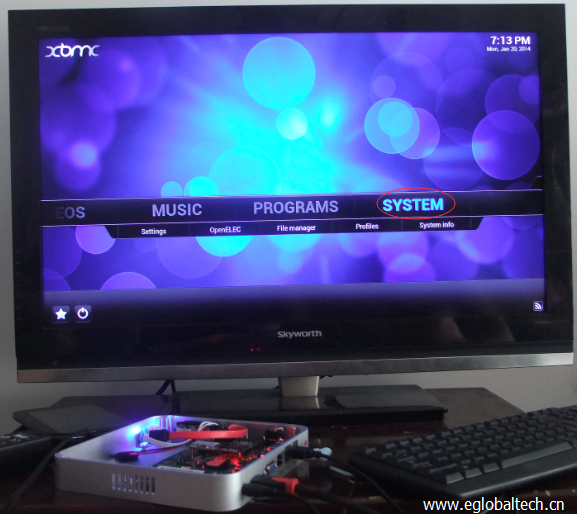
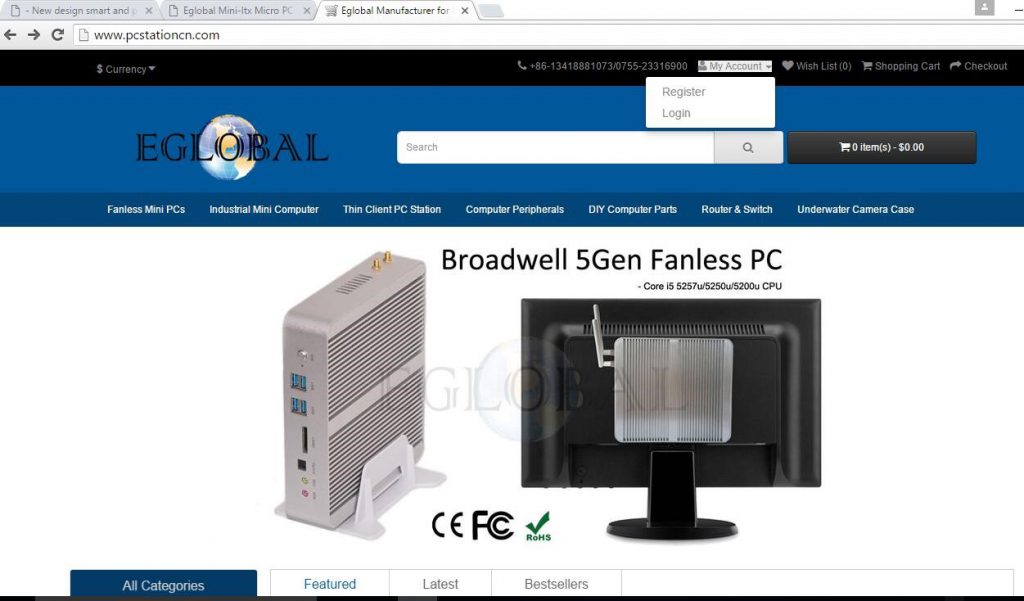
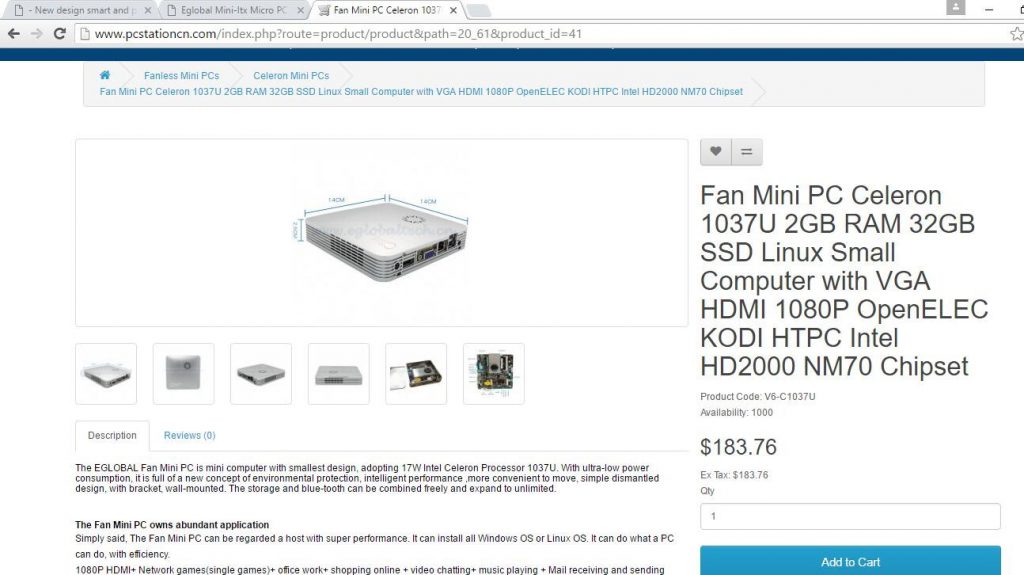
Because RS232 COM port is universal, Most of Eglobal Industrial Mini Computer is with the RS232 COM port like the following pictures shown. The Mini PC can support the adapter RS232 to RS422/485 if you need the RS422 or RS485 port.

What’s COM port on Eglobal Industrial Mini PC Computers and What’s its role?

In general, standard industrial mini pc computers have a rich IO interface. We often see the word “COM” on the side of the industrial computer. What does the COM serial port of the industrial computers mean? What kind of effect? We come to you to understand the knowledge and function of the COM serial port of the industrial computers.

First of all, let’s understand the definition of COM interface: COM port (cluster communication port) is the serial communication port, referred to as serial port. The COM serial products commonly used in IPCs generally have RS-232 and RS-485 interfaces. In appearance, both serial ports use a 9-pin type. It’s just that they have different definitions of the two pins, which are not mentioned here.

The RS-232 serial port used by the COM serial port of the industrial computer is relatively more. RS-232 (ANSI/EIA-232 standard) is the standard for serial connection on IBM-PC and its compatible machines.

The COM port is a communication port that can be used in a wide variety of communication devices.

Pin function of the 9-pin serial port:

1 Carrier Detection (CD)

2 Accepted Data (RXD)

3 Send Data (TXD)

4 Data Terminal Ready (DTR)

5 Signal Ground (SG)

6 Data Ready (DSR)

7 Request to Send (RTS)

8 Clear Send (CTS)

9 Ringing Indication (RI)

The COM port is a communication port that can be used in a wide variety of communication devices.

1. Hospital medical equipment control: hospital gastro scope, CT, chest X-ray instrument, etc.

2. Supermarket charging related equipment: small ticket printers, credit card machines, barcode grabs, etc. for supermarkets.

3. Engineering production design control: PLC programmer

4. Computer extended peripheral equipment: such as printer, serial mouse, serial keyboard, etc.!

5. Printing device: printer

6. Weighing equipment: electronic pounds

7. The industrial control COM serial port also has a connection card module, a sensor, a mouse, a modem, etc., and can also be connected to industrial instruments and meters.

How to setup Microphone of Eglobal Mini PC you use

The instructions below are for Windows Vista, 7 and 8 installed on the Eglobal Micro PC you use.
To install a microphone in Windows 10, first click the search icon (magnifying glass) in the bottom-left corner of the screen. Then type: “Set up a microphone” and push enter. Then follow the instructions.

Now back to the Windows Vista, 7 and 8 instructions. In Vista and Windows 7, open the Start Menu and click on Control Panel.
In Windows 8: take your mouse cursor to the upper-right corner of the screen, when menu pops up, click search. Type: “Control Panel” in the search box, and then click Control Panel.

Once the Control Panel window opens, click on Hardware and Sound.

When you are in the Hardware and Sound list, click on em>Sound.

In the Sound window you have three tabs: click on the Recording tab.

Once you are in the Recording tab, right click on the microphone device you just plugged in and select the ‘Set as Default Device’ option.

Now, to test and see if it really works, tap the microphone with your finger a few times. In the Sounds window, the empty lines next to the default microphone should fill up with a green color.

If you are in the Recording tab and you can’t see your microphone device, right click on any device shown in the Recording tab. In the contextual menu, click ‘Show Disabled devices’ if it isn’t marked with a check sign.

If you still can’t see your microphone, you might have not plugged it properly or you need to install a driver for it to work. In the first case, check to see if you have plugged it properly into your computer, plug it again or, if it is on a USB port, plug it in another USB port. As for the second case, use the drivers from the manufacturer’s site or from the CD that came along with the product.

Read the text aloud

At this point Windows Vista may still not recognize that the microphone has been activated. So we need to make Windows Vista aware of the tone and sound of our voice.

Important: The following steps will be also done in the Windows Speech Recognition article so, if you came to this article from that one, you can now go to that one and continue reading from there. Open the Control Panel window and click on Ease of Access.

Now, in the Ease of Access window, click on Set up Microphone.

Choose the microphone device that you currently use and click on the Next button.

A few indications are given and, if they are followed, will give a better user experience. In my case, since I have selected the Headset microphone the indications are as shown in the image. Once you have read the advice given, click on the Next button.

If you accidentally selected the wrong device or want to go back to a previous page of the setup, click on the blue Back arrow positioned in the top left corner of the setup wizard.

Read the given text aloud and, afterwards, click on the Next button.

In some cases the microphone does not work in the wizard setup, although it might be enabled and functions properly according to the Recording tab. If this happens, close the wizard setup and, after you checked to see you have the correct microphone device enabled, open the setup wizard again.

In my case, for example, I have activated the microphone on the headset only when I got to this step and it doesn’t seem to work. A few taps on the microphone shows me that it works in the Recording tab, but does not work in the setup wizard, so I must restart the wizard setup.

Now, assuming you read the text and clicked on the Next button, the wizard setup will tell you that the microphone has been set up and also you will be prompted about setting up the Speech Recognition by pressing the Finish button.

Power indicator light is on but display nothing after Eglobal mini computer(install RAM and SSD well) connect with power adapter

1. Make sure the VGA Cable/HDMI cable between the PC and display is well connected.

2. If that doesn’t work, change a VGA/HDMI cable for trial.

3. Make sure the memory you use is the same kind as per Eglobal mini computer requirement.

4. Close the power and try to open the mini computer case carefully, check if the memory plugged correct or loose, unplug the memory and wipe it up by nonwovens then insert it on the mini computer, connect power adapter and re-start it.

5. sometimes the problem comes due to CMOS battery problem, the CMOS battery remember some error information and make the computer no display, you can remove and try it again.

If your computer is losing its time or date settings, or you are receiving a message CMOS Read Error, CMOS checksum error, or CMOS Battery Failure, or lost display, for example, some users using Eglobal mini computer and find all indicator shows correct, RAM also correctly plugged in, but totally no display, it may due to the CMOS problem, it remember some error and shows nothing on hardware, you will need to remove your CMOS battery and try it again.

Before opening your computer, make sure you are aware of ESD and its dangers: ElectroStatic Discharge, ESD is one of the few things you can do to damage or destroy your computer or parts of your computer. Much like the shock you receive when rubbing your feet on the carpet and touching something metal, ESD can occur when working in your computer and can cause components you touch to no longer work properly. ESD can occur without the user feeling a shock and only occurs while working on the inside of the computer or handling an expansion card or other hardware. The best method of preventing ESD is to use an ESD wrist strap, grounding mat, or grounding workbench. However, because most users do not have access to such items, we have included the steps below to help reduce the chances of ESD as much as possible.

For our mini pc, after remove the CMOS battery, you can plug power adapter and turn on the mini pc again, this time it will shows normally and confirms the computer has no hardware problem. After that, power it off and remove power plug, then put the CMOS battery back again, after CMOS battery back work, everything will runs normal now.

Why my Eglobal Mini PC (XBMC) has no Sound when connect to TV by HDMI cable?

When first time connect the mini pc (XBMC with Openelec pre-installed) to TV by HDMI, you should select the correct HDMI device if it didn’t have any sound.

The following pictures to teach how to set sound on XBMC System:

Step 1: open the Mini HTPC computer and go to its homepage as this picture:

Step 2. Click “System “ button and go into system setting

Step 3. Click “system” button

Step 4.Click “Audio Output”

Step 5. Select the right audio output device from the list shows there:

After set the Mini PC to “Stand by” mode, how to wake it up?

After set the Mini PC to “Stand by” mode, I cannot wake it up directly by touch keyboard or mouse, no matter long press the power switch or short press the power switch, the mini pc will restart directly instead of wake up, does you mini pc have this problem? And how to solve it.

To wake up the computer directly via mouse or keyboard, you should not close your hard disk when the computer goes to “stand by” mode, go to Power Options and set the hard disk never turn off will be ok. Operate step by step as per the following picture:

If you are using Win7 OS: First, click on the battery icon and go to “Power Options”, you can also find “Power Options” from “Control Panel”.

Secondly, click the > Change advanced power settings link in the bottom left.

Hard disk: Set it never turn off the hard disk in sleep mode.

If you are running XP: Open the Control Panel and switch to Classic View (if not already selected), Select Power Options and adjust the settings in the power scheme, select never turn off hard disks,choose ok to save  your changes.

How to place order from www.pcstationcn.com

Create an account. Click the upper right button My Account, select to register.

Fill your personal information.

Set your password for this ID and select receiving newsletter or not, then mark Agree Terms and click Continue.

Your Account is created. Click Continue to enter your account.

Enter My Account, to see if you need set others things before placing orders.

Select the product you want to buy and open the specification page, add it to the cart.

After adding the item in the cart, you can see the item quantity number & amount showing in the cart area.

Put the cursor on cart area, you can see the item name, quantity and total amount. Select Checkout.

Confirm the billing address then click Continue.

Confirm the receiving address then click Continue.

Confirm the shipping method and leave message if you have some requirements on the shipping method. Click Continue.

Select the payment method and mark Agree terms, then click Continue.

Confirm Order.

Login your Paypal account to finish the payment.

You can view your order on your account of our website after paying, don’t forget to login out when you are done.

How To Re-partition Without Destroying The Data On Eglobal Mini PC Computers?

Some customers ask: The system is installed on Eglobal mini pc computers. But there’s only one partition. I don’t want to reinstall the system to re-partition. Is it possible to create another partition?

This might be a problem that troubles many users. Generally, some third party software can provide such features. However, now Windows 7 enables you to make some certain degree of adjustments towards current partition sizes.

Let’s check the How-to:

Preparation

An essential requirement of this operation is that your file system must be NTFS. FAT32 file system doesn’t work.

Right click the drive -> Property -> on the General tab -> File System will display your file system.

If it is FAT32 system, it can be converted to NTFS.(Alert: Converting to NTFS will bring some trouble. For example, if there are two systems installed on the computer, and one of them is an earlier system like Windows 98 or Windows ME, then the older system will not be able to recognize NTFS’s drive letter.)

  1. Start -> In Start Search, type cmd, -> and right click cmd in the result list at the top – >Click Run as administrator.
    If you see a message saying Windows needs your permission to continue, don’t be surprised. Just click continue to confirm.
  2. Type the following command, and press Enter to run it (x represents your drive letter, and it should be replaced with you specific drive letter).
    convert x: /fs:ntfs

3.Wait for a few minutes, and don’t close the window until you see the confirm message.

How To Create And Format A Hard Disk Partition On Eglobal Mini PC Computers

To create a partition or volume (the two terms are often used interchangeably) on a hard disk, you must be logged in as an administrator, and there must be either unallocated disk space or free space within an extended partition on the hard disk.

If there is no unallocated disk space, you can create some by shrinking an existing partition, deleting a partition, or by using a third-party partitioning program.

To create and format a new partition (volume)

  1. Open Computer Management by selecting the Start  button. The select Control Panel > System and Security Administrative Tools, and then double-click Computer Management.
  2. In the left pane, under Storage, select Disk Management.
  3. Right-click an unallocated region on your hard disk, and then select New Simple Volume.
  4. In the New Simple Volume Wizard, select Next.
  5. Enter the size of the volume you want to create in megabytes (MB) or accept the maximum default size, and then select Next.
  6. Accept the default drive letter or choose a different drive letter to identify the partition, and then select Next.
  7. In the Format Partition dialog box, do one of the following:
    1. If you don’t want to format the volume right now, select Do not format this volume, and then select Next.
    1. To format the volume with the default settings, select Next.
  8. Review your choices, and then select Finish.

Notes: When you create new partitions on a basic disk, the first three will be formatted as primary partitions. Beginning with the fourth, each one will be configured as a logical drive within an extended partition.

To format an existing partition (volume)

Warning: Formatting a volume will destroy any data on the partition. Be sure to back up any data you want to save before you begin.

  1. Open Computer Management by selecting the Start  button. The select Control Panel > System and Security Administrative Tools, and then double-click Computer Management.
  2. In the left pane, under Storage, select Disk Management.
  3. Right-click the volume that you want to format, and then select Format.
  4. To format the volume with the default settings, in the Format dialog box, select OK, and then select OK again.

Notes

Notes: You cannot format a disk or partition that is currently in use, including the partition that contains Windows.
The Perform a quick format option will create a new file table, but will not fully overwrite or erase the volume. A quick format is much faster than a normal format, which fully erases any existing data on the volume.

How To Make Auto-Power-On function of Eglobal Mini PC?

Eglobal mini pc can stand up by desk bracket but also can be mounted back of monitor by VESA bracket we supply. When you fix the computer back of monitor, it is inconvenient for you to press the On/Off Switch button each time, so it would be good if Eglobal mini pc could start automatically when connecting to the mains power.

Here let’s see the BIOS setting for your reference(different models of Eglobal Mini PC have different BIOS interface):

Step 1: Press On/Off Switch on the mini pc and then keep press “Esc” on the keyboard until goes into BIOS;
Or Press “ F11 ” after booting, select “ Enter Setup ”  into BIOS interface as the picture shown:

2. Select “ Chipset ” and Press “ Enter ” into “PCH-IO Configuration” .

3. Select “ Restore AC Power Loss ” and setup “ Power on ”.

4. Press “ F10 ” and Select “ Yes ” to save the setting and re-start the machine. Now you can test the function “Auto-Power-On”.