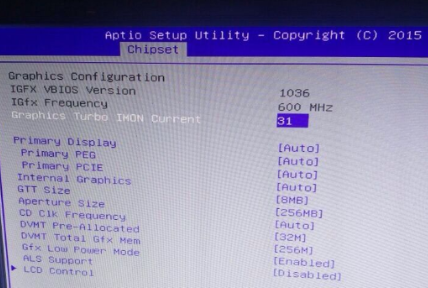
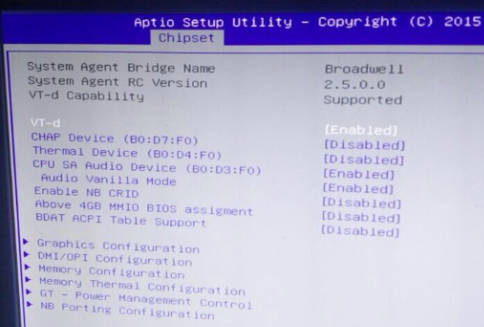
Step 1: Into the BIOS, and point the “Chipest”
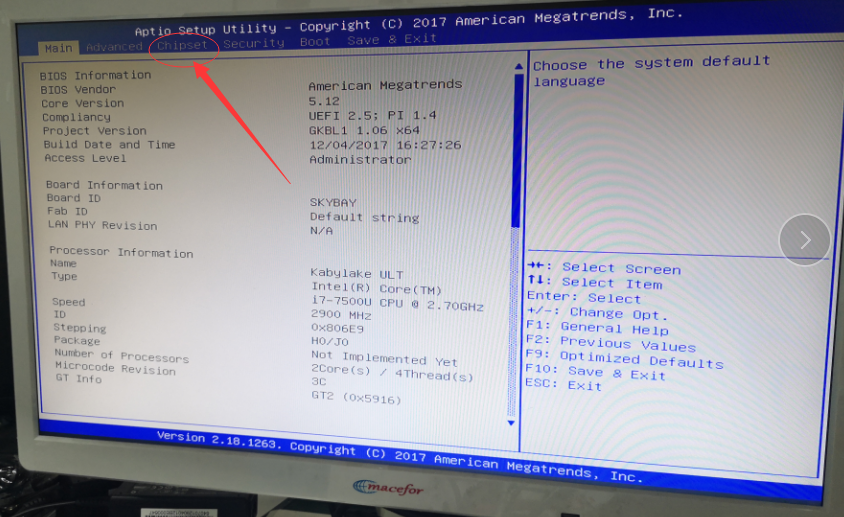
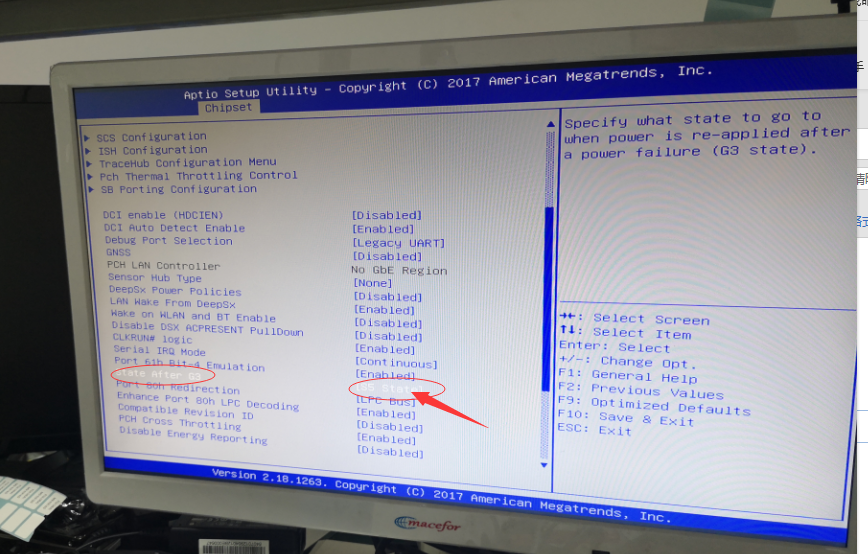
Step 2: Setup the “PCH-10 Configuration”
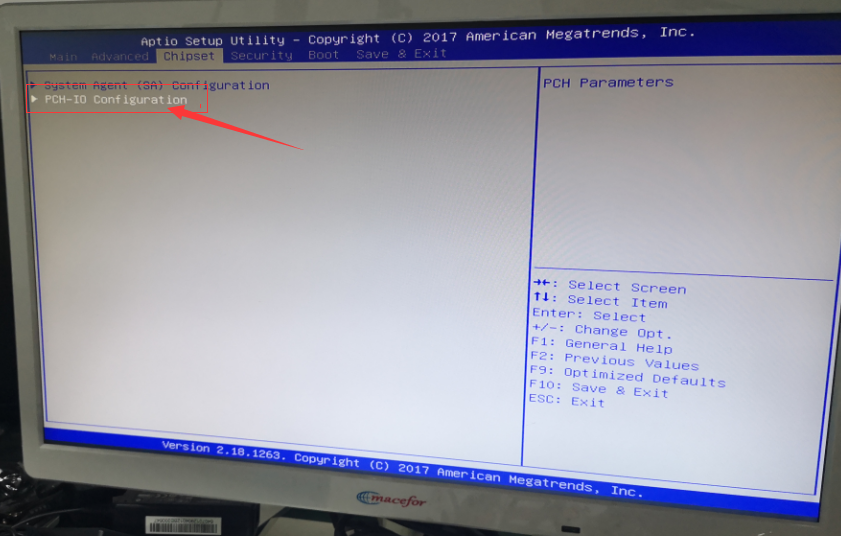
Step 3: Find the “state after G3” ——-Make it become“S0 state”

Step 1: Into the BIOS, and point the “Chipest”
Step 2: Setup the “PCH-10 Configuration”
Step 3: Find the “state after G3” ——-Make it become“S0 state”
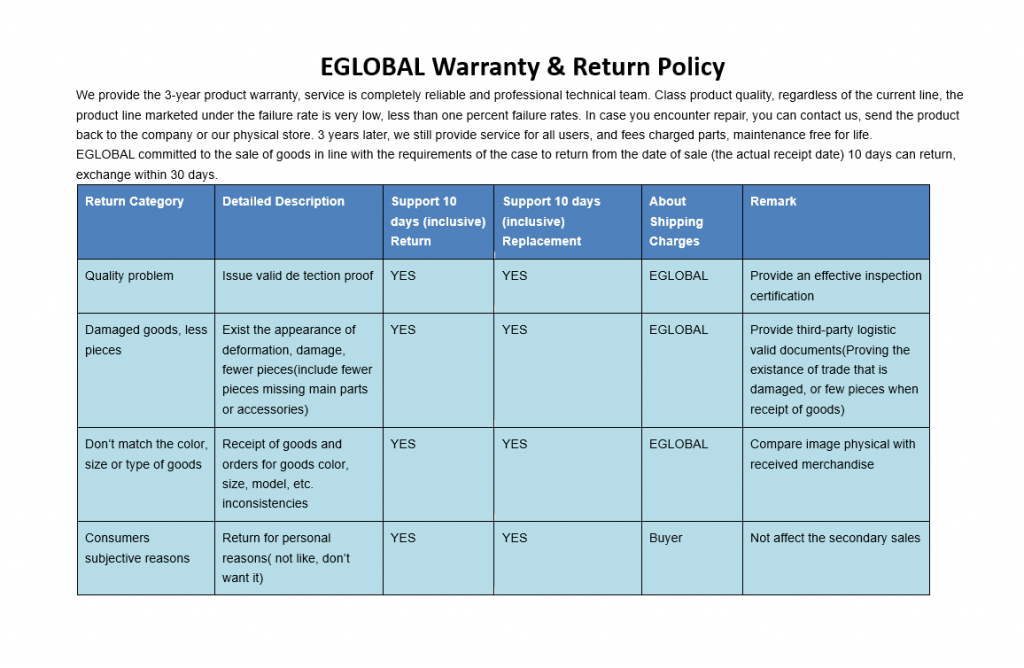
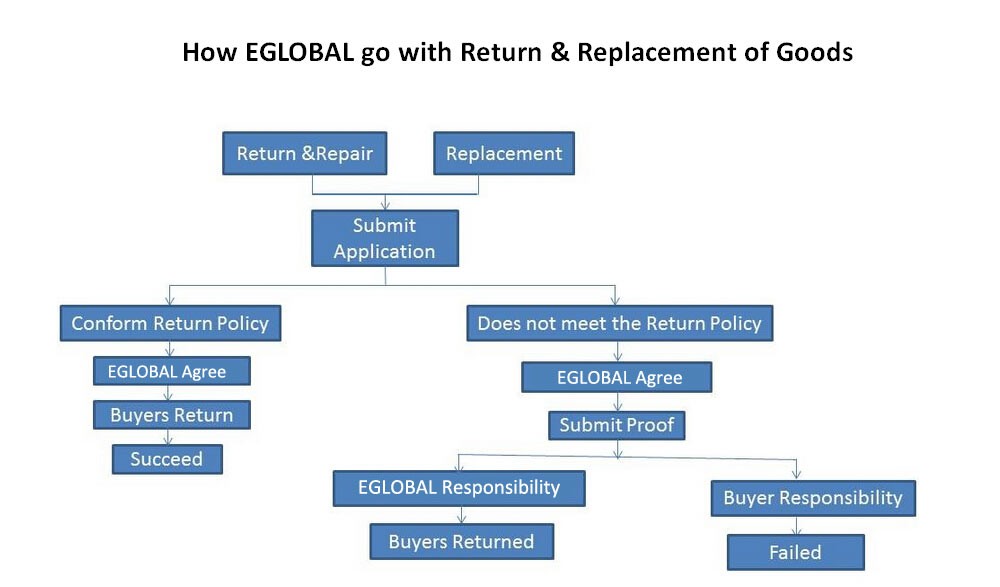
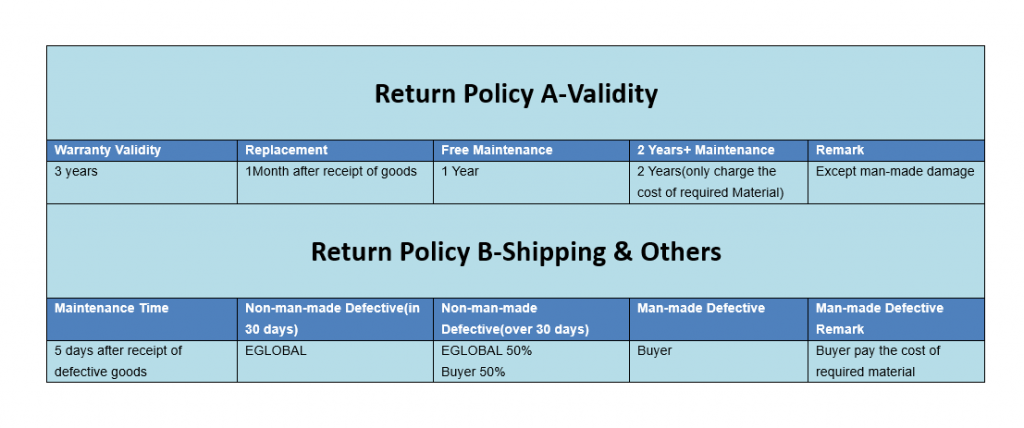
Thanks a lot for our customers’ support. Of course we provide 3 years warranty for Eglobal Mini PC. Details about our Warranty Policy here:
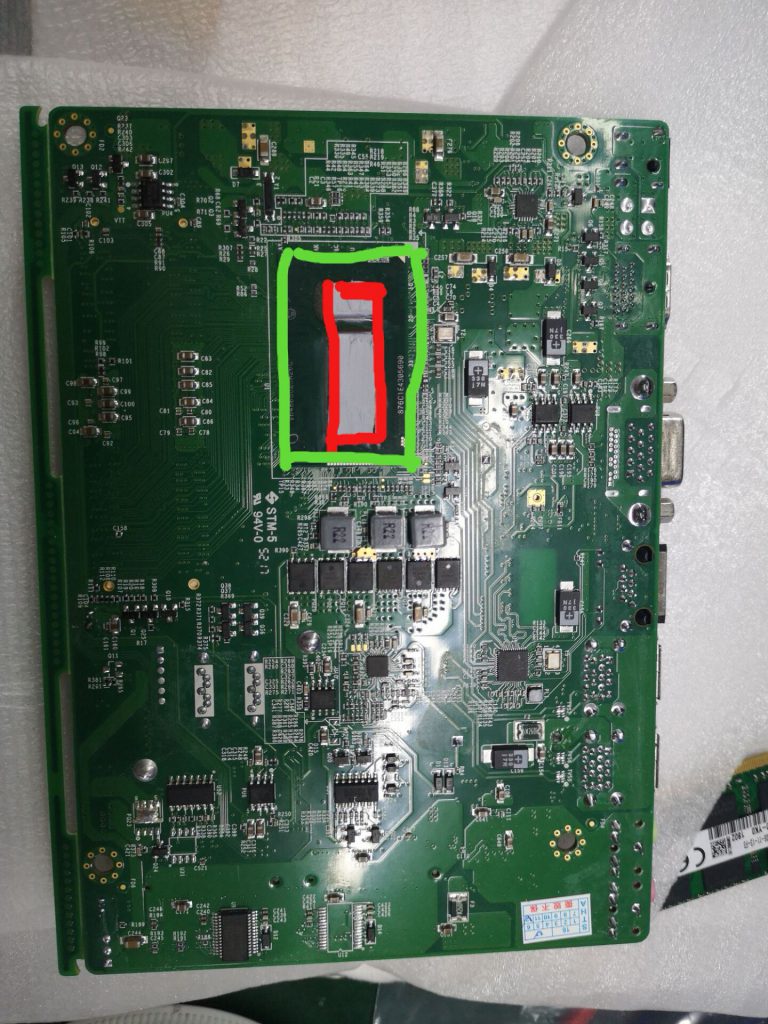
But we received some defective motherboard operated wrongly by our customers because they don’t apply the thermal paste on the motherboard correctly.
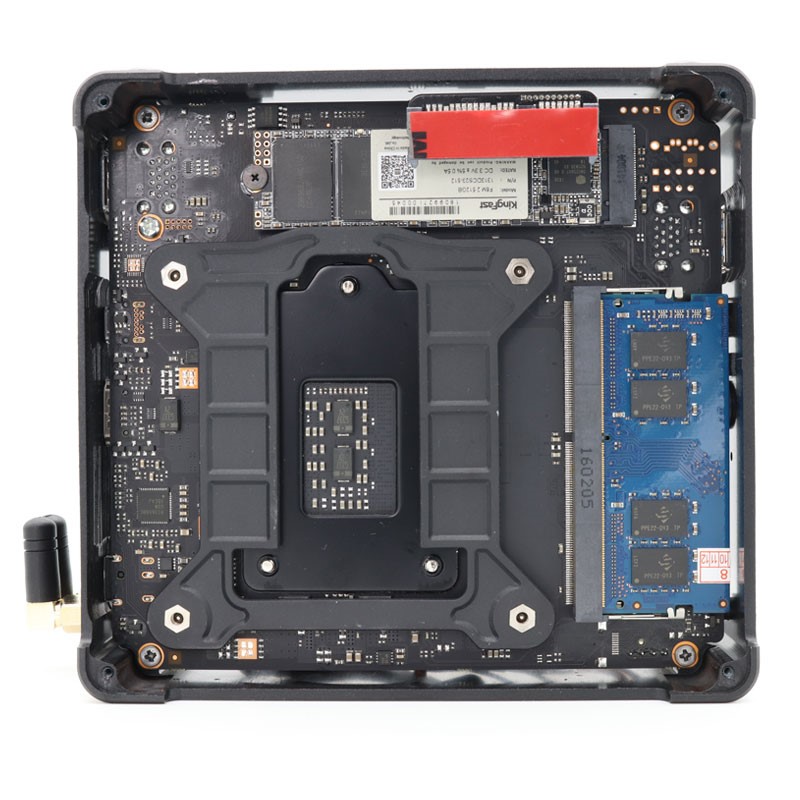
Here is the right tip referring to the picture of motherboard:
CPU onboard is back of the motherboard and located in the green line, it is CPU lens in the red line. The thermal paste cant cross the red line and not too much or thick when you apply. Otherwise it will cause a short circuit on the motherboard. So you must evenly apply the thermal paste on the CPU lens.
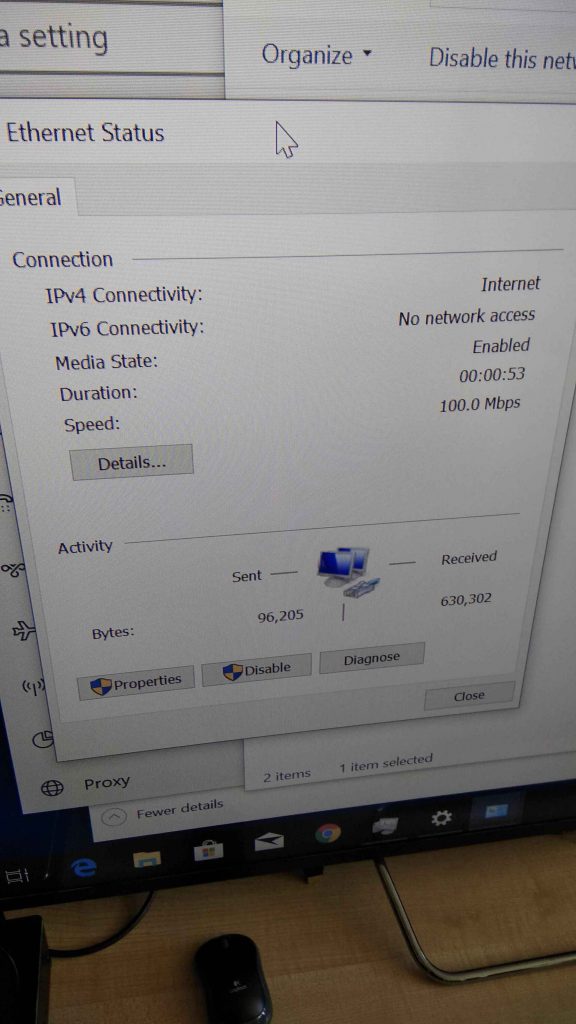
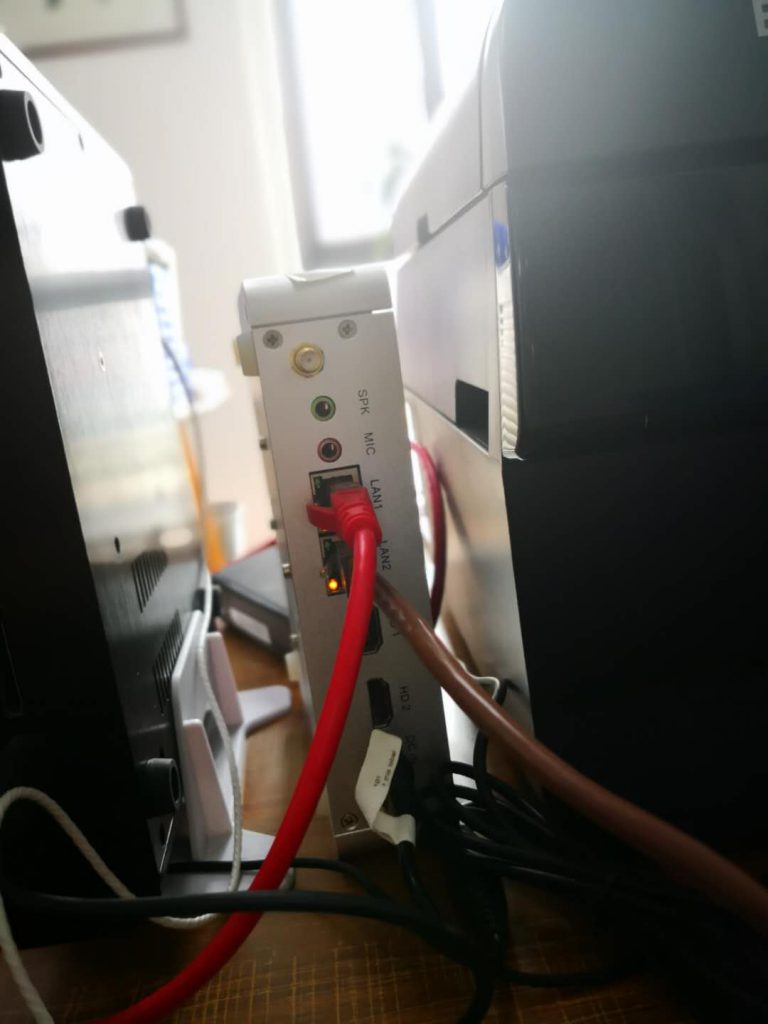
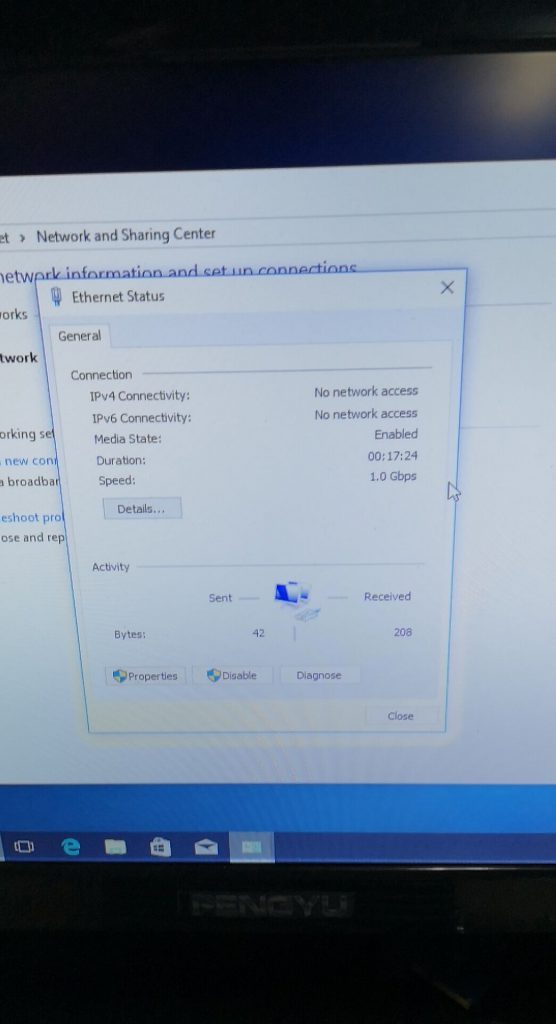
Have you ever encountered such a problem, why my mini computer network card speed is always 100 Mbps, and it refuses to work at 1 Gbps Speed, just like the following picture(example for S200):
There are some way to let you know what went wrong.
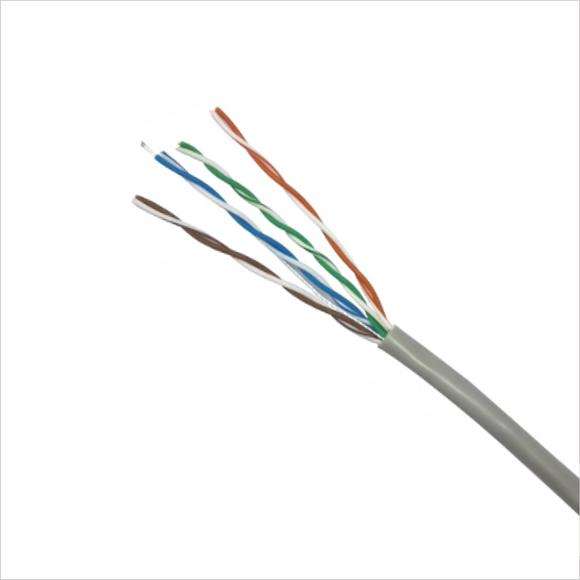
Method 1: If the lan network card support 1Gbps, you may use at least CAT5E or CAT6E network cable.
Method 2: Connect your cable directly to the network port of the mini PC. This method can test whether it is your computer problem or router problem. If the machine connected to the network cable can reach 1 Gbps, then consider whether your router is compatible. If the router is not compatible, you need to change it.
Method 3: select ” Auto Negotiation ” as the picture we attached:
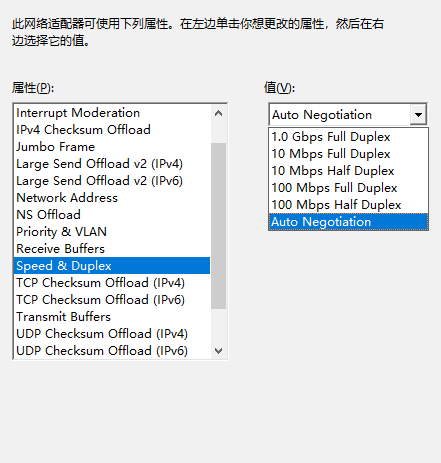
Under normal circumstances, our computer will automatically adapt to the network speed, no need to set, but in this case, you can set or check here.
If there is no problem with the above points, the network speed problem still exists, then contact us, we will help you solve it.
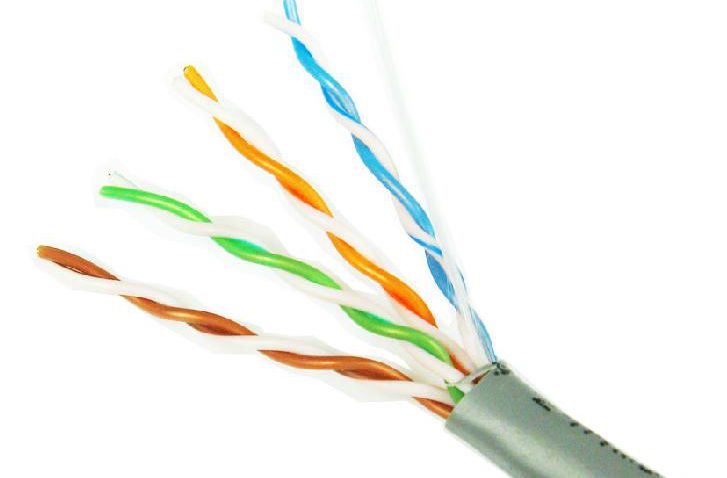
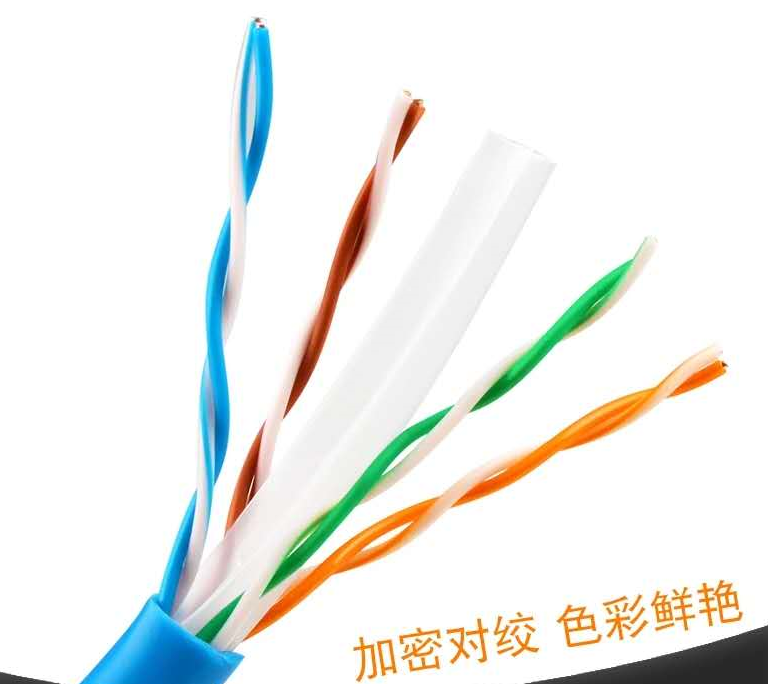
At present, in the twisted-pair this family, Cat.5/CAT5E/CAT.6/ CAT6e cable types of these twisted-pair lines are the most widely used, CAT.7 are also followed, then what are the differences between them?
CAT5, this type of cable increased the winding density, coat a high-quality insulating material, the outer skin will be labeled “CAT5”, transmission bandwidth of 100MHz, for voice transmission and the highest transmission rate of 100Mbps data transmission, mainly used for 100BASE-T and 10BASE-T network. This is the most commonly used Ethernet cable. “CAT7” refers to the CAT5E of unshielded twisted pair (Utp-unshielded Twisted Pair), non-shielded twisted-pair cable is composed of many pairs of twisted-pair wire and a plastic sheath, the outer skin labeled “CAT5e”; transmission bandwidth up to 1000Mb/s, However, it is often necessary to rely on the support of expensive special equipment. As a result, it is often used only in Fast Ethernet of 100Mb/s to enable desktop switch-to-computer connectivity.
The identification of class five lines is “CAT5”, bandwidth 100M, suitable for networks below hundred megabytes, the identification of super five lines is “CAT5E”, bandwidth 155M. CAT5 can meet the increasingly popular 100M/bps Ethernet, CAT5E is mainly used in gigabit network, but now also common applications in the LAN. CAT5 transmit signals with a maximum rate of 100MHz and are widely used. Ultra CAT5 transmit signals with a maximum rate of 100MHz, better performance than five lines, improved metrics such as NEXT, PS-ELFEXT, Atten, and support for duplex applications.
CAT5E mainly used for communication companies or network companies to deploy outdoor short distance links. The maximum effective communication distance of the CAT5 is 100M, and the maximum communication distance of the CAT5E is 300M. And the outer protective layer has a much longer service life than the CAT5. Most of the lines connected to your router or switch from the small zone gateway or the entire building network are CAT5E. While super five types of unshielded twisted-pair wires can also provide up to 1000Mb/s transmission bandwidth, they often require the support of expensive special equipment. As a result, it is typically applied only to 100Mb/s Fast Ethernet, enabling desktop switch-to-computer connectivity.
As people’s need for higher bandwidth and faster speed networks continues to grow, CAT5E and CAT6 are increasingly being used in people’s lives. At present, in the twisted-pair line of this family, compared with CAT3, CAT5 and CAT7 and other twisted-pair lines, CAT5E and CAT6 two twisted-pair lines are the most widely used range. Although the status of CAT5E and CAT6 is at hand, this does not mean that CAT5E and CAT6 can replace each other. Consumers still need to master the characteristics of each of the two, in order to make a better purchase according to their own network needs. So what are the differences between CAT5E and CAT6? First of all, the biggest difference between CAT5E and CAT6 is the difference in their performance. While both the CAT5E and CAT6 systems can transmit gigabit networks, the standard used by the CAT5E system to transmit gigabit networks is 1000Base-T, while 1000BASE-Tx is the way CAT6 systems work. From this point of view, the CAT5E system is only “able” to support Gigabit Ethernet, and the CAT6 system is a “truly guaranteed” use of Gigabit Ethernet.
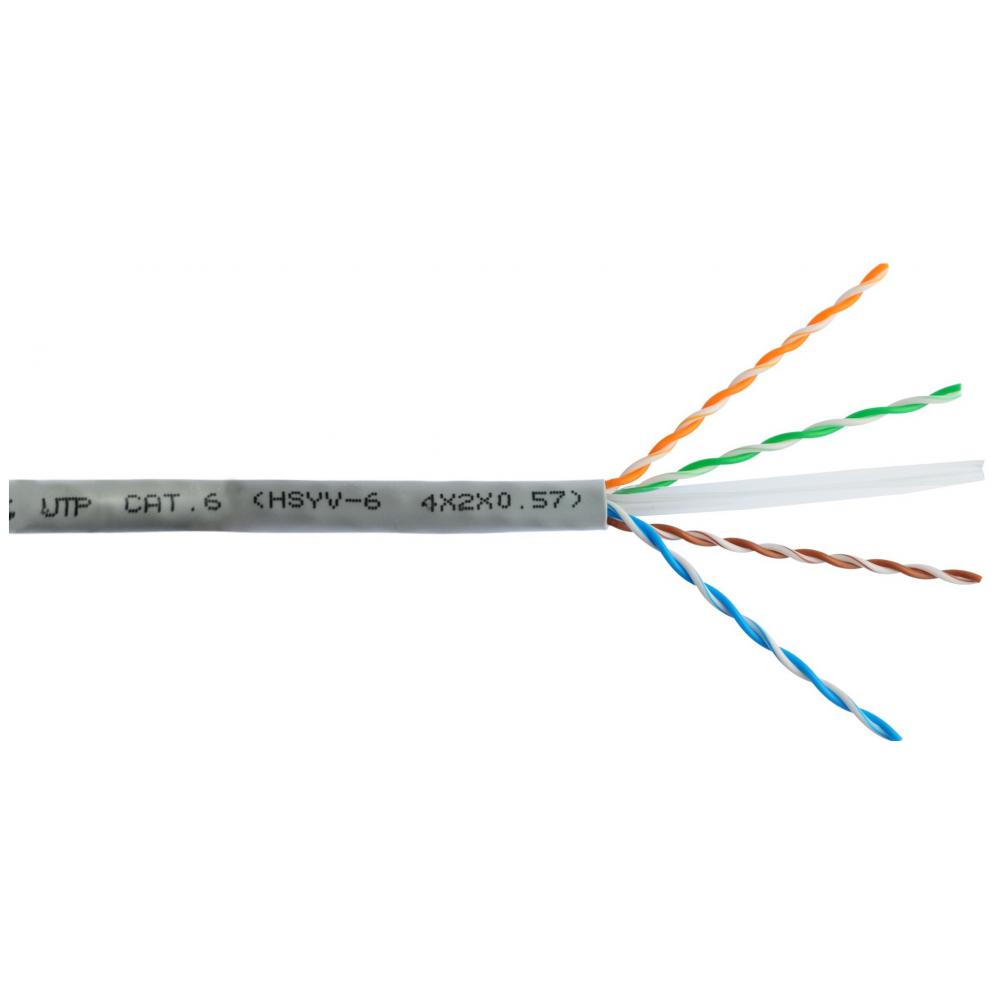
As a result, the CAT6 system is better adapted to the current building environment, especially in places where a large number of twisted-pair wires are concentrated and have many sources of interference, such as rooms with many electrical appliances (computers, telephones, various production equipment, etc.), devices, adjacent to power lines, lighting wires. Secondly, in the structure, there are obvious differences between CAT5E and CAT6. The CAT6 adds an insulated cross skeleton, placing four pairs of twisted-pair wires in four grooves of the cross skeleton respectively, and the cable has a large conductor diameter, small torque and a thicker outer diameter. This central cross new production process is also designed to avoid crosstalk between cables when applied to 1000BASE-T networks.
Since the release of the TIA-568C.2 standard in 2009, CAT6E has been widely used in various wiring systems. Compared with traditional CAT6, CAT6E has a higher transmission frequency and rate. In general, the bandwidth of the CAT6 is 250MHz, and the bandwidth of the CAT6E is twice times that of it, which is clearly a very good solution for a data center with high network bandwidth requirements. As the CAT6E of the current cabling system darling, supply will make a comparison with the traditional CAT6. At present, the number of 10G network ports in the data center is increasing, in the 10G Ethernet interface mode, 10GBase-T four pair of twisted wire is one of the most familiar ways we currently know. CAT6E is now used in data centers, with the further expansion of data center construction, the scale of use of CAT6E will be further expanded. It should be noted, however, that although CAT6E has a superior side to other cables, it also has its drawbacks and shortcomings. In the wiring, not blindly according to the performance of the advantages and disadvantages to choose, but according to the actual situation to choose the appropriate wiring system for their own.
The CAT7 standard is a set of standards that support up to 600MHz bandwidth transmission wiring on a 100 ohm twisted-pair line. CAT7 is a 8-core shielding line, each pair has a shielding layer (generally metal foil shielding DINTEK), and then 8 cores outside there is a shielding layer (generally metal braided screen shielding DINTEK), the interface and the current RJ-45 is not compatible.
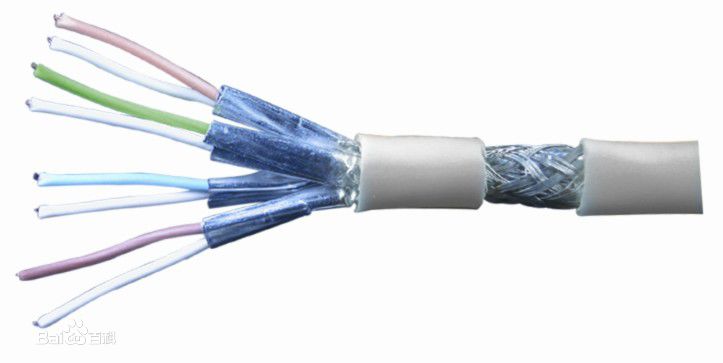
There are many notable differences between CAT7 and CAT6, most notably bandwidth, cat5e has a higher transmission bandwidth (at least 600MHz) compared to CAT4, CAT5, CAT6, and CAT7, The CAT6 channel provides at least 200MHZ of comprehensive attenuation to crosstalk ratio and overall 250MHZ bandwidth, and the CAT7 system can provide at least 500MHZ of comprehensive attenuation to the overall bandwidth of the crosstalk ratio and 600MHZ. Another difference between the CAT6 and CAT7 systems is their structure. CAT6 can use both UTP and STP, while CAT7 is based only on shielded cables. Each pair of lines in the CAT7 has a shielding layer, and the four pairs of lines together also have a large public shielding layer. In terms of physical structure, the additional shielding layer allows the CAT7 to have a larger line diameter. Another important difference is its ability to connect hardware, the parameters of the CAT7 system require the connection head at 600MHZ when all line pairs provide at least 60DB of integrated proximal string winding, while the CAT5E system only requires that the value of 43DB,CAT6 in 250MHZ be provided at 100MHZ as 46DB.
Finally, it needs to be explained that regardless of the use and purchase of that product, it is necessary to understand the principle of the barrel, that is, the use of the network rate of the online is how much, remember that high-performance products can be backward compatible, in turn not. Then home use of the network speed limit is the rate of the network card, in other words, the rate of the network card is how much, the network line is how much.
Mini host, also called mini computer, mini computer host, thin client (HTPC), minicomputer, cloud terminal or miniPC, others like to call it a desktop computer, it is a small size, low power consumption, ultra-quiet The high performance, stylish and beautiful computer host, the mini host has the basic properties and performance of the traditional desktop host.

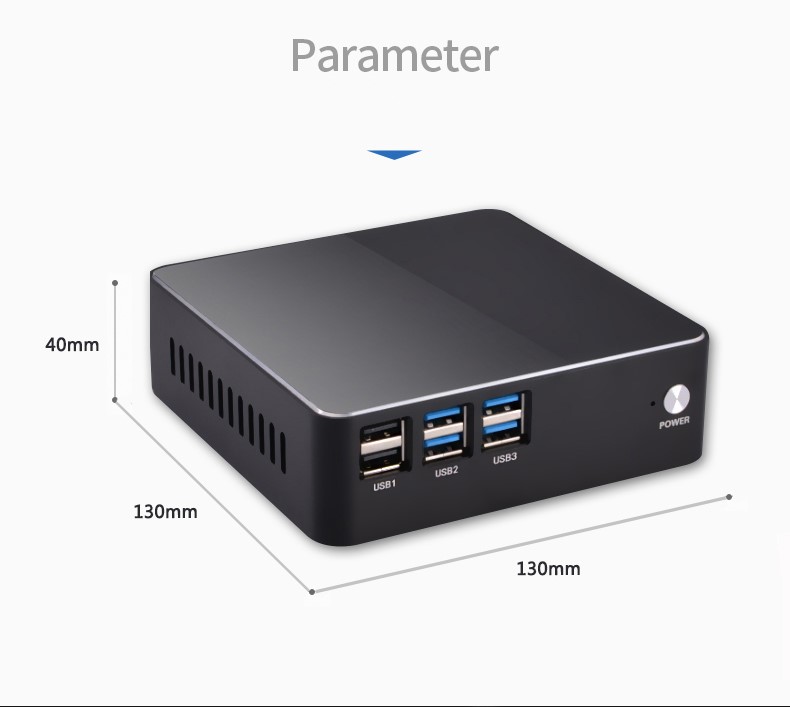
(1) Small and portable: Compact is the biggest feature of the mini-host. Its volume is generally 1/30 of the volume of a traditional desktop mainframe. It is equivalent to a 130-page book thickness, and the length and width are as large as A5 paper. For example, Datang’s mini-host is called a book computer, precisely because the host looks like a book standing quietly on the table. Of course, there are also smaller hosts on the market, such as computer sticks, which are equivalent to a U disk size. The mini-host is very convenient to carry, and can even be taken directly in the trouser pocket to bring more work and life. Convenience.
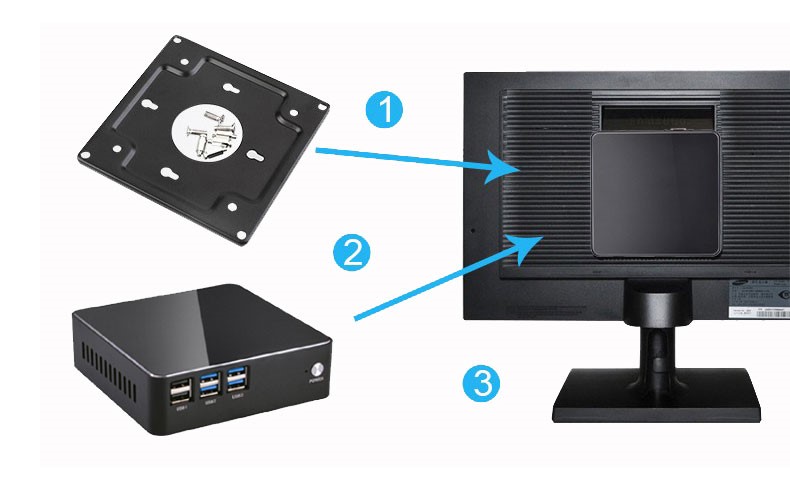
(2) Space saving resources: The compact size of the mini-host can be fixed by the pylon, can be placed at any small corner on the table, or can be fixed on the display or electricity with a dedicated pylon: behind the screen, making room for the current office or home life. The space resources are also a clean and tidy space on the desktop.
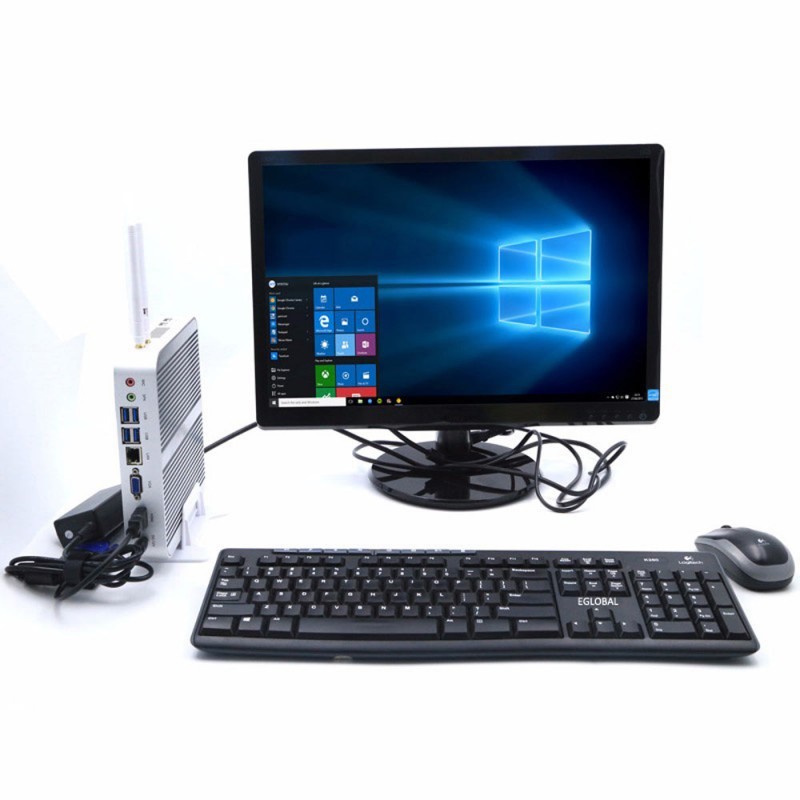
(3) Stylish and beautiful: Most of the traditional large desktop mainframes can not meet the aesthetic needs of modern people, and the stylish design of the mini-host, combined with the small and exquisite, whether it is on the desk, the living room or the study, is very artistic, giving Life and work bring a more enjoyable experience.
(4) Low power consumption, energy saving: The mini-host uses a low-power processor, and the thermal design power consumption TDP is generally around 10W-17W, while the traditional large desktop host consumes an average of 100W~150W, which is 10 times or more of the power consumption of the mini-host. (5) Silent and environmental protection.
(5) Silent and environmental protection: The loud noise of traditional big desktops has seriously affected the experience of computer workers, gamers and home life. In this ubiquitous living space, people can no longer afford more pollution. Due to the fanless heat dissipation design of the mini-host, the whole machine can achieve zero noise during operation, which brings a quiet experience of work and life, and has been well received by people.
(6) Strong performance: The performance of the mini-host has matured. After several years of exploration and accumulation, most of the mini-hosts can meet the basic needs of office, entertainment, industrial control, display and playback of 70% of users, although most mini-hosts are still designed. However, some high-profile independent mini-hosts are not inferior in overall performance.
(7) Safe and stable: Due to the small size of the mini-host, the high level of motherboard integration, and the design layout of component chips are very compact. Therefore, most mini-hosts can achieve stable operation for a long time, and it is not easy to affect the operation or interruption of the whole machine due to individual hardware problems, or even damage the whole. In the case of the machine, the traditional large desktop host has a large number of hardware overlays, which is prone to compatibility or unstable individual components and affects the operation of the whole machine.
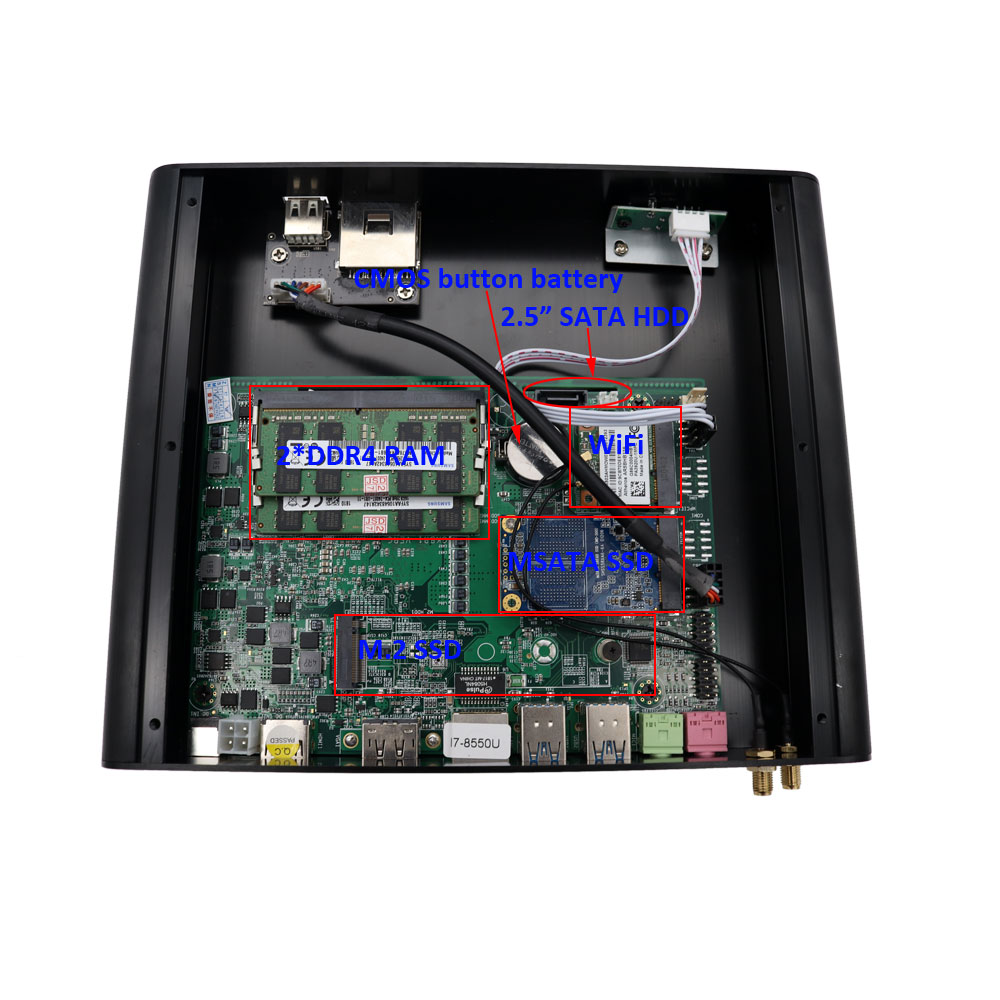
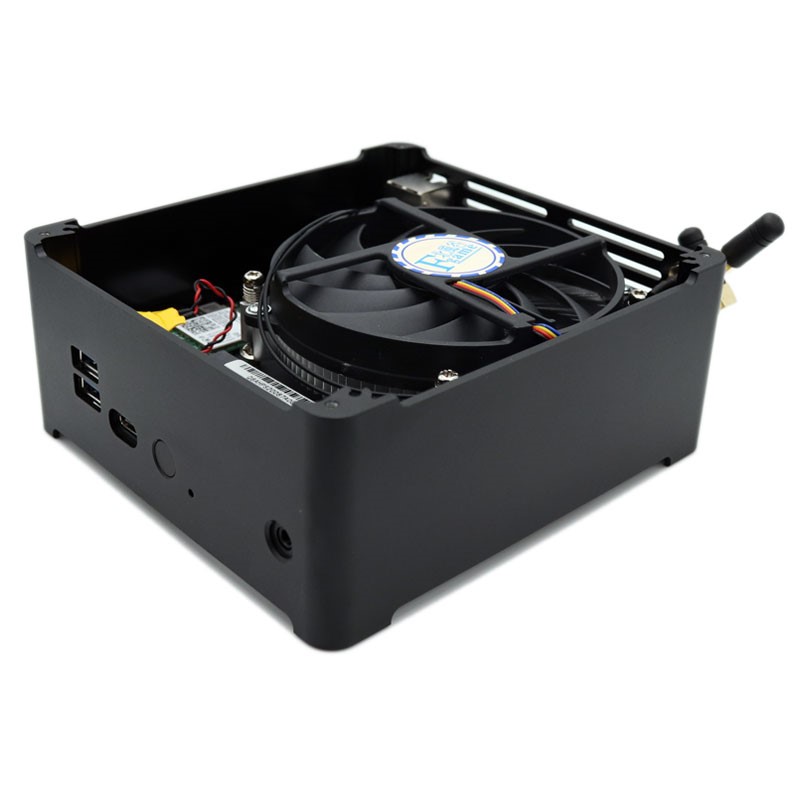
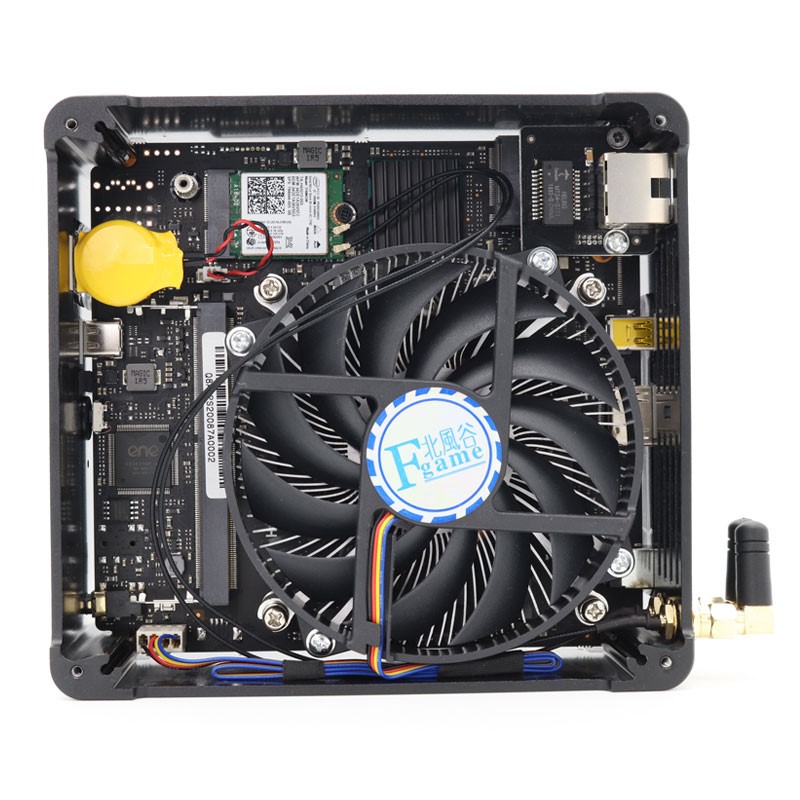
(8) Easy to update and maintain: The mini-host is small and portable, whether it is in software update or hardware update, it is very convenient. If you need to expand the memory hard disk, you only need to open the cover of the mini-host with a screwdriver. The internal motherboard structure and hardware of the chassis are clear at a glance, and the replacement is quite convenient. If the host has problems and needs to be repaired, girls or children, the elderly can easily take out the store or send it back to the factory for repair.
(9) Cost-effective: In addition to Intel’s own micro-PCs are very expensive, the price of other brands’ mini-hosts is very close to the people, generally within 1,000 to 3,000 RMB, the configuration is higher, the price will generally not exceed 5,000 RMB, which to some extent Make a lot of pre-space for DIY users.
(1) Graphics card: The current soft rib of the mini-host is undoubtedly the problem of the graphics card. As we all know, the single-function display has a large amount of heat. Since the mini-host is born to be small, it naturally sacrifices the performance factor of the main part when controlling the heat. Most of the minis on the market. That’s why the mainframes are all integrated graphics, not alone. Therefore, the mini-host with the set display will be a little difficult when dealing with large gun battle games. Of course, there is no pressure on small single-player games and playing 1080P HD video.
PS: But now, we also have some miniPCs that can hold graphics cards, and can also play LOL. In addition, mini-hosts with unique display have also begun to be launched, but there is still much room for improvement in overall performance coordination.
(2) After sales: There are after-sales problems in the mini-host products. More often, users need to send them back to the factory for repair. Many computer repair shops can’t provide technicians and technical services for mini-host maintenance. Of course, the mini-host market has just opened, and sales always lag behind product sales. It takes time to accumulate technical services. However, as long as you have purchased eglobal’s mini PC, if you have a problem with your mini pc, we can guarantee it for three years. During the effective warranty period, you only need to send your product back, we will repair it for you free of charge.
(1) Corporate office: In corporate office applications, whether it is daily office software, graphics tools or various management software, research and development systems, etc., the mini-host has been able to easily control, such as Datang Computer Co., Ltd., has fully used the mini-host as an office equipment, walked into In their office or workshop, you can’t find a big host.
(2) Family entertainment / living room audio and video: The compact and compact appearance of the mini-host, combined with its more powerful features than the TV box, has been well received by audio-visual entertainment users.
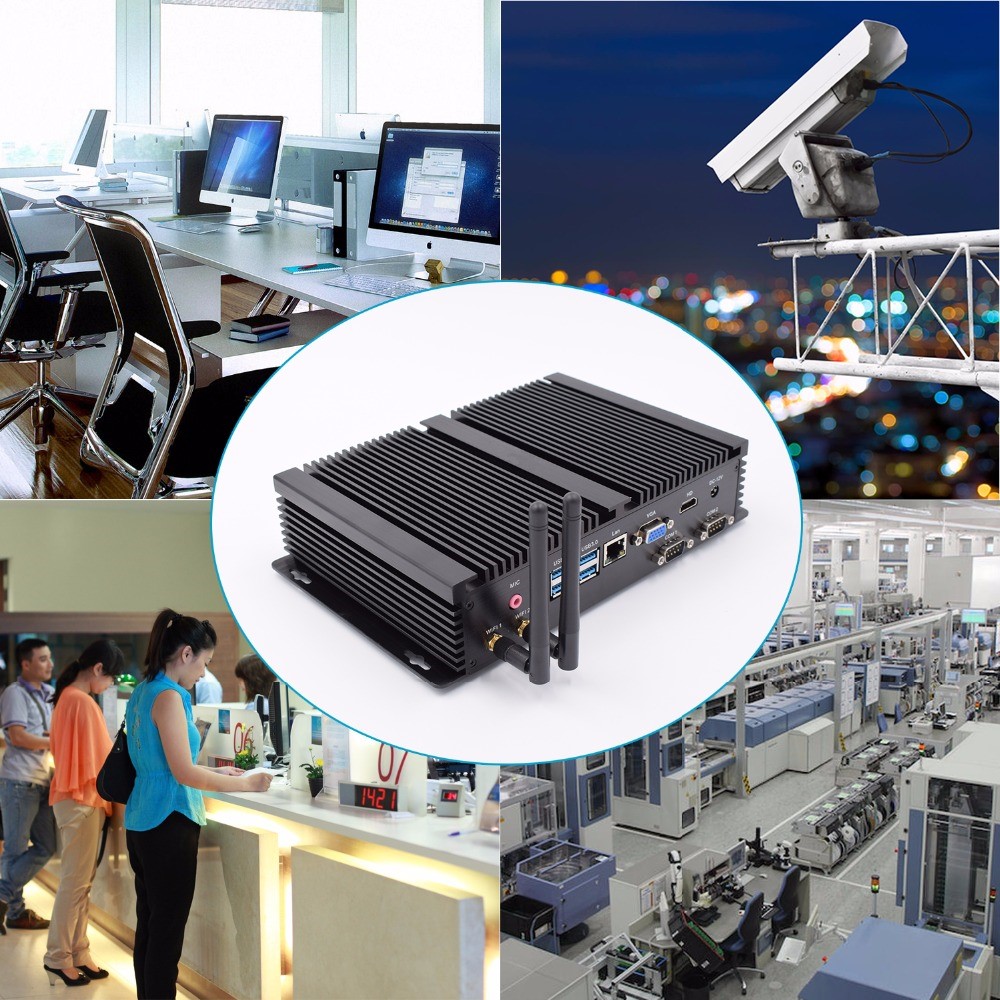
(3) Industrial control: In this era of looking at the value of the face, the large and rough chassis design of the traditional industrial computer will be gradually replaced by the mini-type industrial computer. The function is no longer the only choice for the industrial computer users.
(4) Cloud terminal: The mini host can be used as an access terminal device for diskless workstations. My users save more maintenance costs and ensure the security of user data resources.
(5) School Education / Multimedia Classroom: The mini-host can provide perfect support for teaching programs, such as resource acquisition, cyberspace, and shared services. The modernization of teaching methods requires more modern teaching equipment to help! In recent years, in the process of digitalization, networking, intelligence and multimedia, the universities have adopted mini-hosts as the equipment for multimedia classrooms.
(6) Download machine: The characteristics of the download machine, the mini-host is more than nothing: small size, power saving and good heat dissipation, 24 hours stable operation is no longer a problem.
(7) Digital signage: One of the mini-hosts is called an OPS computer, and its biggest role is to provide a complete solution for digital signage, educational all-in-ones, and electronic whiteboards.
(8) Shangchao, government, medical, military and other fields.
Nowadays, the mini pc can realize dual-screen or three-screen display. It can sell stocks and play games. It has far exceeded the basic performance originally pursued by the mini pc. I believe that with the continuous advancement of technology, I believe that the eglobal mini pc will create more surprise products for users.
In the new retail industry, there are some industrial mini pc for project needs that can be inserted into the SIM card. This makes it easy for them to plug in different SIM card numbers to connect to the IPC, and they may run online at any time. Since this type of industrial computer has relatively small market demand, few such industrial computer manufacturers are willing to customize for customers.
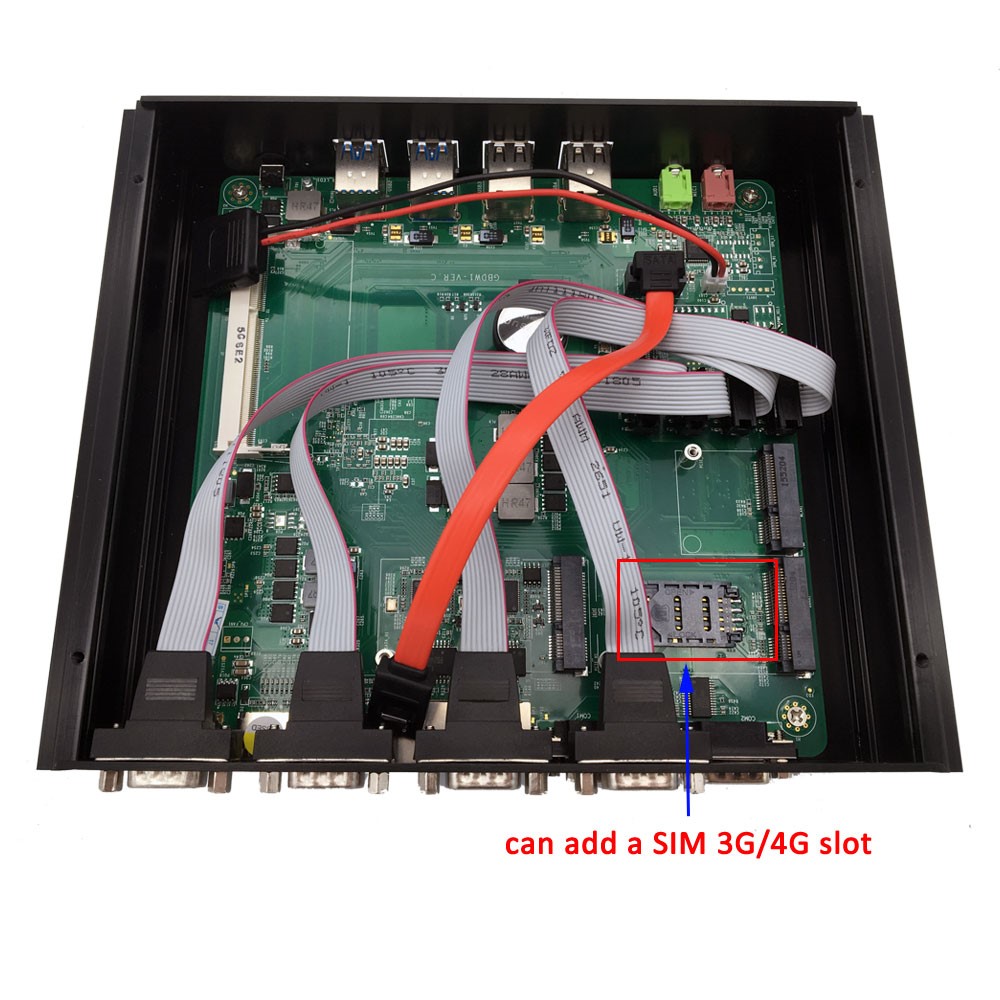
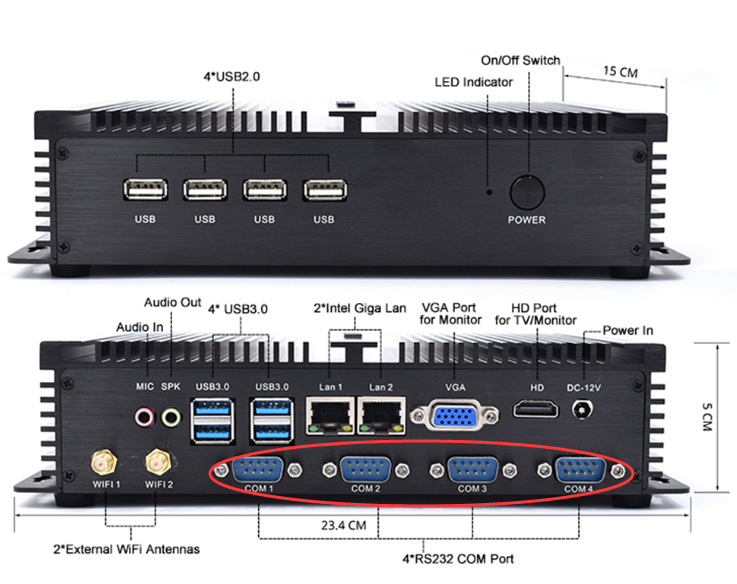
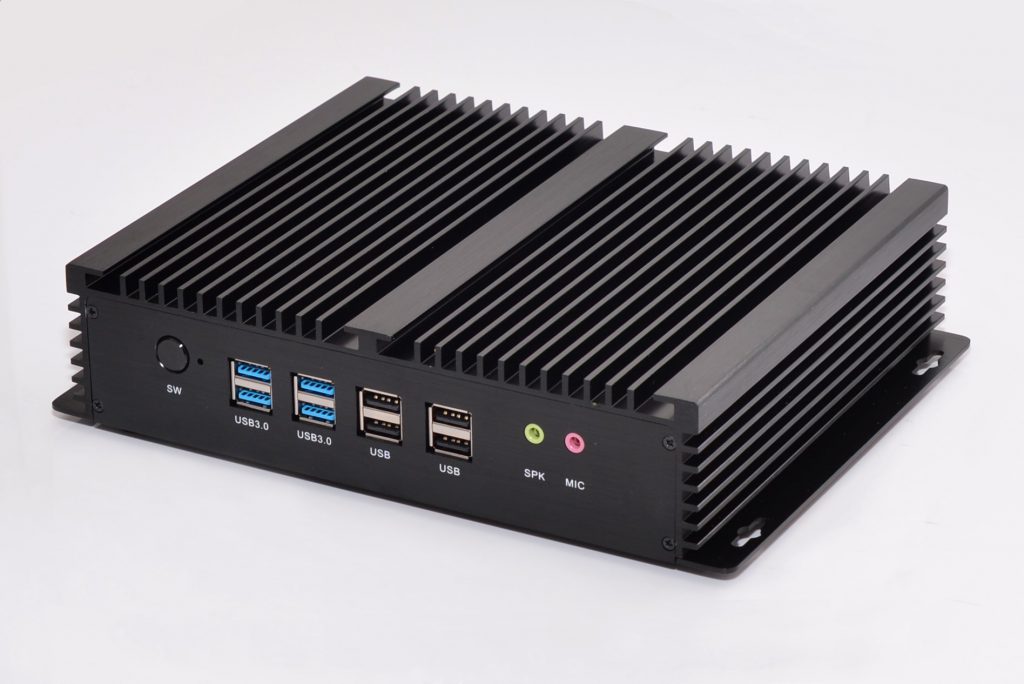
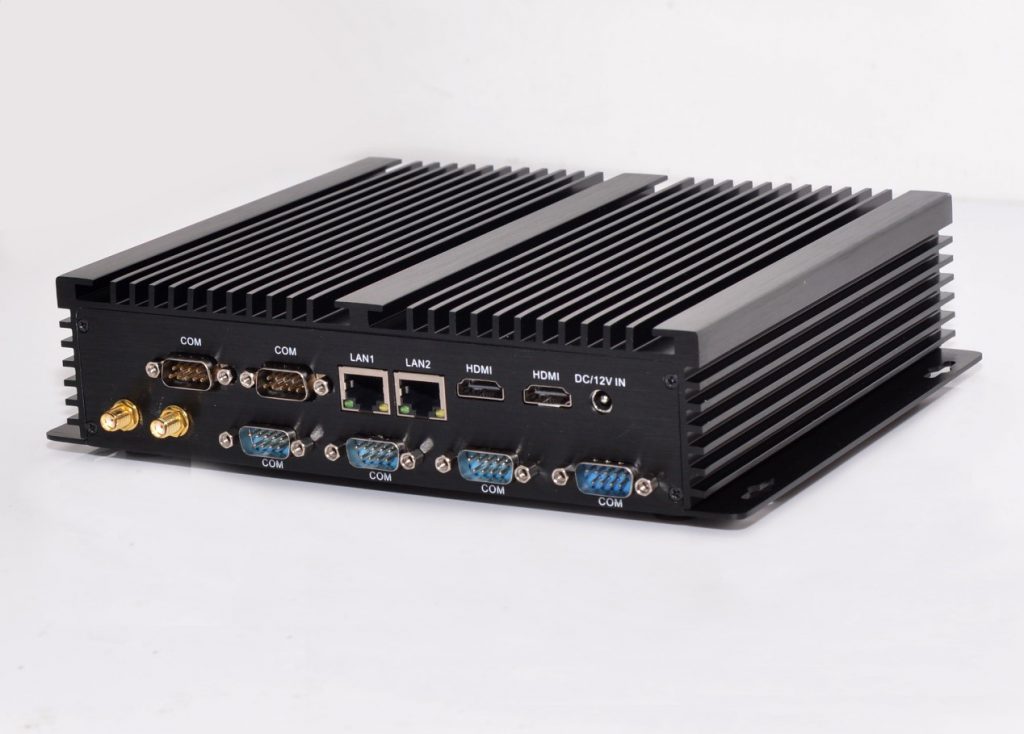
GK-UL is a generation of fanless industrial computer with Intel Core processor and onboard memory. Designed to meet a wide range of demanding environments, the fanless design allows GK-UL to be used flexibly in a wide range of applications in the equipment automation industry. In order to facilitate the customer’s experience, this industrial computer supports 3G/4G wireless network communication, has dual Gigabit Ethernet port, 6× serial port, 8×USB port, which is light and convenient, and meets the needs of customers in different industries.
This industrial computer with external SIM card insertion process is mature, and it can be used freely in high temperature and low temperature environment to ensure that the customer’s machine will work 24 hours a day. It is a rare support for 3G/4G network communication industrial computer in the market.
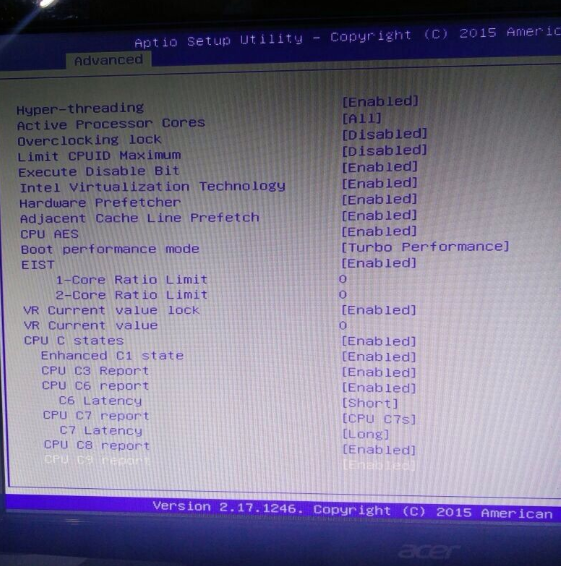
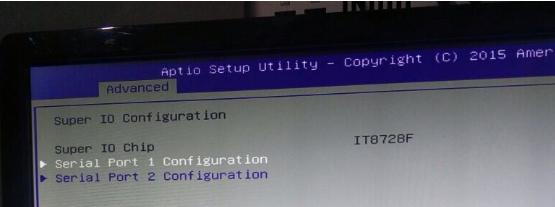
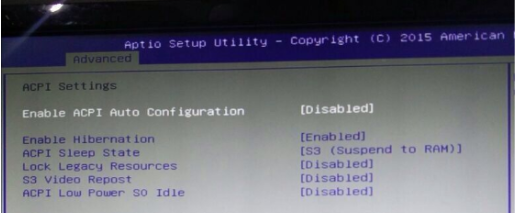
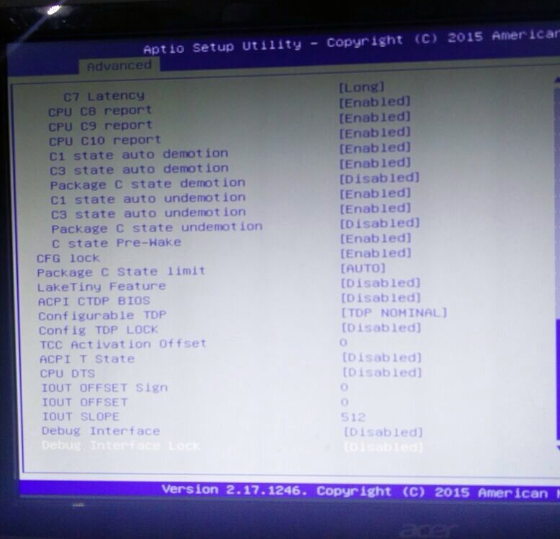
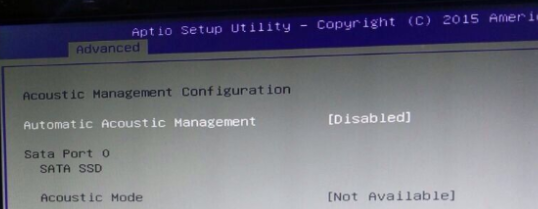
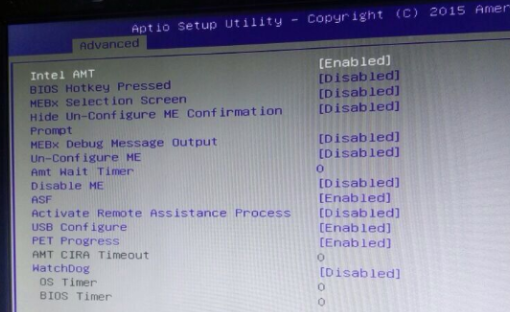
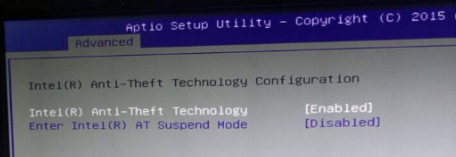
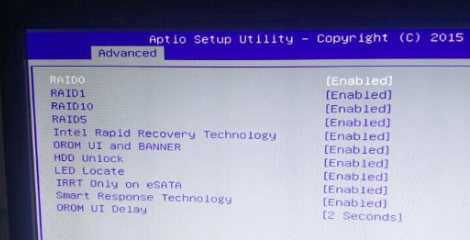
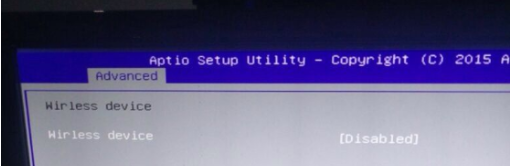
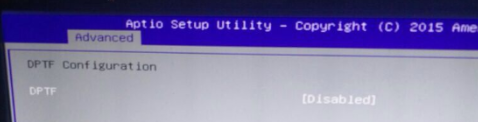
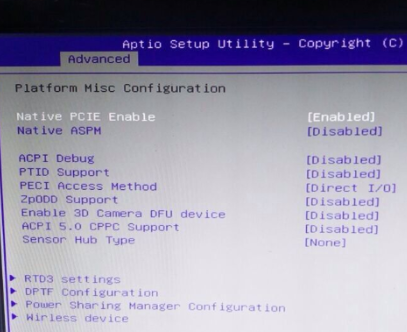
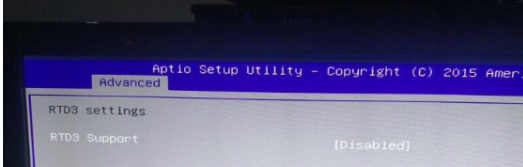
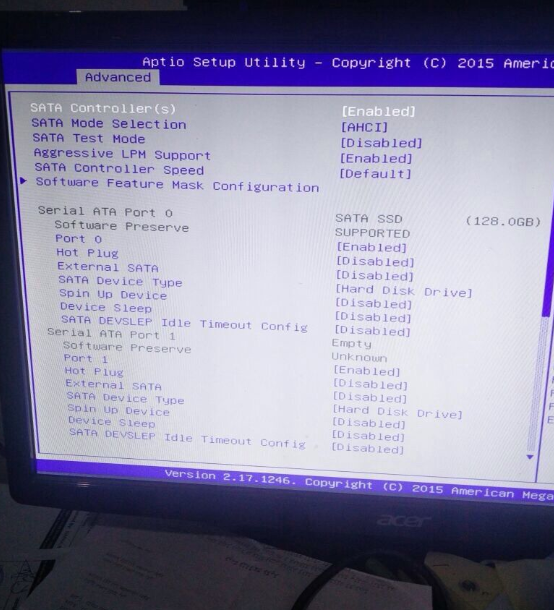
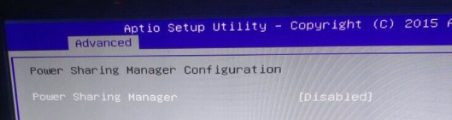
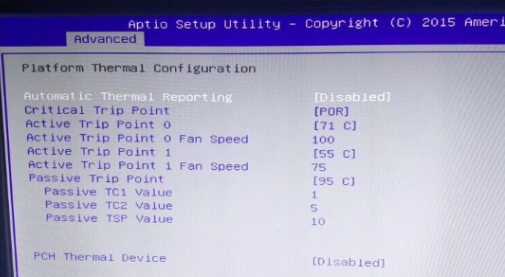
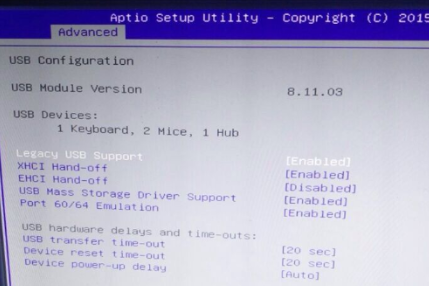
Please go the BIOS and configure BIOS settings as the following pictures: If you don’t know how to into the BIOS, please refer to our previous blog content, which contains the process of how to enter the BIOS.


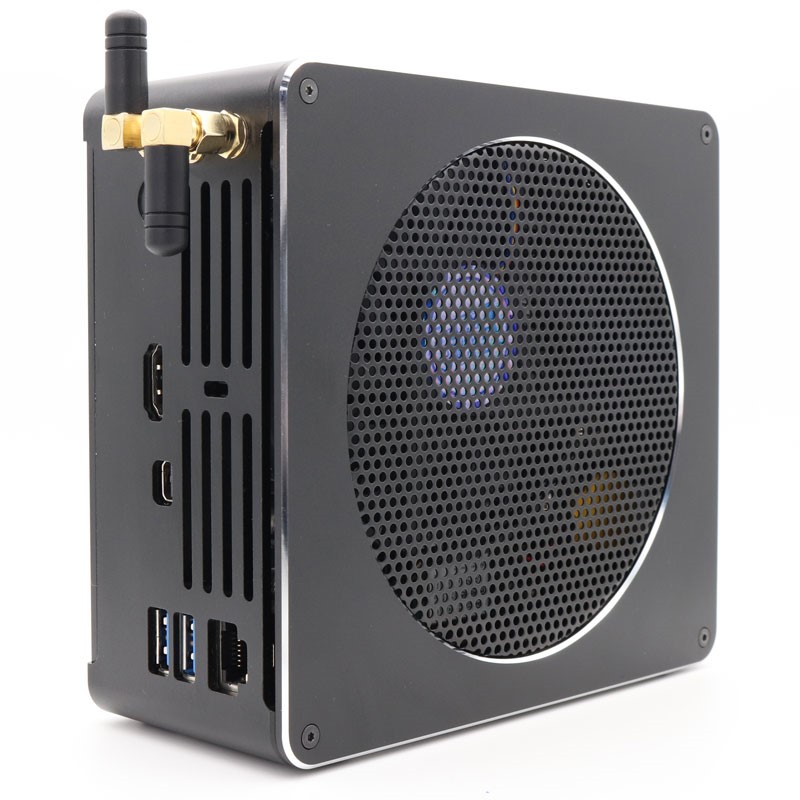
This i9 mini pc was launched at the beginning of this year, which measures 5.6 x 5.3 x 2.5 inches and can be equipped with Intel Core i9-8950HK processor. It can also be equipped with up to 32GB of DDR4 2666 memory and up to 1TB of NVMe SSD.
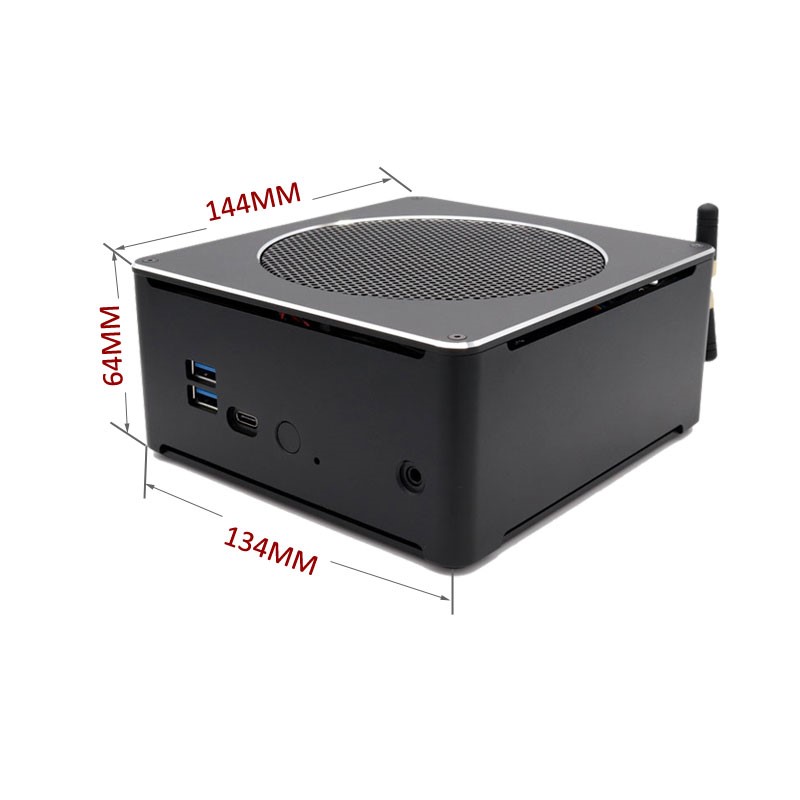
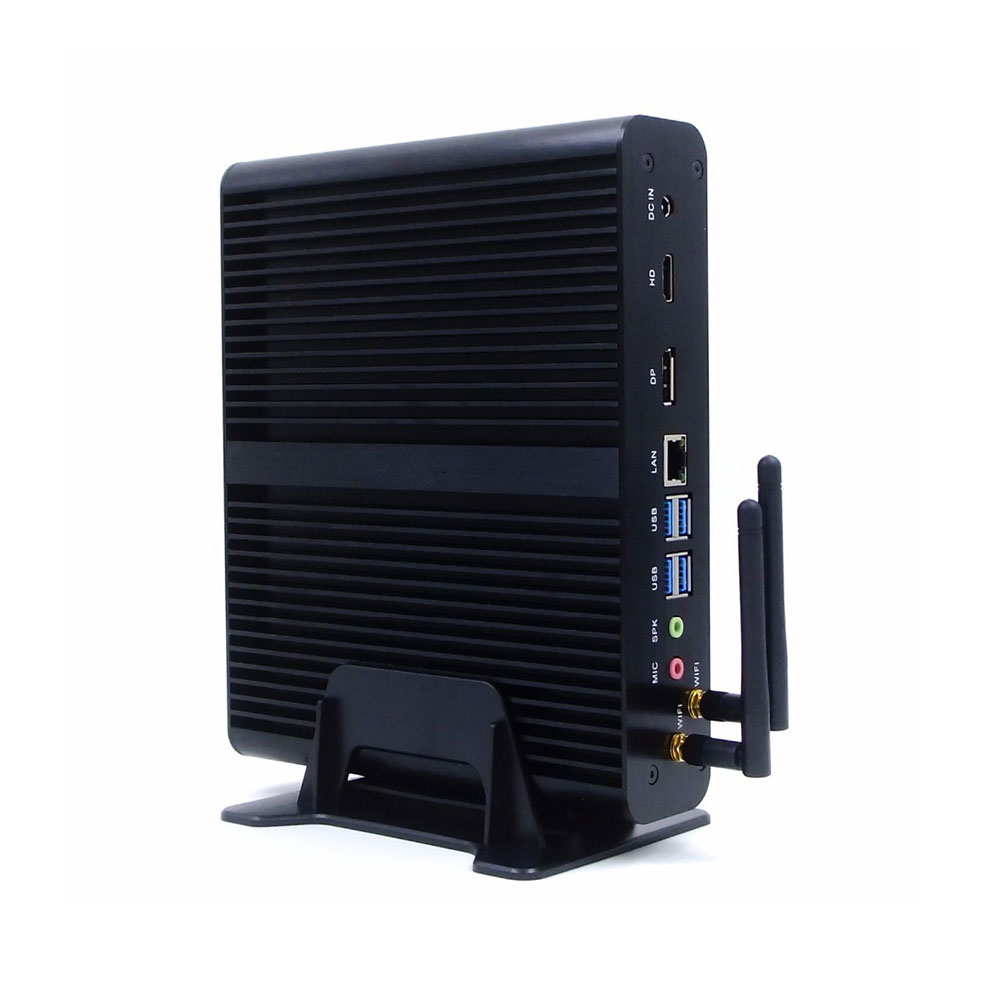
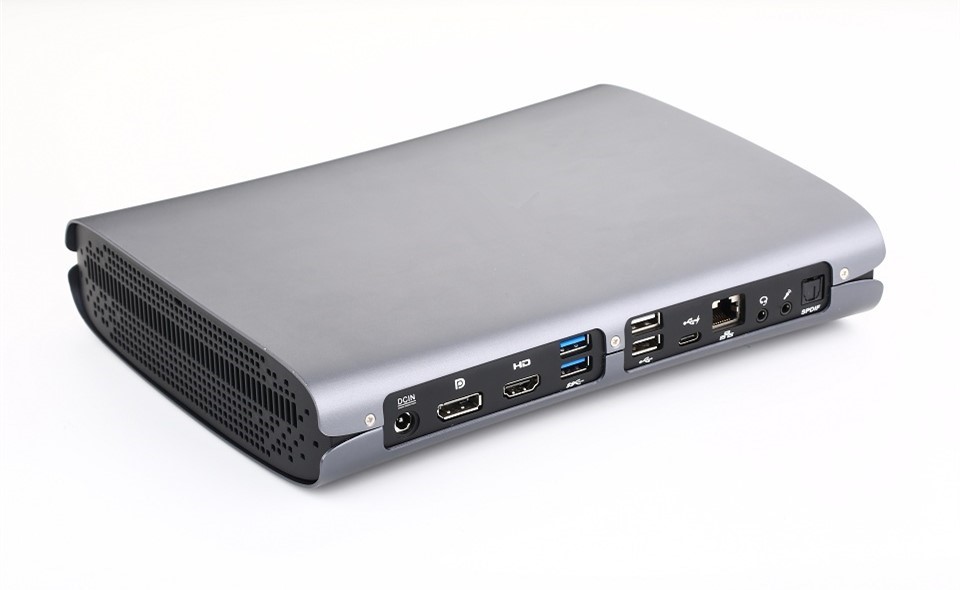
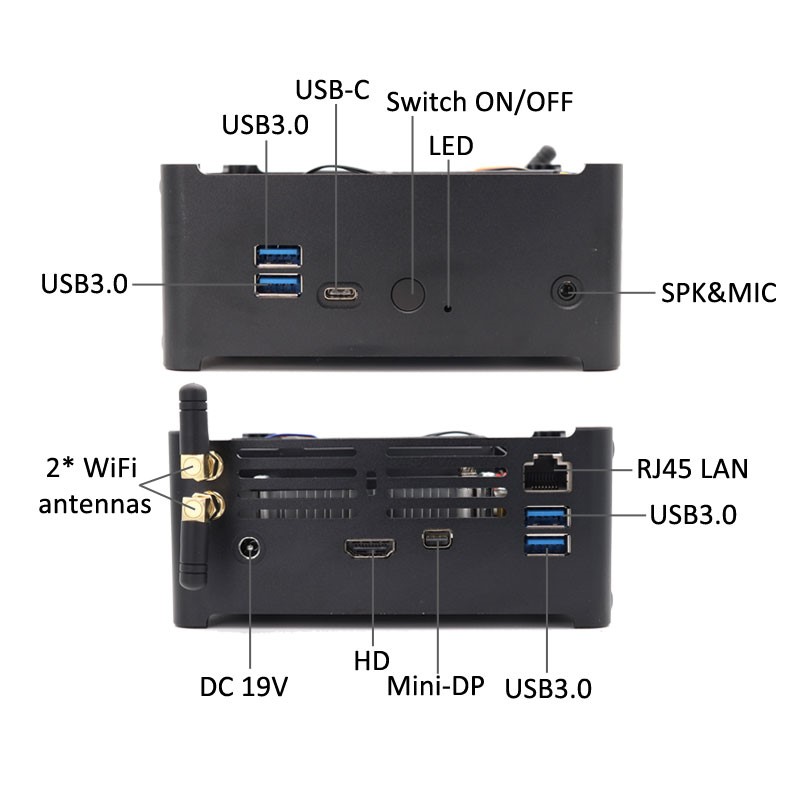
The mini PC has an HDMI interface, a DP interface, four USB 3.0 ports, and a lightning 3 interface. It also has WiFi, Bluetooth and Ethernet interfaces.
i9 mini pcs has a simple design style, super mini body and good performance, fan system with cooling fan, stable heat dissipation. Strict ME tolerance control: Comprehensive tool design and CNC machining achieve good gap control during final system assembly and support PXE, Avar, RTC functions.
Of course, if you feel that the Intel Core i9-8950HK processor is very expensive, then EGLOBAL also offers a cheaper version, such as the Core i5-8300H / i7-8750H / Xeon E-2176M processor. More details you may went to the Eglobal mini pc website: www.pcstationcn.com
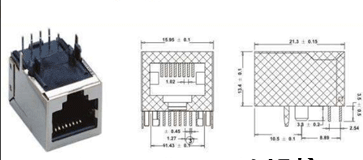
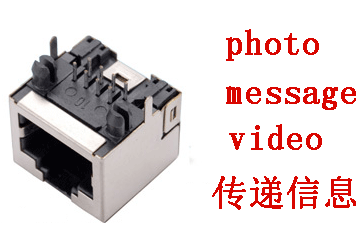
Introduction to the network RJ45 interface:
RJ45 Port: It belongs to the connector and consists of a plug (connector, crystal head) and a socket (module). The plug has 8 grooves and 8 contacts. It is a network signal connector that is used in network devices.
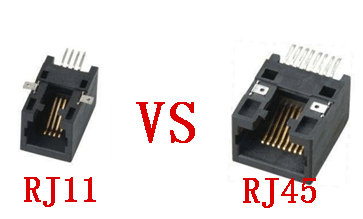
The difference between RJ45 interface and RJ11 interface:
The RJ45 interface is used for network signals, and the RJ11 is used for telephone signals and fax signals. The former is 8 contacts, the connected network twisted pair cable is 8 wires, and the latter is 4 pins and 4 contacts. The two are very similar in appearance, the former is more bulky, the latter is slightly smaller, and the most accurate distinction is more accurate by using the number of contacts as a reference.
RJ45 interface product application:
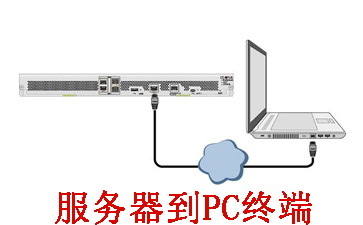
RJ45 interface, also known as network interface. Applications include internal LANs, external network connections, and more. Common RJ45 interface products are: network server, routing cat, hub, personal PC terminal, printer and other equipment.
RJ45 interface industry application:
The RJ45 interface is the most used in the network equipment manufacturing industry, computer PC manufacturers, network printer equipment manufacturers, network system installation architecture industry. In the former, the RJ45 interface will be used in the finished product, and some products of the former will be used in the post-architecture network environment.
The complementarity between RJ45 and RJ11 in the era of network e-commerce:
The wide application of RJ45 interface promotes the development and growth of network e-commerce, and a large-scale sales channel before e-commerce is telemarketing or telemarketing. Information in the e-commerce era conveys more accurate, clear and intuitive products through platform and online communication, making up for the void caused by the latter language description.
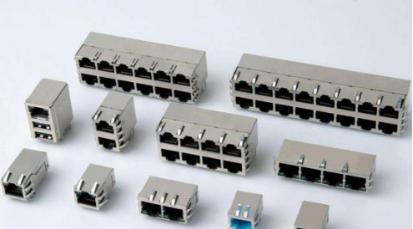
RJ45 interface manufacturers of various types of products:
1. Regular.
2. With lights without lights.
3. Twin RJ45 interface.
4.2*4 RJ45 interface.
5.Other custom RJ45 interfaces.
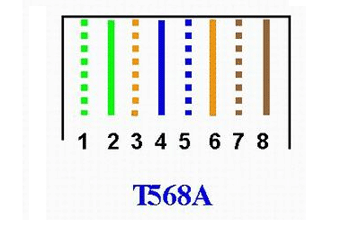
RJ45 wiring diagram:
T568A: 1 white-green, 2 green, 3 white-orange, 4 blue, 5 white-blue, 6 orange, 7 white-brown, 8 brown
Mouth 1: green blue orange brown, light color in front, three five exchange
Mouth 2: white green, white orange blue, white blue orange, white brown brown
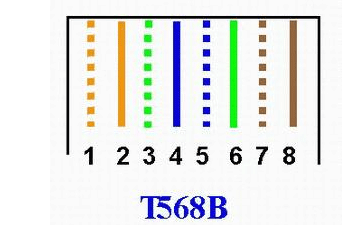
T568B: 1 white-orange, 2 orange, 3 white-green, 4 blue, 5 white-blue, 6 green, 7 white-brown, 8 brown
Mouth 1: orange blue green brown, light color in front, three five exchange
Mouth 2: white orange, white green blue, white blue green, white brown brown
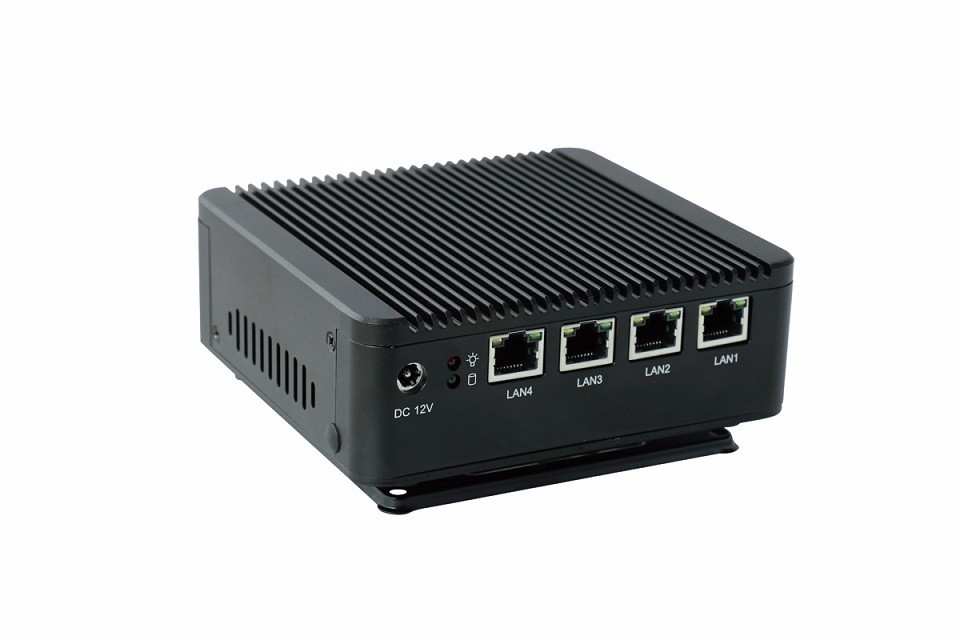
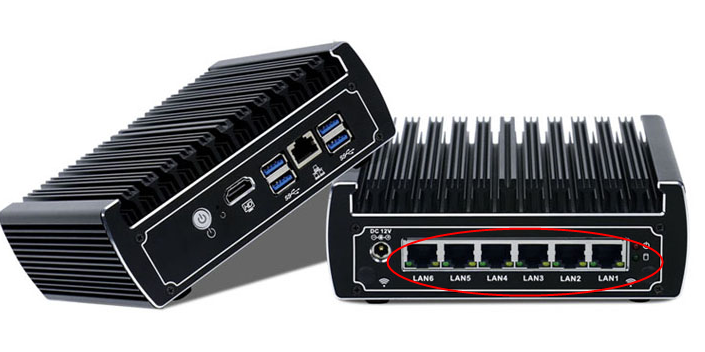
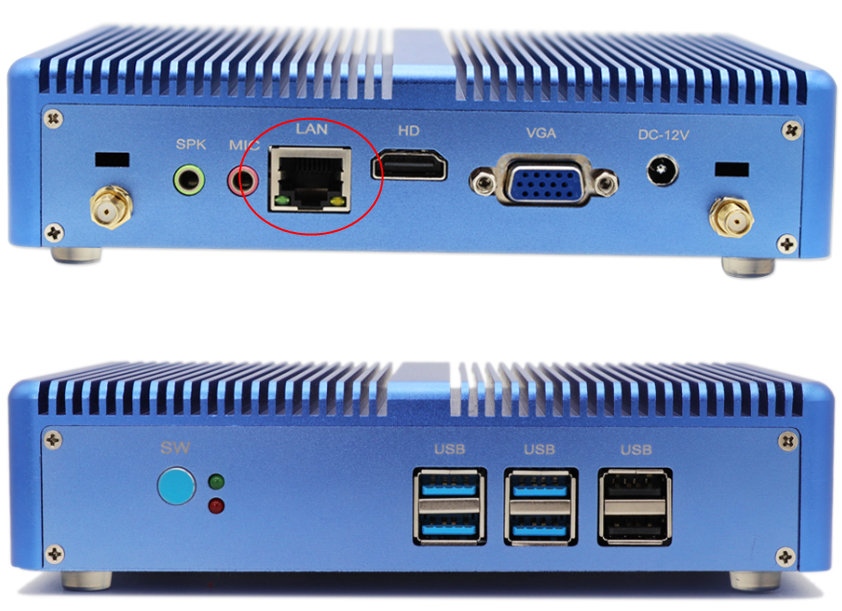
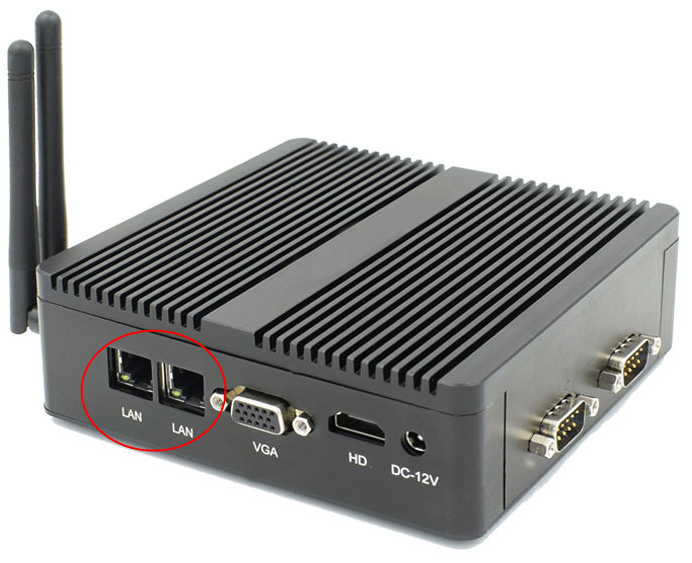
There are many different models of Eglobal Mini Computers with Gigabit RJ45 LAN port. Users can surf the internet after connecting a RJ45 LAN cable with Eglobal Mini Computers you bought. As technology becomes more developed, the Internet seems to be something that people have to do.
RS232 is a standard interface, which is a D-shaped 9-pin. The signal definition of the interface of the connected device is the same. The RS422/RS485 is a non-standard interface, generally a 15-pin serial interface (also a 9-pin interface), and the pin definition of each device is different. RS232 is a 4-wire system with full duplex mode. RS485 is a two-wire system with half-duplex mode.
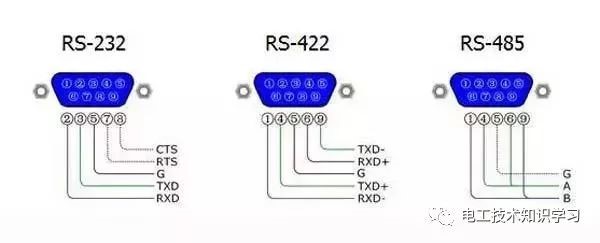
RS232 is designed for point-to-point communication (that is, using only a pair of receiving and transmitting devices). The driver load is 3~7kΩ. Therefore, RS232 is suitable for communication between local devices. 422 and 485 serial interface standards, RS232 and RS422/RS485 are different. The data signal adopts differential transmission mode, also called balanced transmission. It uses a bunch of twisted pairs. In the early PC communication, the maximum transmission distance of RS422 is more common. 4000 feet with a maximum transfer rate of 10 Mb/s.
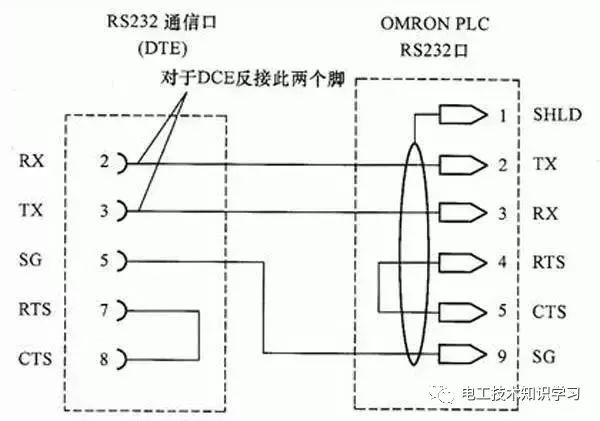
The basic knowledge of RS232 communication: RS232 communication is also called serial communication mode. It refers to the way that the computer uses the serial port cable and the single device (controller) to communicate through the RS232 international standard protocol.
Communication distance: 9600 baud is recommended within 13 meters.
Communication rate (baud rate): The default is 9600 bps, and the common ones are 1200 2400 4800 19200 38400. The larger the baud rate, the faster the transmission speed, but the shorter the stable transmission distance, the worse the anti-interference ability.
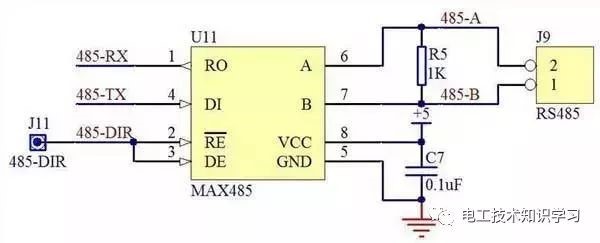
The basic knowledge of RS485 communication: The basic communication mechanism of RS485 and RS232 is the same. His advantage is that it makes up for the shortcoming of RS232 communication distance and can not carry out network management of multiple devices at the same time.
The computer connects multiple 485 devices (access controllers) in turn through the RS232 RS485 converter, and polls the devices on the bus in turn.
The wiring label is 485+ 485-, which corresponds to 485+ 485- of the link device (controller).
RS422 has longer distance and faster transmission rate than RS232 transmission. The transmission rate is up to 10Mbit/s. At this rate, the cable length is 120 meters. If the transmission rate is lower, such as 9000 baud rate, the maximum distance can reach 1200 meters. .
RS422 uses two signal lines per channel, if one is in a logic “1” state and the other is a logic “0”. The circuit consists of a transmitter, a balanced connection cable, a cable termination load, and a receiver. It is stipulated in the circuit that there is only one transmitter and there are multiple receivers, so the point-to-point communication method is usually adopted.
Basic knowledge of RS422 communication: His communication principle is similar to RS485. The difference is that his bus is two sets of twisted pairs (4 lines), which are respectively labeled as R+ R- T+ T-. The disadvantage is that the wiring cost is high and it is easy to make mistakes. It is used less now.
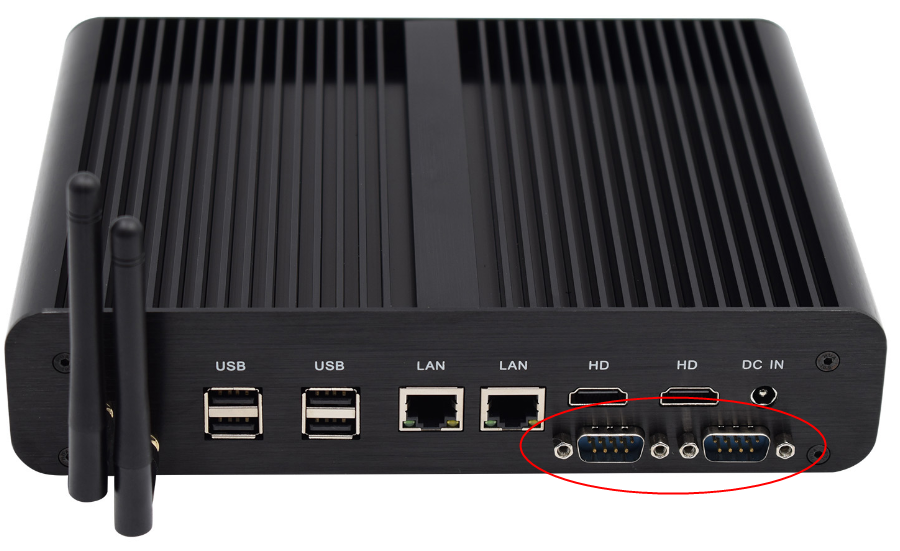
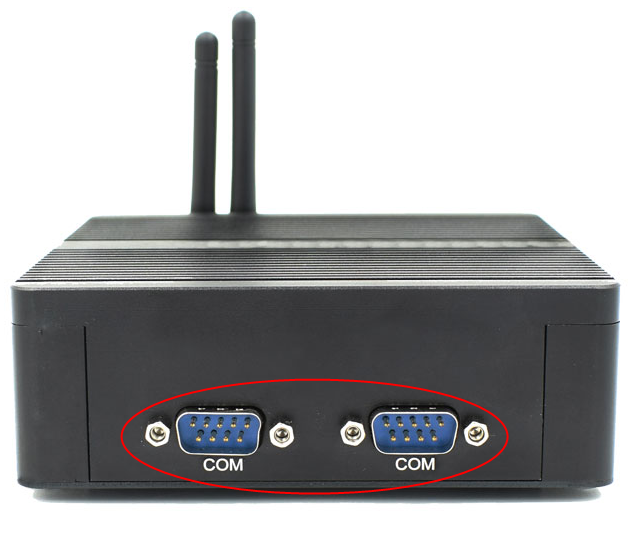
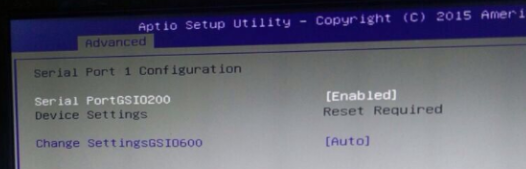
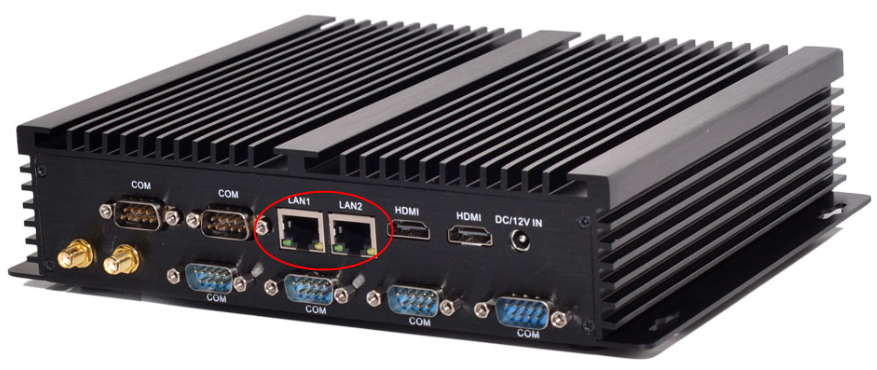
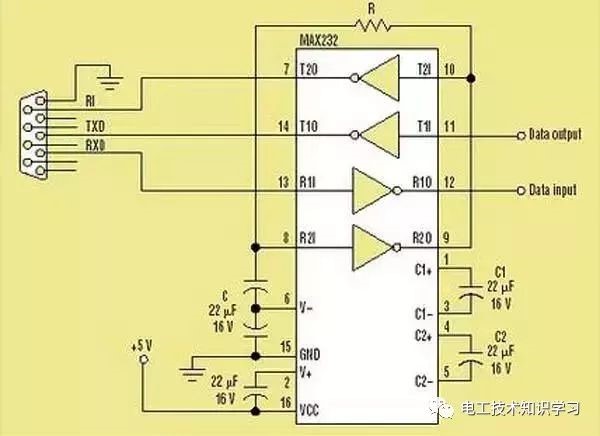
Because RS232 COM port is universal, Most of Eglobal Industrial Mini Computer is with the RS232 COM port like the following pictures shown. The Mini PC can support the adapter RS232 to RS422/485 if you need the RS422 or RS485 port.