How to install the 1037U system using the USB driver

Step 1: Make a bootable flash usb driver as the following pictures

Install the software “make bootable USB software.exe ” on your computer, then open it to make the bootable flash usb driver.

The important step: Copy the xp.gho to the usb dirver

Step 2: Use your UBS driver into the PE system

Put your USB driver on your mini pc that you want to re-install the system, then turn on your mini pc and press “F11” then you will see the picture:

Select your USB Driver like “SinDisk Curzer Edge 1.27” then press “Enter”

Re-start your computer after above steps finished.

Video – How to assemble EGLOBAL Fanless Mini PC M3 serial

Usually we assemble a complete Mini PC well for our customers, but a few customers ask us to send bulk packaging to them in order to avoid high customs tax at local. If you don’t know how to assemble welcome to copy the demonstration video link of EGLOBAL Mini PC M3 serial for your reference.

Step 1: https://youtu.be/FxlMGwR17jE

Apply a few thermal grease between heat sink and motherboard is an important step. Fix the motherboard on the EGLOBAL Mini PC case by screws.

Step 2: https://youtu.be/3nNzaCkLKzQ

Fix the motherboard on the EGLOBAL Mini PC case by screws and install the case frame well.

Step 3: https://youtu.be/tyf12_XIFg8

Install the WiFi RF cables, you shall use the WiFi washer and WiFi screws to fix the two external WiFi antennas.

Step 4: https://youtu.be/PO3F9W68klU

Install the WiFi module, RAM and Storage on the correct slot of this motherboard.

You will recognize M.2 SSD: why some M.2 SSD have two notches?

Before MSATA SSD and SATA HDD/SSD are often used for traditional desktop computers or nowadays smart mini pc. Since technology is developing gradually, more Eglobal Barebone Mini PCs with M.2 SSD slot are coming out. You will learn more about M.2 SSD after reading the article and know how to match the proper M.2 SSD on our Eglobal Barebone Mini PCs.

As we know M.2 is a new SSD slot, but not all M.2 slot can install different kinds of SSDs. Why some M.2 SSDs have two notches, some have one notch? Let us know more about that.

M.2 2242 and M.2 2280 are usually used for most of M.2 modules. In addition, M.2 also provides a variety of standard specifications. A basic principle is that the small size can be installed in a large volume slot, and the M.2 2242 is more flexible than the M.2 2280.

Not all M.2 slots are used for SSDs, for example the M.2 E Key slot in the following picture is reserved for wireless module. You will find the location of E key is different from the B Key on a common SSD if you observe carefully. The M.2 slot is the location of the notch to express the type of M.2 device that it can support.

The common M.2 SSDs have two types: one notch(M Key) and two notches(B Key). From top to bottom, Toshiba RD400 NVME SSD, Toshiba Q200 240G M.2 SSD and Toshiba RC100 NVME SSD, are respectively corresponding to PCIE NVME, SATA AHCI and PCIE NVME interfaces. That is to say, the two notches of the M.2 SSD may be either the NVME protocol or the SATA protocol, and one notch(M Key) is usually possible with the NVME protocol only.

Corresponding to the SSD, there are some differences in the position of the bayonet on the M.2 slot. The figure below compares the two most common M.2 slots: Socket 2 and Socket 3. Socket 2 supports PCIE x2 or SATA, while Socket 3 supports PCIE x4 or SATA.

The conclusion is clear now. Due to the limitation of the slot, the SSDs with two notches(B+M Key) can be installed in the M.2 slot of Socket 2 or Socket 3, and the SSDs with one notch ( M Key) can be installed into the Socket 3 only.

The SSDs with two notches can only support PCIE x2, which will limit the continuous read and write bandwidth, but the 4K random read and write performance that determines the daily performance is not affected.

Although the PCIEx2 has limited performance, there are also excellent products. For example, Toshiba’s mini NVME SSD – RC100 uses the B+M Key, while maintaining excellent compatibility, the 4K random read speed reaches 58.55MB/s, which is consistent with the high-end flagship NVME SSD.

Benefiting from the dual bayonet features of the B+M Key, the RC100 can even be installed in the M.2 2242 slot reserved for the 4GB wireless module(B Key) and works normally. Players already use them in the Thinkpad T470p and other models. This particular usage was verified.

In summary, starting from the ultimate performance, M.2 NVME SSDs with a notch(M Key) is the strongest(not 100% certain, depending on the main control specification); from the compatibility, M. 2 SATA SSDs with two notches are better (such as Q200 M.2); for both performance and compatibility, M.2 NVME SSDs with two notches(such as RC100) are ideal.

Guide-How to setup AWAL( auto power on) on EGLOBAL Mini PC Computer

Not every EGLOBAL Mini PC Computer support AWAL function, please check with our sales person to confirm before placing the order. Some customers will use AWAL function of EGLOBAL Mini PC Computer, how to setup? Please kindly refer to the following steps and the video link on YouTube: https://youtu.be/ZwVLJQ_BFtQ

1. Press ” Delete ” to enter BIOS when starting the PC;

2. Select “ Chipset ” and Press “ Enter ” into “PCH-IO Configuration” ;

3. Select “ Restore AC Power Loss ” and setup “ Power on ”;

4. Press “ F10 ” and Select “ YES ” to save the setting and re-start the machine.

Welcome to subscribe to ” Eglobal Technology Co., Limited ” on YouTube or Facebook.

How to find the minicomputer NIC Driver and install the NIC driver

How to find the minicomputer NIC Driver

Method 1

1.Right click on My Computer Select Management – if there are some simple systems, click Device Manager directly if there is a device manager option, or select Manage if there is no Device Manager option.

2.Click Device Manager

3.Click the arrow on the left side of the network adapter – expand, you can view the NIC Driver, if it is an exclamation mark, it means that the NIC driver has not been installed. If it is displayed normally, it means that it is installed (normal).

Method 2

1.Right click on my computer to select properties

2.Directly click on the device manager to directly view the network card driver

Method 3

1.Using the hot key, win+R key combination

2.A command window pops up in the lower left corner, enter “devmgmt.msc” in the address bar and press Enter to pop up the device manager window.

Install the NIC driver

Method 1

Under the premise, the minicomputer has an optical drive and a network card drive CD, directly put the CD and click to install the driver file.

Method 2

View the NIC driver model, download the driver file of the corresponding model on another networked minicomputer, download it to the U disk or move the hard disk, and transfer it to the minicomputer for installation.

How to turn off ACPI on your minicomputer

ACPI is actually a power management standard. ACPI is an acronym for Advanced Configuration and Power Interface. It is generally translated into advanced power management. It is a power management standard jointly developed by Intel, Microsoft and Toshiba.

What is the use of ACPI?

   ACPI is part of Windows (starting with Win98). It helps the operating system to properly control and allocate the power of computer hardware devices. With ACPI, the operating system can shut down different hardware devices as needed according to the actual situation of the device. For example, in Win7 or Win8 system, when the system sleeps, the system stores the current information in the memory, and only keeps the power of several key components such as memory, so that the computer is in a high power saving state.

ACPI is powerful, enabling device and processor performance management, configuration/plug-and-play device management, system events, temperature management, embedded controllers, and SMBus controllers.

ACPI indicates that the advanced configuration and power management interface ACPI can achieve the following functions: 1. The user can make the peripheral switch at the specified time; 2. The user who uses the laptop can specify that the computer enters the low power state under low voltage to ensure Important applications run; 3, the operating system can reduce the clock frequency when the application time is not high;

4, the operating system can allocate energy according to the specific needs of peripherals and motherboards; 5, when no one uses the computer can make the computer into a sleep state, but to ensure that some communication devices are turned on; 6, plug and play devices are inserted

How to copy large files to a USB flash drive?

Do you have such an experience? I want to copy a large file to a USB flash drive. It is obvious that there is a considerable capacity in the USB flash drive. When copying, it always prompts that the file is too large to be transmitted. Today I will teach you how to copy large files into a USB flash drive. Two methods are introduced. The first method will lose the data in the USB flash drive. The second method will not lose the data in the USB flash drive.

Key points: The format of U disk is commonly FAT, FAT32, NTFS and exFAT. The default format of the USB flash drive is FAT32, and the FAT32 format does not support storing a single file larger than 4G, so we only need to convert the format of the USB flash drive to NTFS.

The operation method is as follows

Method 1

1. Right click on the U disk and select “Format”

2. Select “NTFS” at the file system.

3. Click on “Start”

4. Click “OK”.

5. Click “OK”.

6. Copy large files to the U disk now.

Key points: This method is easy to operate, but all the contents of the USB flash drive will be cleared when formatting.

Common ways to solve Minicomputer blue screen

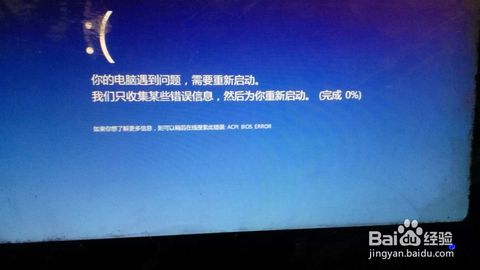
In the process of using the computer, the most annoying color is the “blue”. Sometimes the sudden blue screen is just a crash. In fact, the computer blue screen is also a common phenomenon. There are many factors that cause the blue screen of the computer. Today I will give the corresponding solution for the common blue screen of the computer. I hope that it will help everyone, and I hope that these codes will give you some inspiration, so that you can prevent the blue screen of the computer in time.

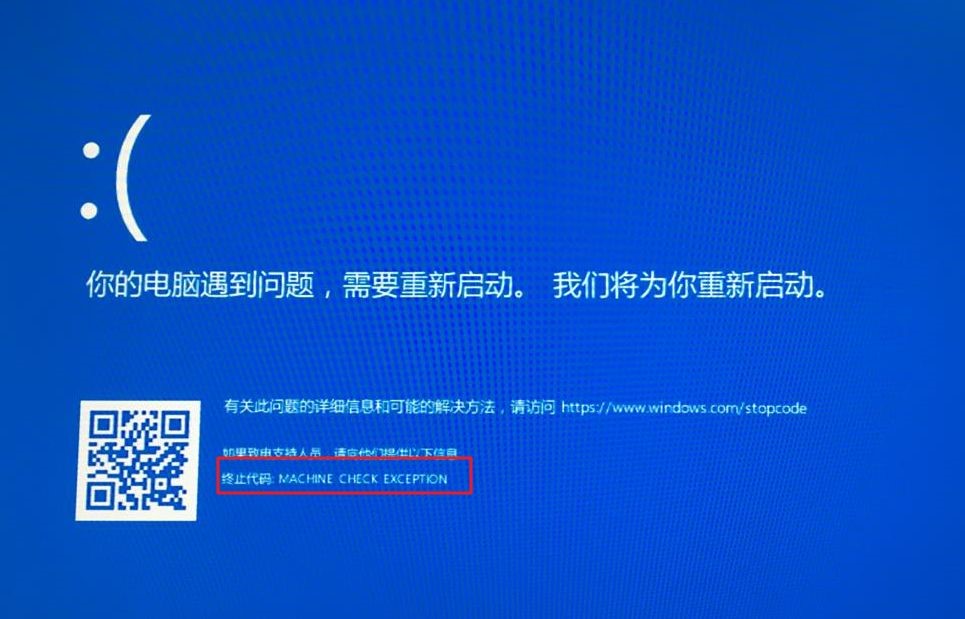
Blue screen code 1: MACHINE-CHECK-EXCEPTION

Cause analysis: The CPU is too overclocked.

Solution: Start the auto-repair program and restore the CPU to the factory frequency after fixing the system error. Don’t overclock, it’s best not to use software with too much capacity or software that tests CPU overclocking.

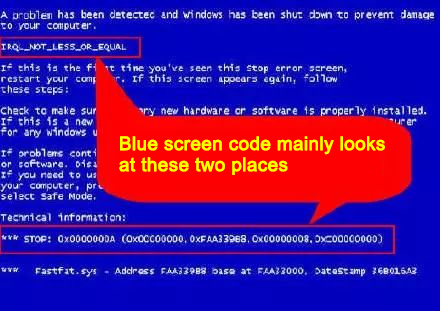
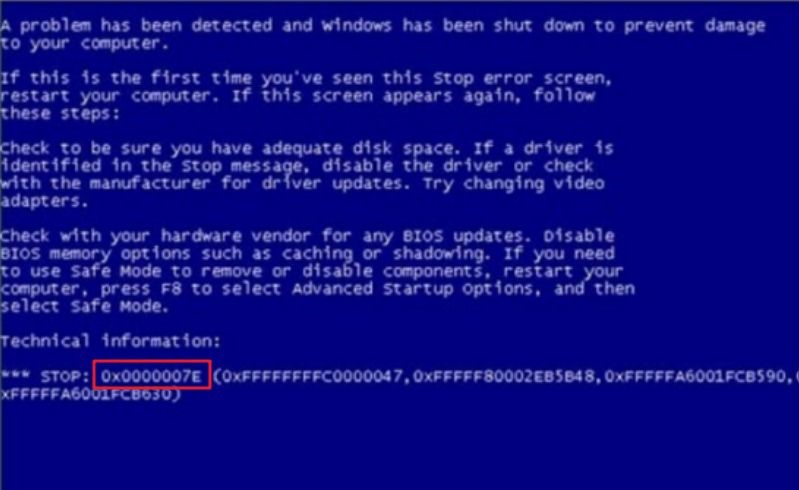
Blue screen code 2: 0X0000007E、0X0000008E

Analysis of the cause: Generally, it is caused by viruses, memory damage or poor contact.

Solution: Press F8 to enter safe mode, the system will be disinfected, or you can try to re-plug the memory. Generally, the memory damage probability of this code is not large.

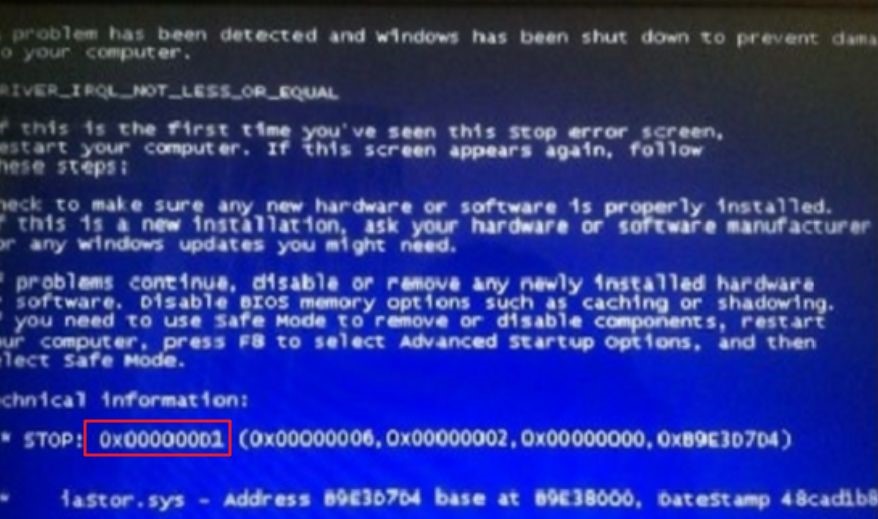
Blue screen code 3: 0X000000D1

Analysis of the cause: Generally it is related to the graphics card, which may be caused by the damage of the graphics card or the installation of a less compatible graphics card driver.

Solution: Try to download a graphics card driver installation on the official website. If it still doesn’t work, the host has an integrated graphics card, try it with an integrated graphics card, or directly unplug the graphics card.

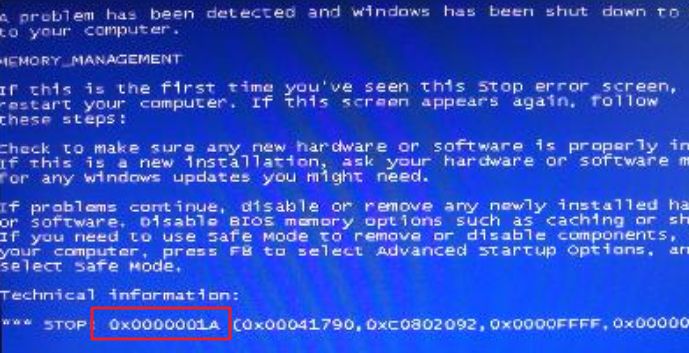
Blue screen code 4:0x0000001A

Analysis of the cause: Some of the brand-name memory modules are heated.

Solution: Change the memory stick to solve.

Step 1: to eliminate hardware failures and memory failures, starting from the memory stick, in the case of ensuring that the memory is not damaged, remove the memory strip and wipe it, then plug it in again to solve;

Step 2: If you are using two memory modules, you can try to unplug one of the memory modules.

Step 3: If it has not been solved, check whether the hard disk is faulty, check if there is a problem with the data cable, and then try to format the hard disk. In addition, if the video card is damaged, it may also cause.

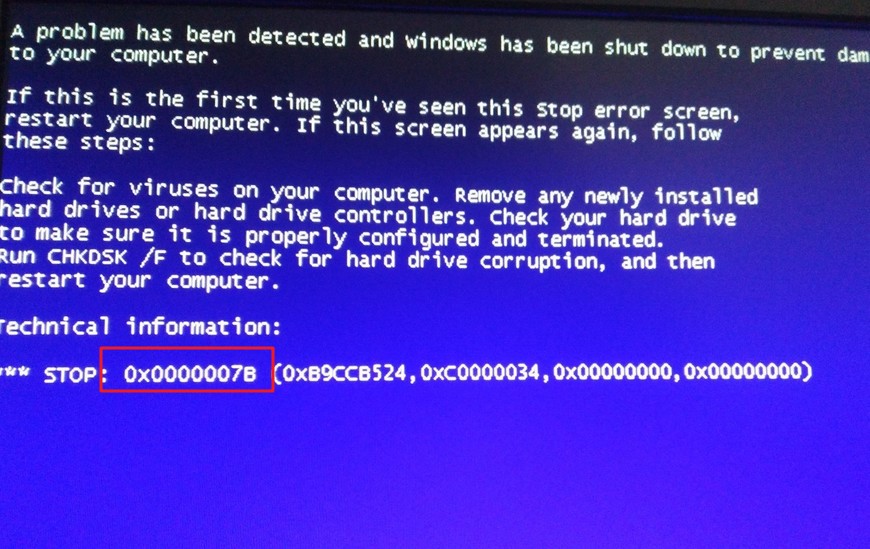
Blue screen code 5:0x0000007B

Cause analysis: Error due to system boot.

Solution: You can try to change the hard disk mode, or go to the PE to repair the system boot.

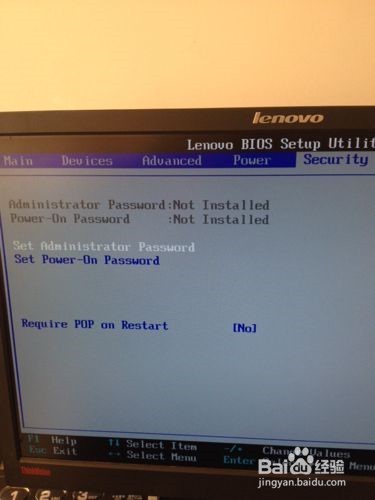
Step 1: restart the computer, press the shortcut key F1, F2 or Del key after the boot screen appears (different computers enter the bios shortcut keys are not the same, the general boot interface will prompt) enter the bios startup item setting interface, through the keyboard Use the left and right arrow keys to move the cursor to “Advanced”, then press the up/down direction key to select “SATA Configuration” and press the Enter key to confirm.

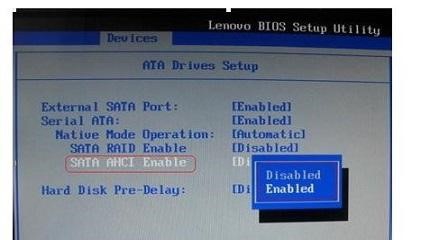
Step 2: A mode selection window will pop up. Here we use the up and down arrow keys to move the cursor to select the “AHCI” mode, and then press the Enter key to execute.

Step 3: After completing the above two steps, just press F10 to save the changed settings. When the computer restarts and enters the system loading screen again, we will find that the blue screen error code 0x000007B is no longer displayed. Most of the problems with this blue screen are caused by the non-compliance of the hard disk mode in the bios settings with the current system.

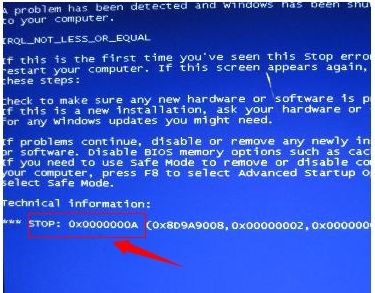
Blue screen code 6:0x0000000A

Analysis of the cause: There is a conflict in the computer driver, and there are more problems with the graphics card and the chipset.

Solution: Enter safe mode, delete the latest updates and installed graphics card and motherboard drivers.

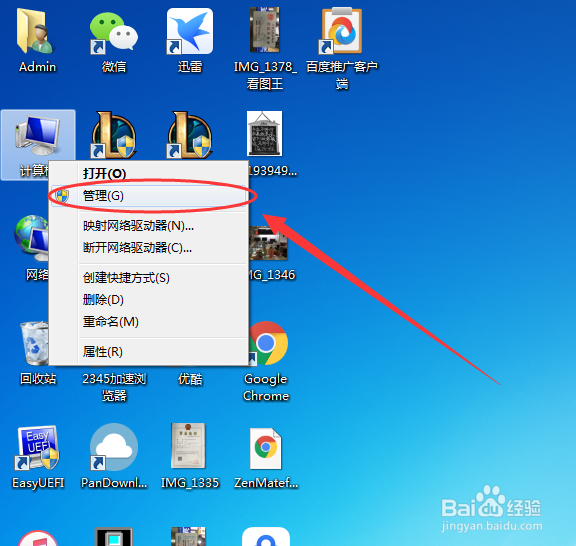
Step 1: Return to the desktop interface of your computer, then right-click on the desktop computer icon and select Manage Options from the Sliding menu.

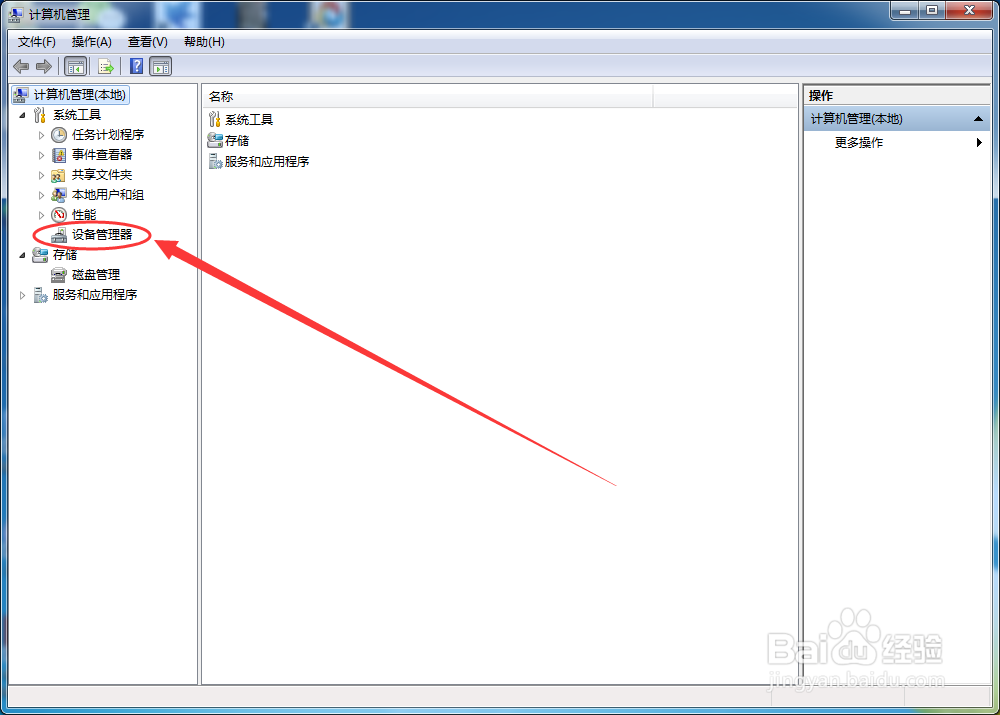
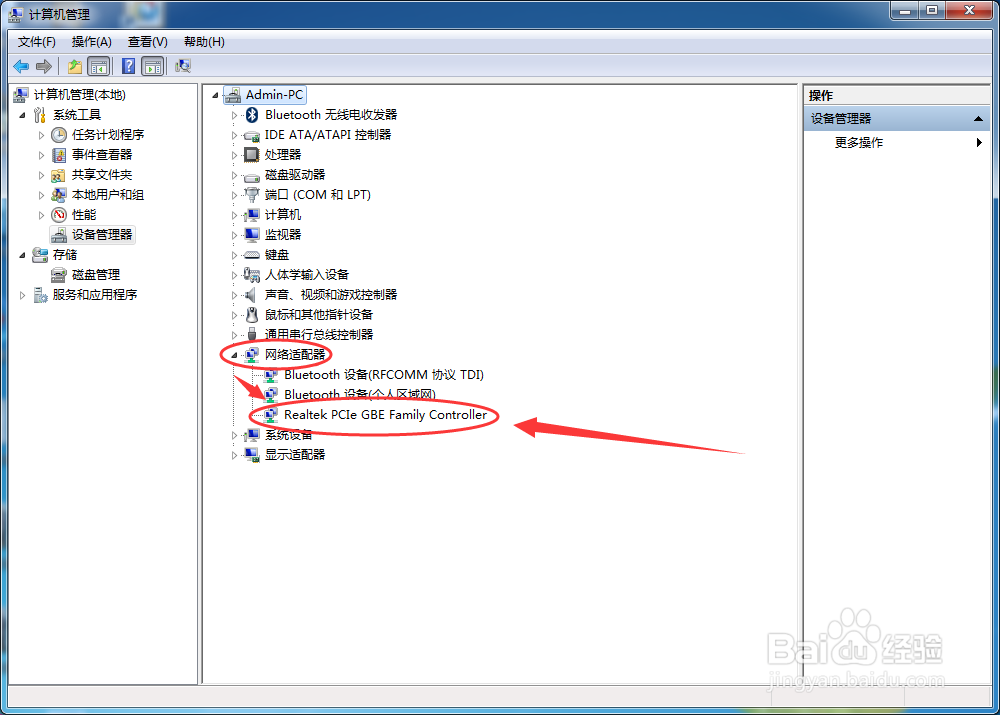
Step 2: In the open computer management interface, click Event Viewer – Manage Event Summary in the left window to determine which driver is the fault. After determining the faulty driver, manually uninstall the driver. That’s it. If it is a computer compatibility problem, we can use the system diagnostic tool to check whether the hardware and driver are compatible with the system, and then re-set its compatibility.

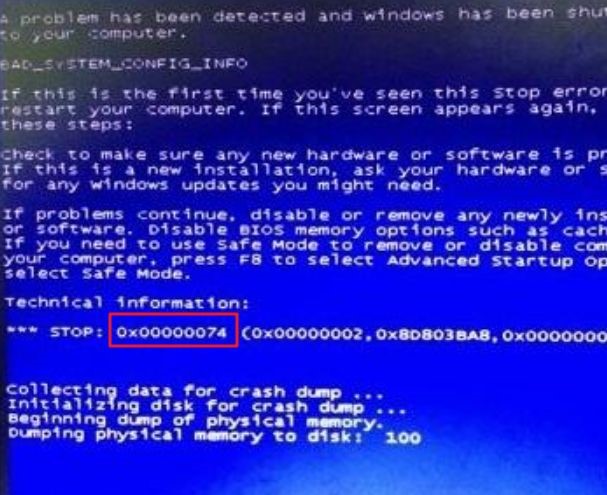
Blue screen code 7:0x00000074

Cause analysis: Indicates that the registry has an error. This error can occur if the system module is corrupted. This error can also occur if some of the registry’s key key values are missing. This may be the result of manually editing the registry.

Solution:

(1) At startup, press F8 to enter “Enable Debugging” for debugging.

The system is shut down, press F8 when booting, enter the advanced startup interface, “Troubleshooting > Advanced Options > View More Recovery Options > Startup Settings > Restart”, then the page will jump to the “Startup Settings” interface, press F1 “Enable” Debugging, the system enters the system in debug mode and can then be debugged.

(2) If it is invalid, please backup the data in advance, then press or press F10 at boot time to restore the computer to the factory state by using the system to restore the factory function.

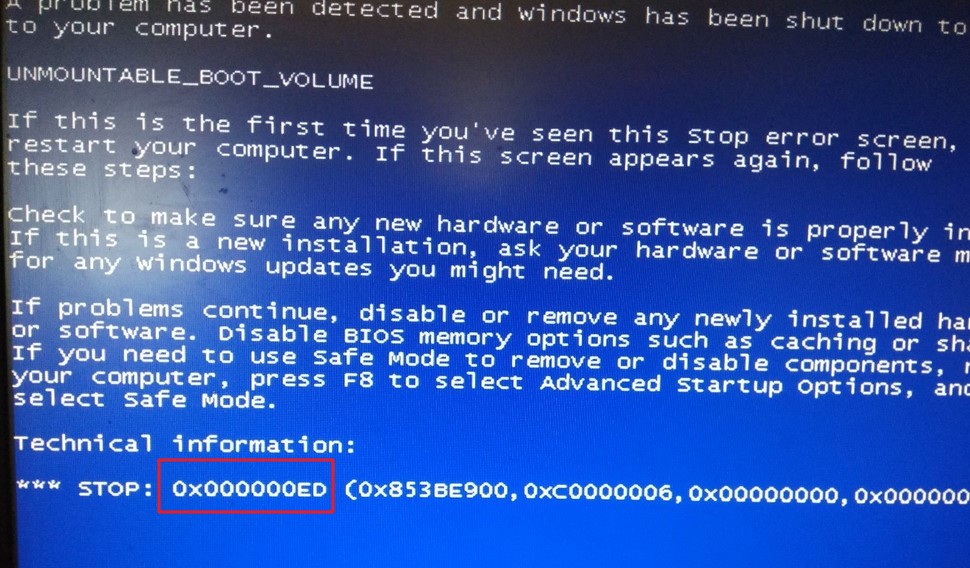
Blue screen code 8:0X000000ED

Analysis of the cause: The fault is mainly related to the hard disk and the system. The probability of system damage is large, and the probability that the hard disk is really bad is relatively small, and there may be a problem with the volume.

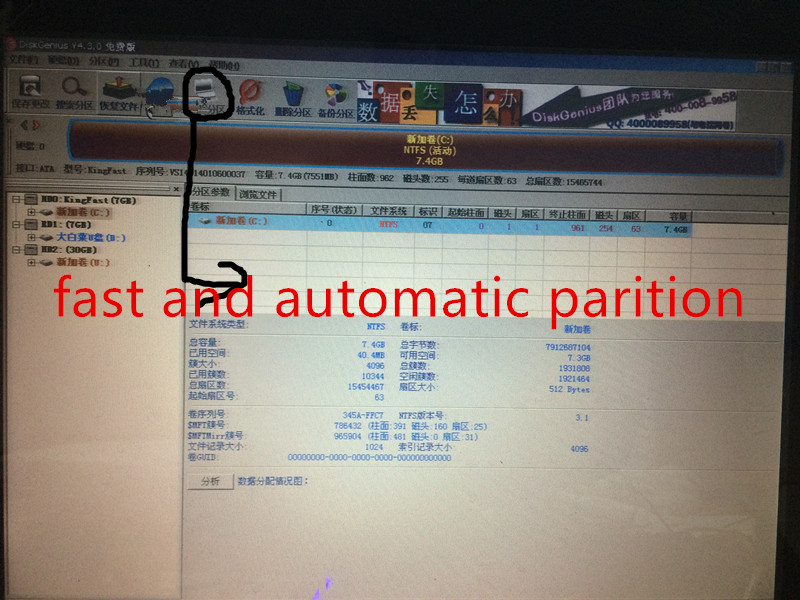
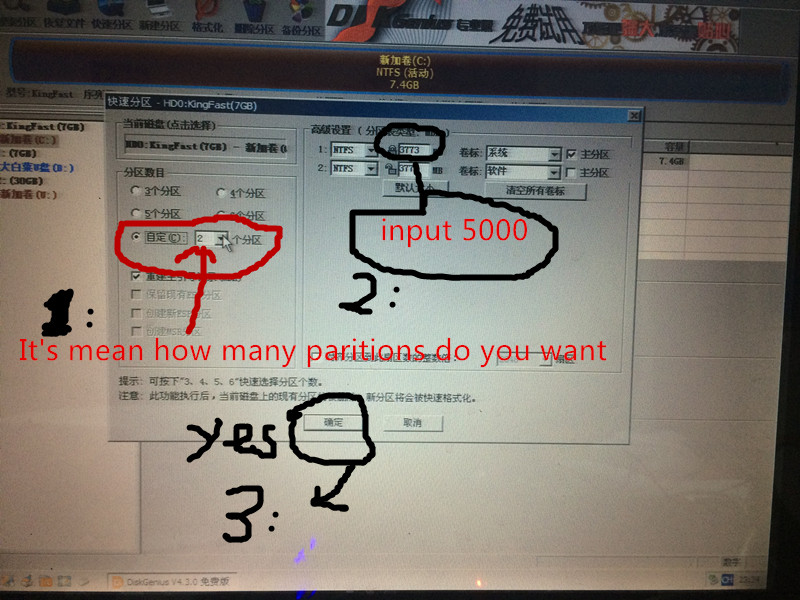
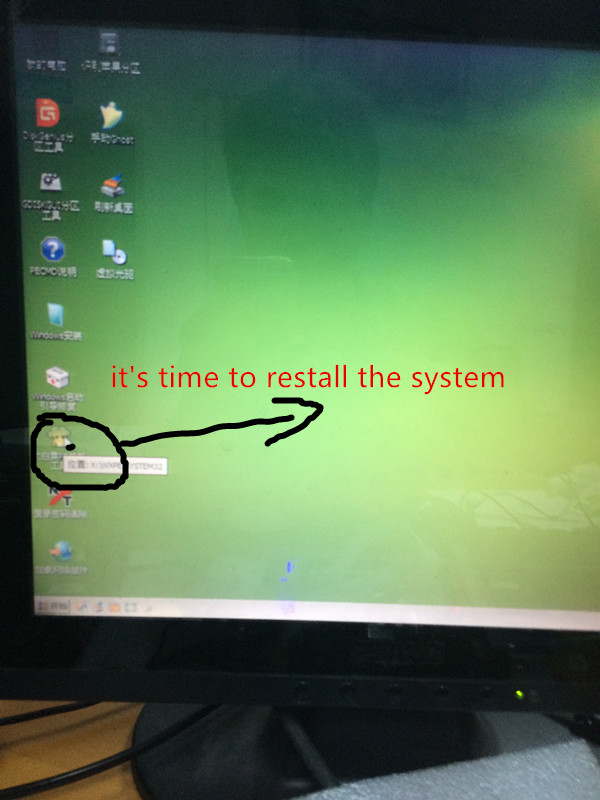
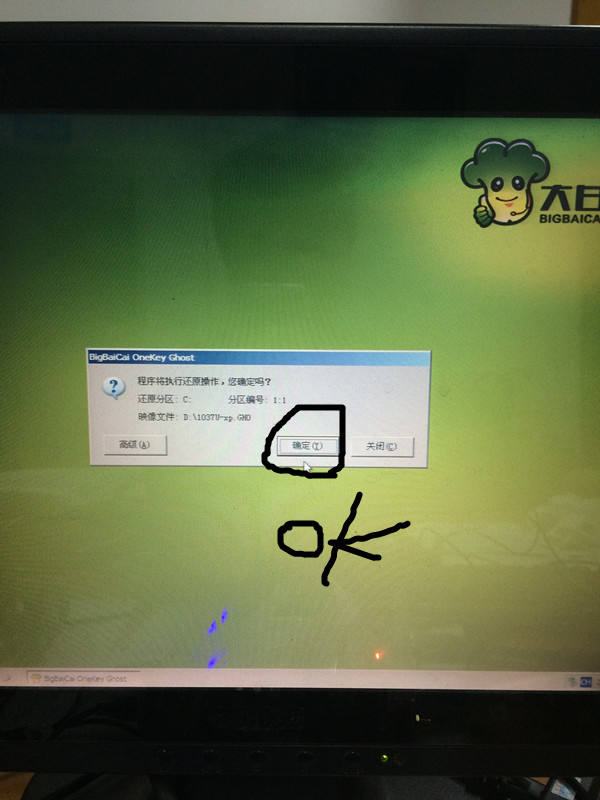
Solution: Reinstall the system / replace the hard drive.

The above is a more common computer blue screen solution. In short, the blue screen code is tens of thousands, safe to use the first! If you don’t have any blue screen code above, then please contact our after-sales staff.

How to change the minicomputer desktop path?

The default desktop path of the minicomputer is usually on the C drive, and we especially like to put the files on the desktop, because the desktop is convenient and easy to find. For a long time, more and more desktop files will be available, and the C disk space will become smaller and smaller, which will slow down the system. How to set the system desktop path to a non-C drive? This tutorial will be explained for everyone.

1. Double-click “Computer or this computer” on the desktop

2. Right click on the “Desktop” and select “Properties”

Key points: If you are a Win7 system, please find the user folder on the system disk (C drive), and find the desktop folder under the folder of your own username. The default path is C:\Users\Administrator\Desktop

3. Click on “Location” to change the disk placed on the desktop (I want to place the desktop on the D drive, change C directly to D) and click “Apply”.

4. Click “Yes”

Key points: If you are a Win7 system, please find the user folder on the system disk (C drive), and find the desktop folder under the folder of your own username. The default path is C:\Users\Administrator\Desktop

5. Click “Yes”

6. We smoothly moved all the files on the desktop to the D drive, so that we can safely save the files directly to the desktop.

Key points: In fact, the space in the C drive only affects the running speed of the computer system, because our system is installed in the C drive, but it doesn’t matter if the computer card is not stuck!