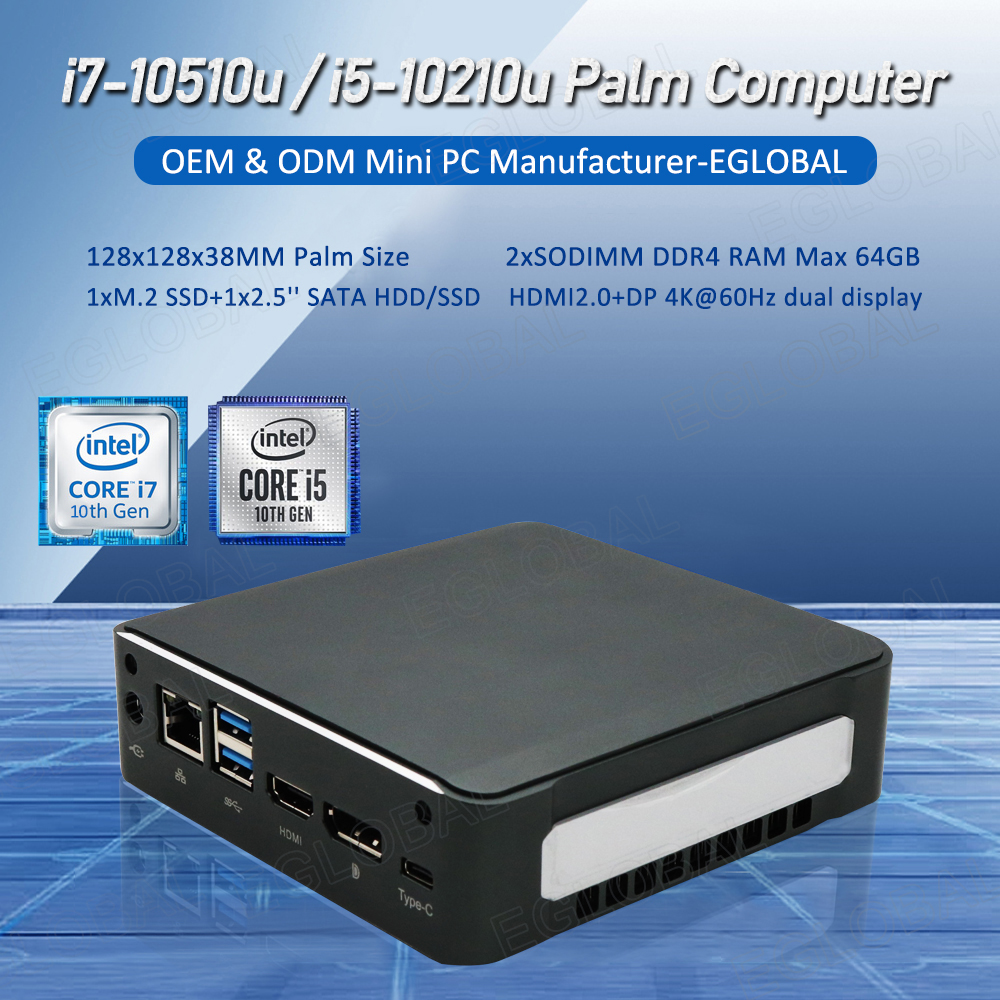
Eglobal Technology Co., Limited (Hong Kong) was registered in Hong Kong in 2009 and founded its own brand “EGLOBAL”. It is a high-tech enterprise specializing in the production and operation of thin clients and fan mini computers. The company’s products mainly involve cloud terminals, computer terminals, Net Computer, mini desktop, mini TV boxes, ultra-quiet fanless mini computers, etc.
Eglobal Technology Co., Limited adheres to the concept of “People-oriented, quality as guarantee, integrity management”, focuses on technological advantages, and is committed to the development of economic, energy-saving, stable, safe, simple and fast mini computers. Our products are widely used, such as schools, governments, enterprises, banks, hospitals, offices, terminal kiosks, POS, CCTV, KTV, etc. At the same time, we developed and produced a cloud computer, a host can support multiple users, selling in developing countries. The plant area will be expanded to about 3000 square meters in 2020.
The future looks bright, the future looks promising. Don’t Forget Why We Started and Move Forward Bravely!
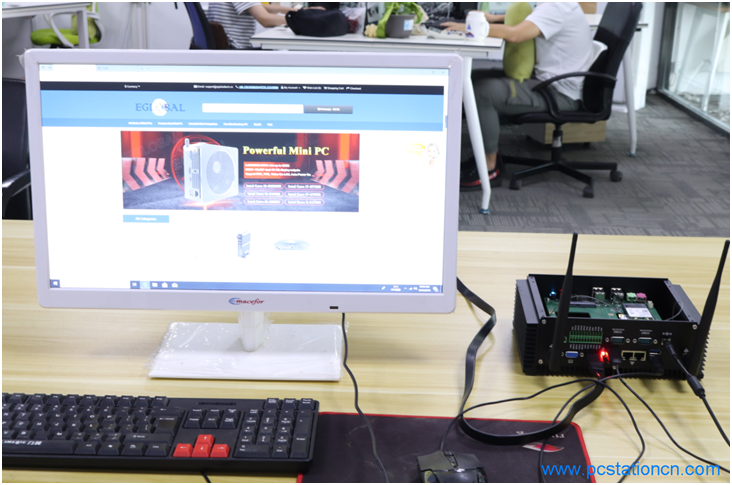
If you have Eglobal Mini PC with one SIM card slot on the motherboard and would like to use 4G WiFi, welcome to read this article about how to install 4G module taking Eglobal Industrial Mini PC G4 for example.
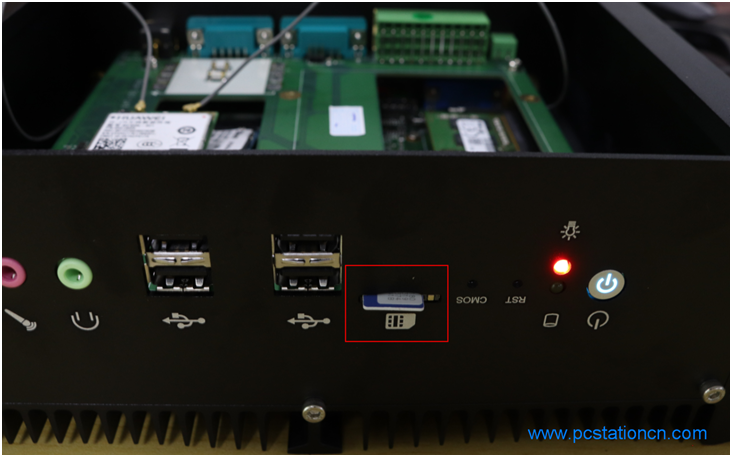
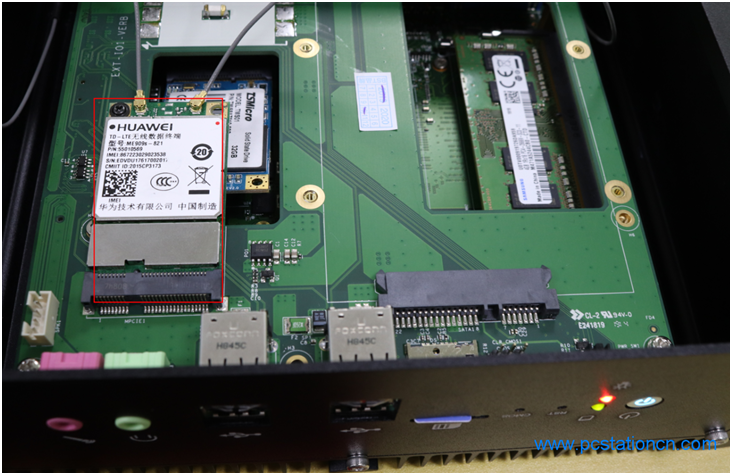
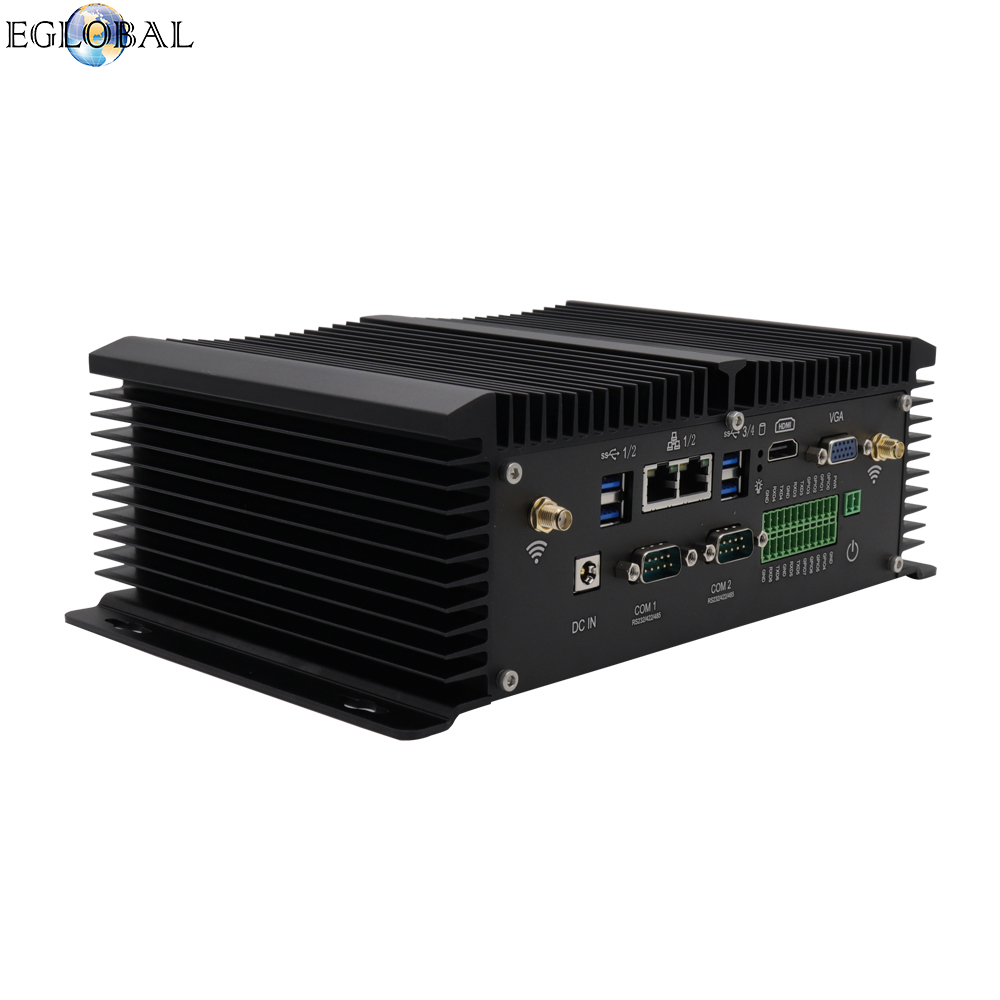
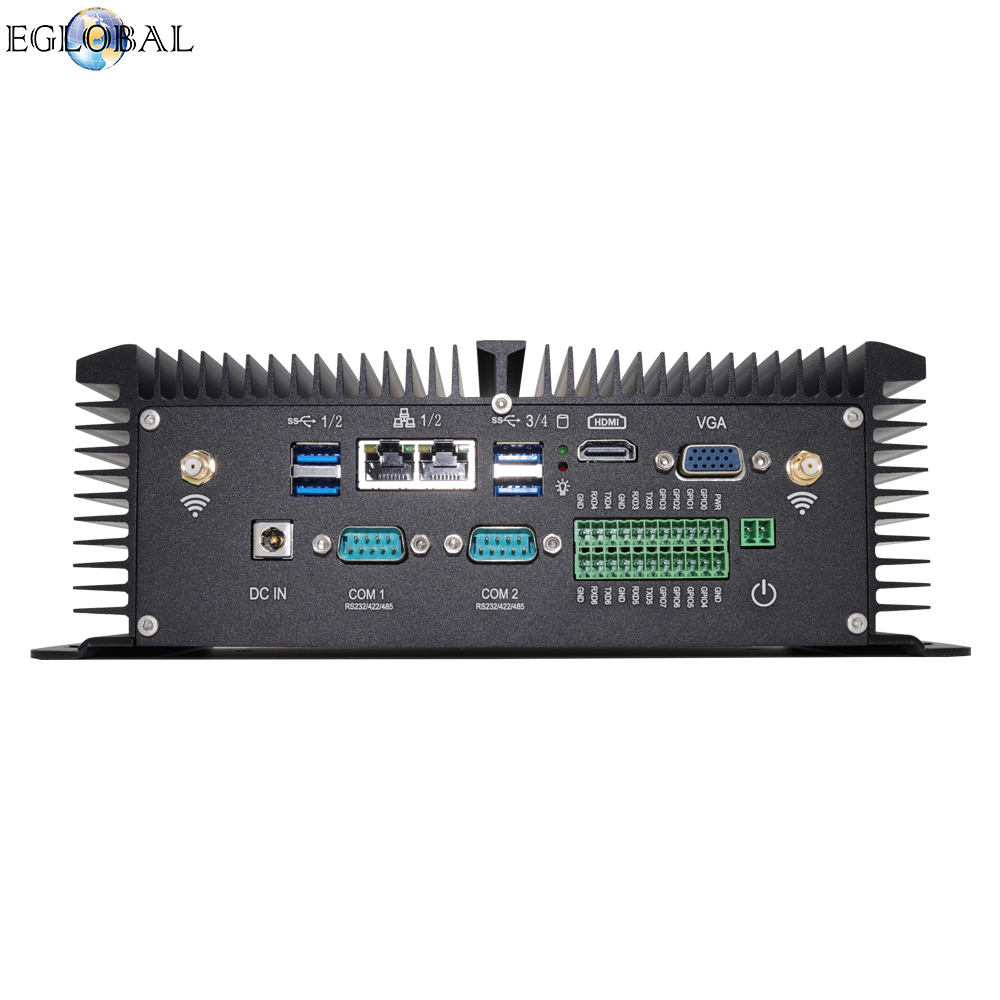
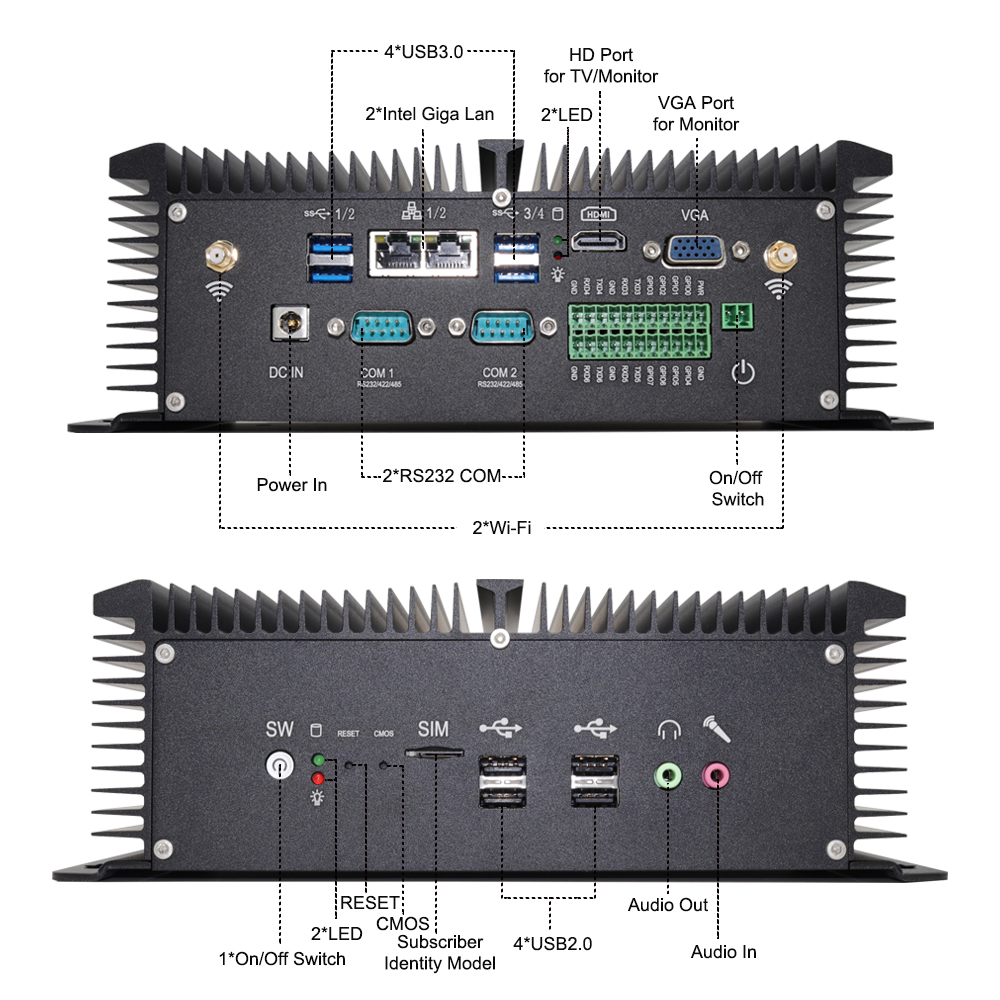
The Eglobal Industrial Mini Computer G4 with Intel Core i5-8250u processor onboard, Intel UHD Graphics 620, Rich interfaces: dual Intel Gigabit LAN, 2 x COM ports, can change to RS232/422/485 from BIOS, 1 x VGA, 1 x HDMI, 4 x USB2.0, 4 x USB3.0, 1 x GPIO, 1 x MIC, 1 x SPK, 1 x Reset, 1 x CMOS clear button, 1 x 2Pin Phoenix terminal power supply input, 1 x SIM card slot. The Industrial Mini PC outside has one SIM card slot with push function and there is one Mini-PCIE slot supporting 4G module on the motherboard. How to install 4G module on the Eglobal Industrial Mini PC G4?
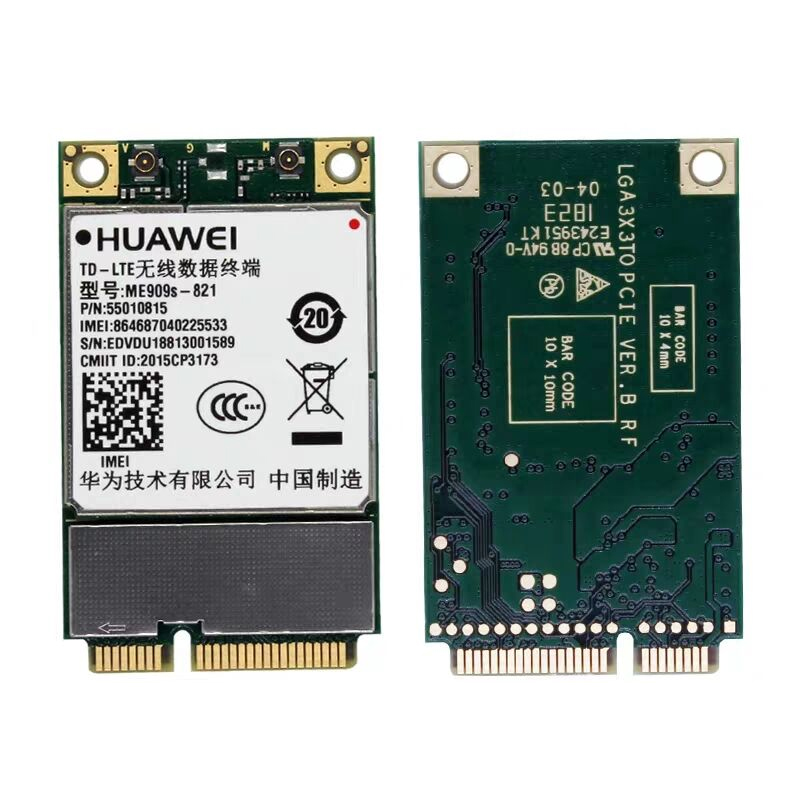
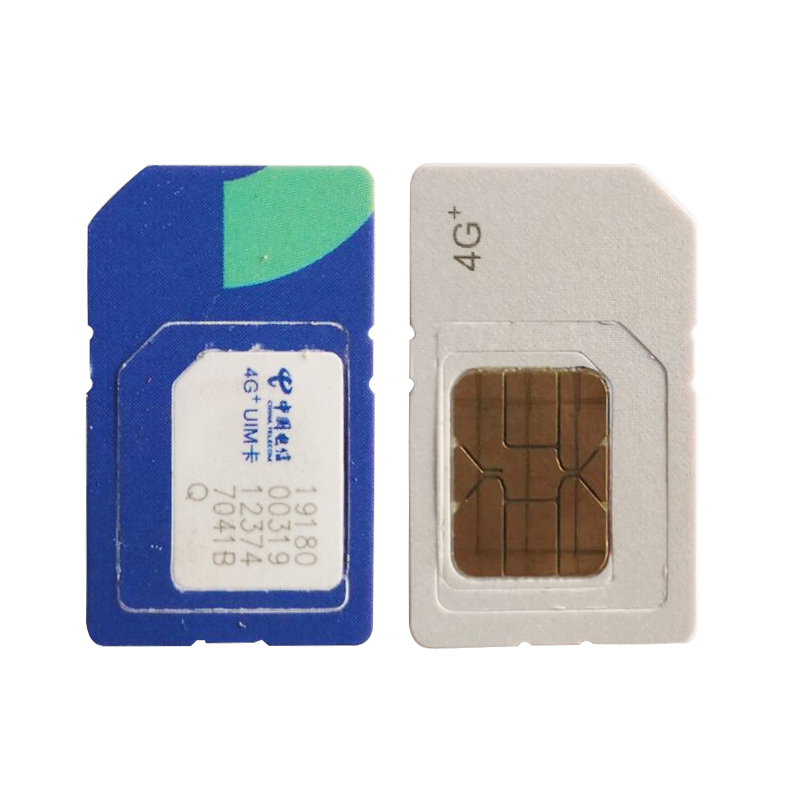
Step 1, you shall preprare these things: one SIM card, one 4G module for your local 4G communication, one Eglobal Mini PC like G4 model.
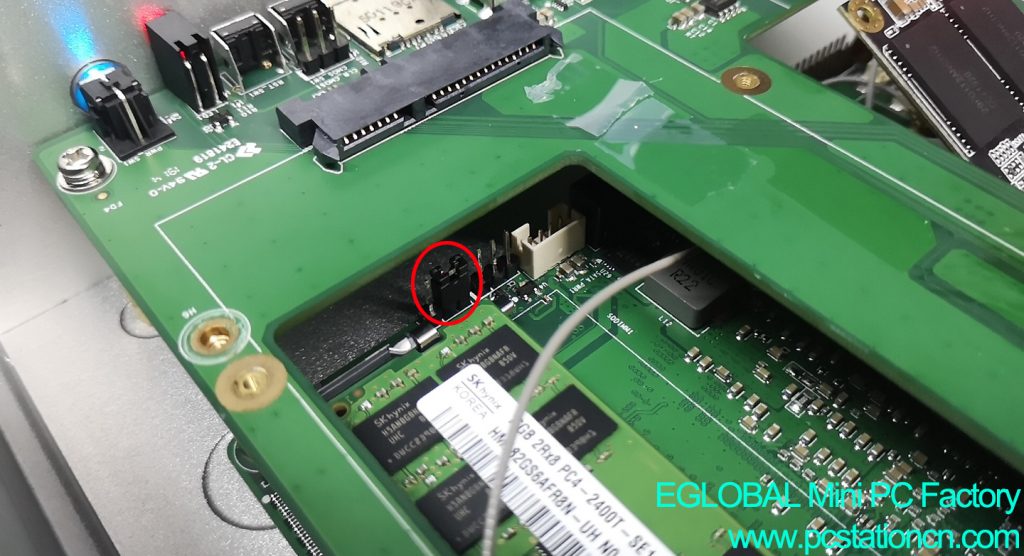
Step 2, push the SIM card into the SIM card slot.
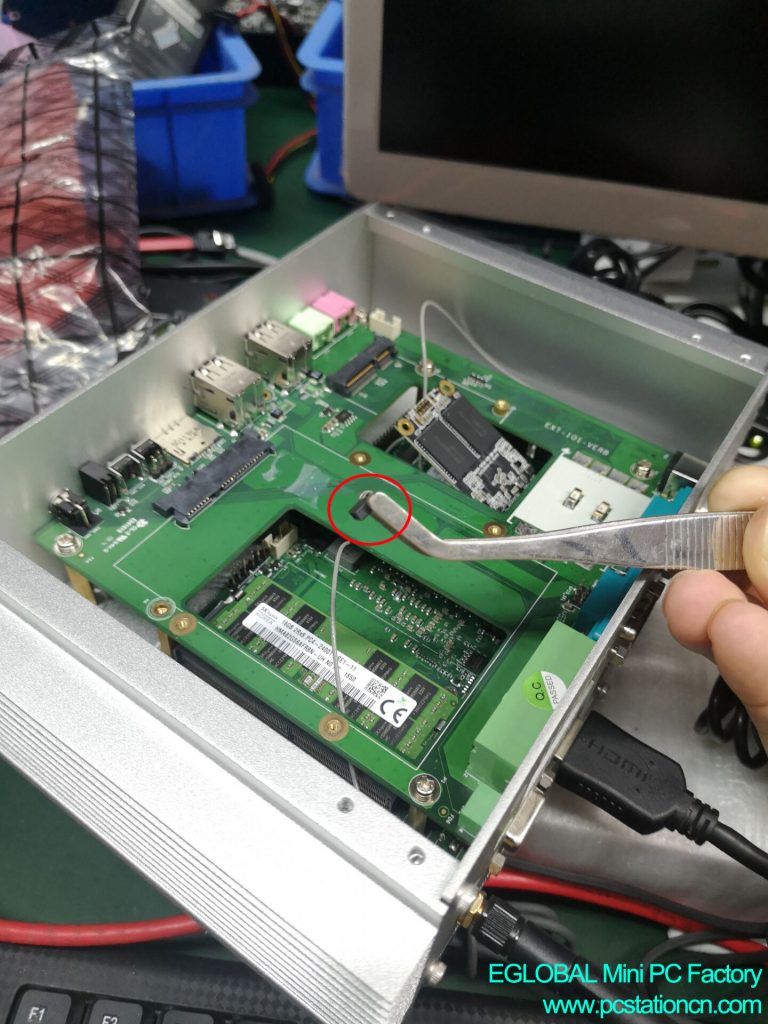
Step 3, open the baseplate of Mini PC G4, find the Mini-PCIE slot for 4G module, then install it and fix by one screw using screwdriver.
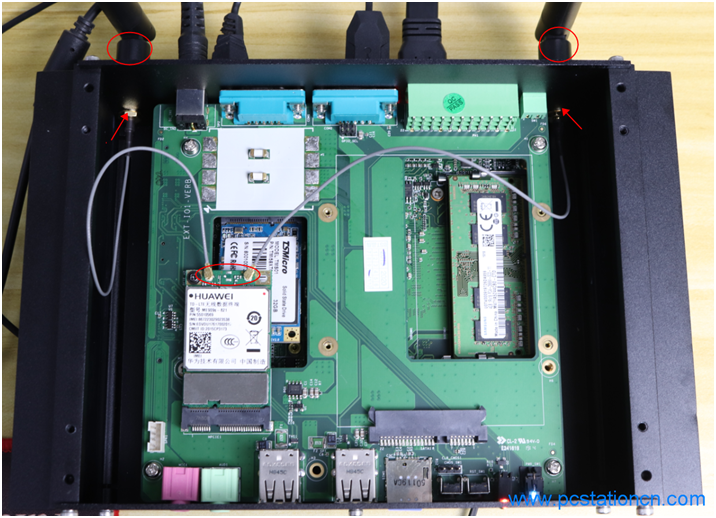
Step 4, connect two small RF cables with 4G module, and install dual external wireless antennas into the two WiFi holes.
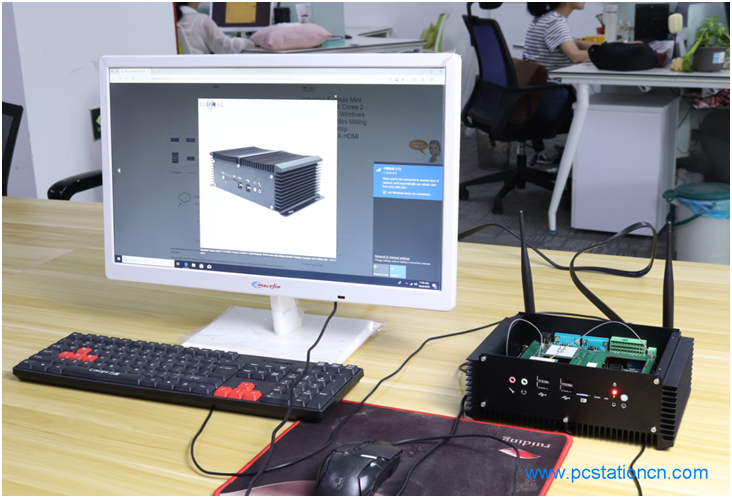
Step 5, cover the backside of the mini pc, connect to power supply, mouse, keyboard and monitor, turn on the mini pc.
Step 6, the mini pc will connect the local 4G WiFi automatically shown in the video.
If disconnection it shows message and require us adding an APN network, click the wifi button on the bottom right corner, you can see “Network&Internet settings” and go to “Settings”, click “Cellular”, click “Add an APN”, go to APN window, and input the information(anything ok), click ” Save”, then the APN wifi available, click it to connect to 4G wifi.
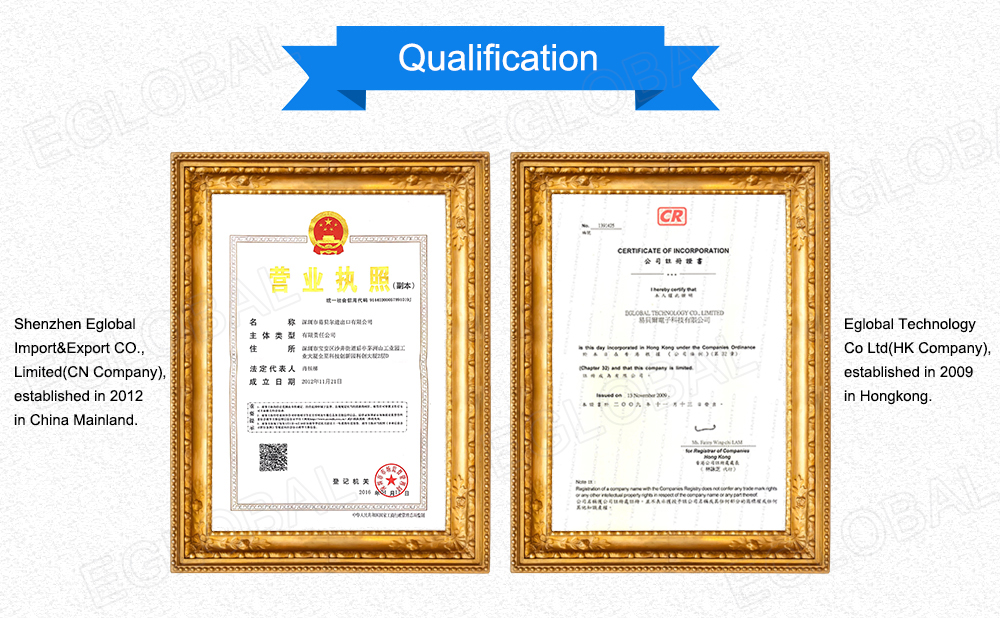
Eglobal Technology Co Ltd(HK Company),
established in 2009 in Hong Kong, is a high-tech company in line with latest
computer technical, is also a professional manufacturer and exporter that is
concerned with the design, development and production of Mini PCs. At the
beginning of our company, we devote into thin client pc station, in 2011 we
expand our business field into Mini PCs development and supplying, especially
fanless system without cooling fan. We are located in Shenzhen City, Guangdong
Province, with high-speed developed economy, preferential policies local
government support and convenient transportation access. And with our
deeply-accumulated experience and knowledge of oversea marketing sales team in
Eglobal international trade department and 7 technical support team with 10
years computer support experience we wish to become one of your best supplier.
We create own brand “EGLOBAL” with high quality, competitive
price, excellent sales team and nice after-sales support, quickly get big
worldwide market, market includes Latin America, Asia, Africa and some European
countries. In 2016, EGLOBAL as Gold Sellers is Top-Quality Brands on
AliExpress, our Sales ranked eighth in Computer & Office catalog, second
only to Samsung. Since now a monthly sales reached USD200000 by the official
store here. EGLOBAL on AliExpress: https://eglobal.aliexpress.com/store/217312
Shenzhen Eglobal Import&Export CO., Limited(CN Company), established in
2012, cooperated with Alibaba to expand our market all over the world. EGLOBAL
on Alibaba: http://eglobal.en.alibaba.com/. As our company’s development, we shall
expand our sales team then open a new Alibaba in 2017: https://eglobalminipc.en.alibaba.com/ .
In order to make us become stronger, we provide Drop Shipping service all over
the world branded EGLOBAL and we also supply wholesale OEM & ODM service,
including designing and printing customer outside color package, build in
customer logo into our software along with the hardware, produce customer
designed product shape and so on.
Details about us please kindly copy the
video on YouTube: https://youtu.be/vvoKfOfgzz8 .
Welcome to subscribe to ” Eglobal Technology Co., Limited ” on YouTube or Facebook.
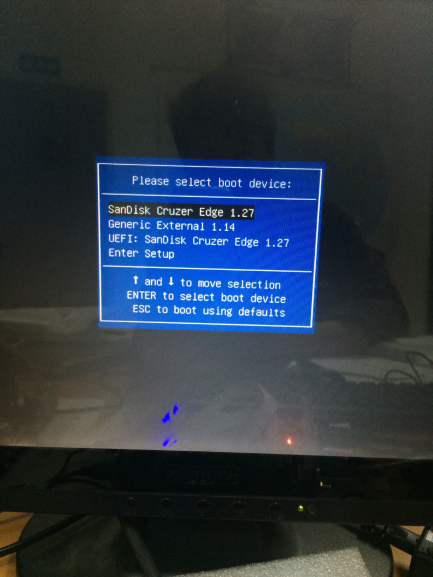
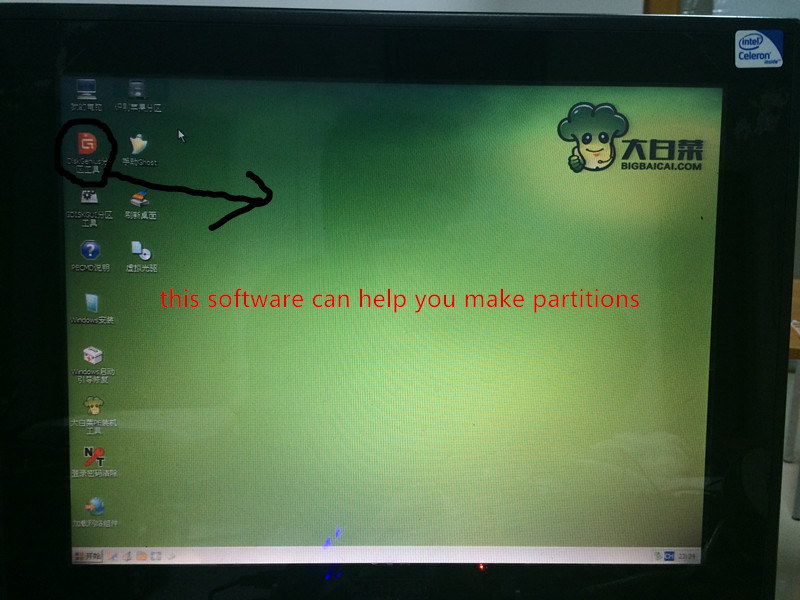
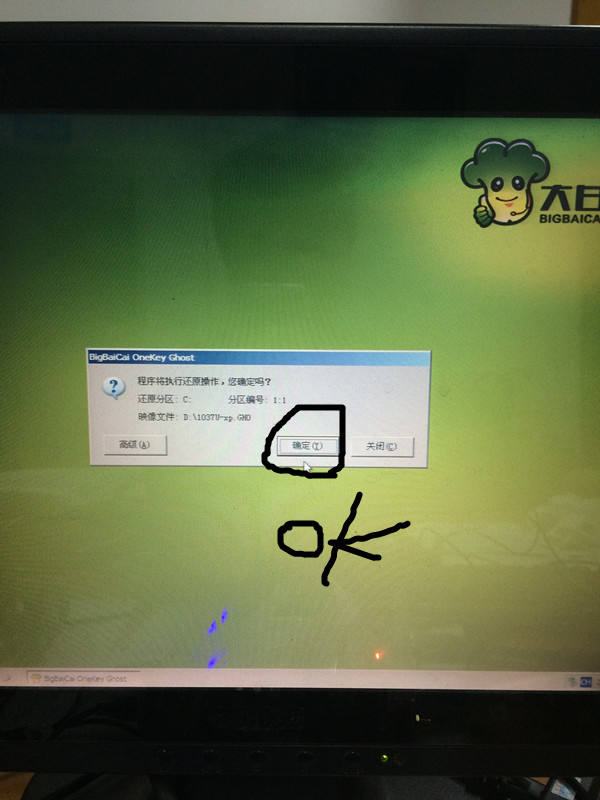
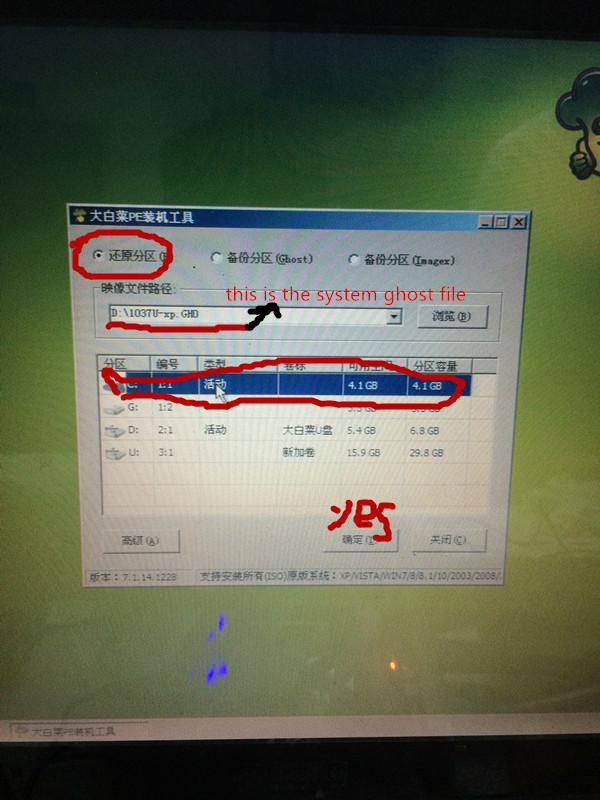
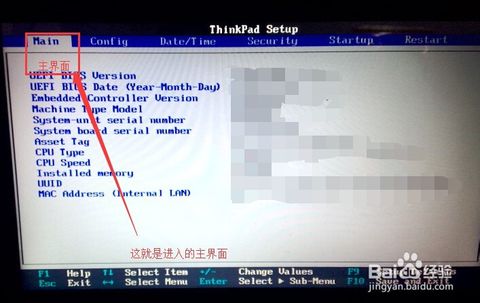
Our mini computers are usually booted from the hard disk, but when some need, it may be set to boot on some peripherals (such as USB flash drive or mobile hard disk). In this case, the boot has a non-hard disk boot, how to going to modify the hard drive to boot?
First of all, if we open a mini computer, we need to restart the mini computer at this time. If you don’t have a mini computer, just press the power button. (PS: Try to close all programs, this will minimize the damage to the mini computer)
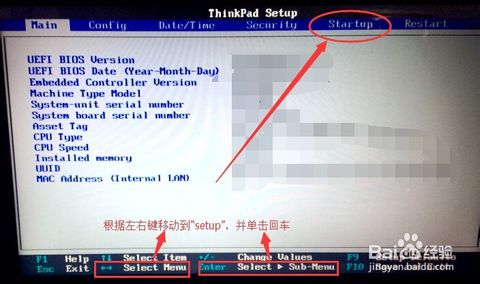
After restarting, you must pay attention to the English of the page on the boot page. At this time, you need to remember to enter the BIOS setting keyboard button (PS: Different computer’s entry BIOS settings are different, you must not press it randomly, according to the boot page to determine.)
At this point, enter the BIOS setup window, we need to find him “Advanced BIOS (Advanced BIOS function) options”, look carefully, you will find, and then double-click it to enter a new page. Of course, unlike computers, you need to observe them carefully. It is best to check English at any time.
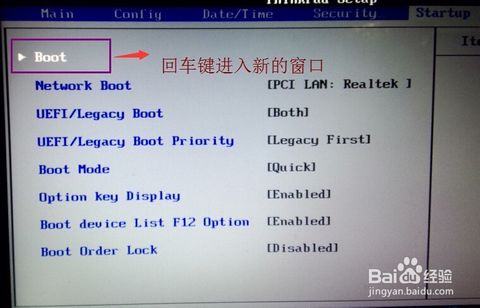
In the new pop-up window, we need to find the “Boot Devlice priorfty” carefully, this time still double-click it to enter the new page. If not, you will need to find the boot, and the Enter key will come out of the new window.
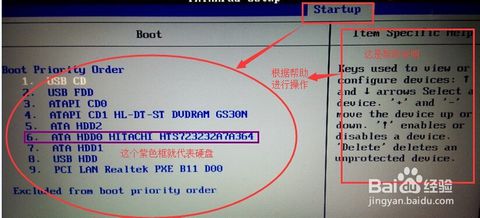
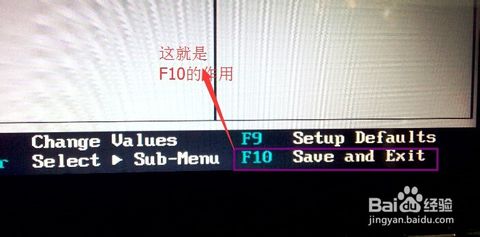
On entering the new page, we can see the three items “1, 2, 3” arranged in order (some BIOS is 1st Boot Device; 2nd Boot Device; 3th Boot Device), which means “the first start” The second item starts and the third item starts. You can look at the picture carefully. (This computer is represented by numbers.)
Once found, we need to modify according to the prompts on the page, set the order to “hard disk – HDD; mobile device is USB; CD-ROM drive is CDROM”. (PS: According to the picture, we can find that the hard disk of this computer is very hdd0, according to the prompt at the bottom of the page and the help on the left.)
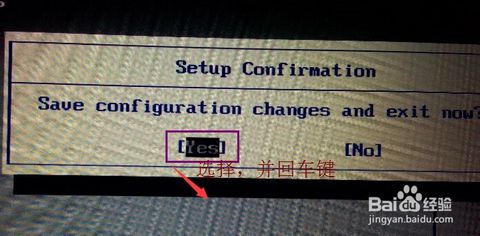
After the setup is completed, we generally use F10 to save (there is also a prompt at the bottom of the PS page). In the pop-up dialog box, we select or enter “Y” to save. At this time, the computer will restart automatically, and our settings will take effect. (This computer can hit the Enter key directly in the yes place.)
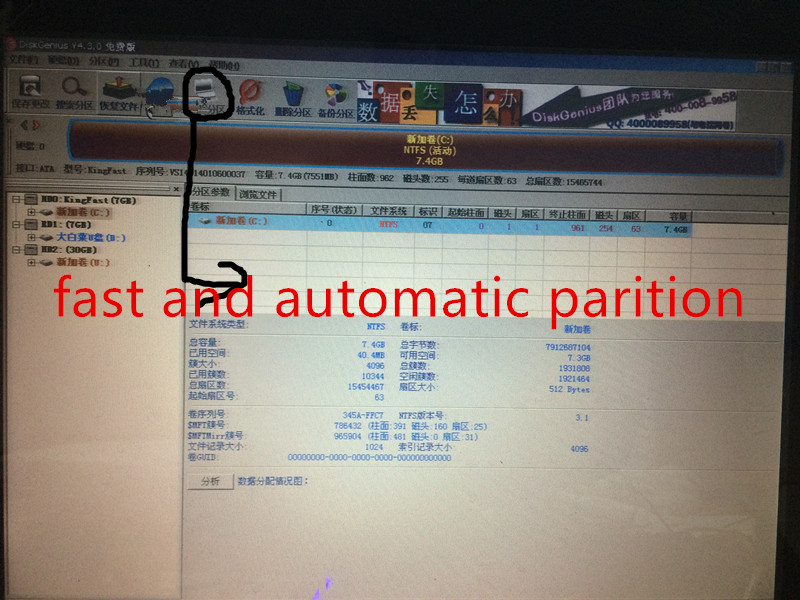
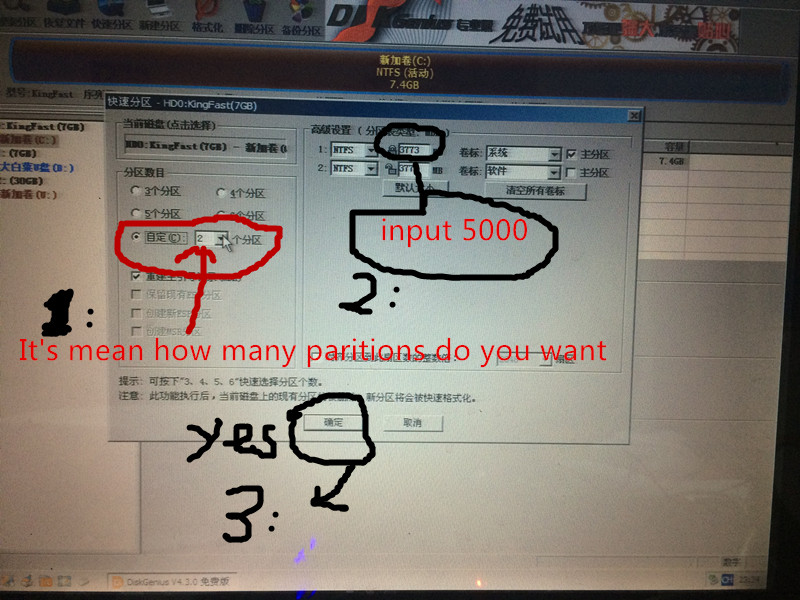
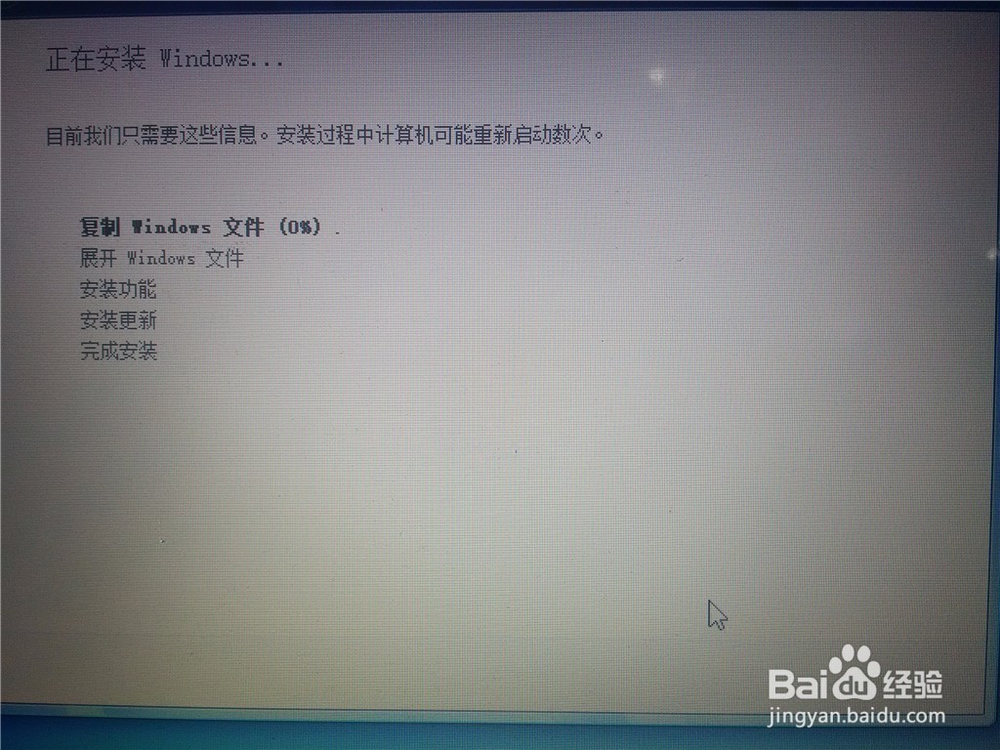
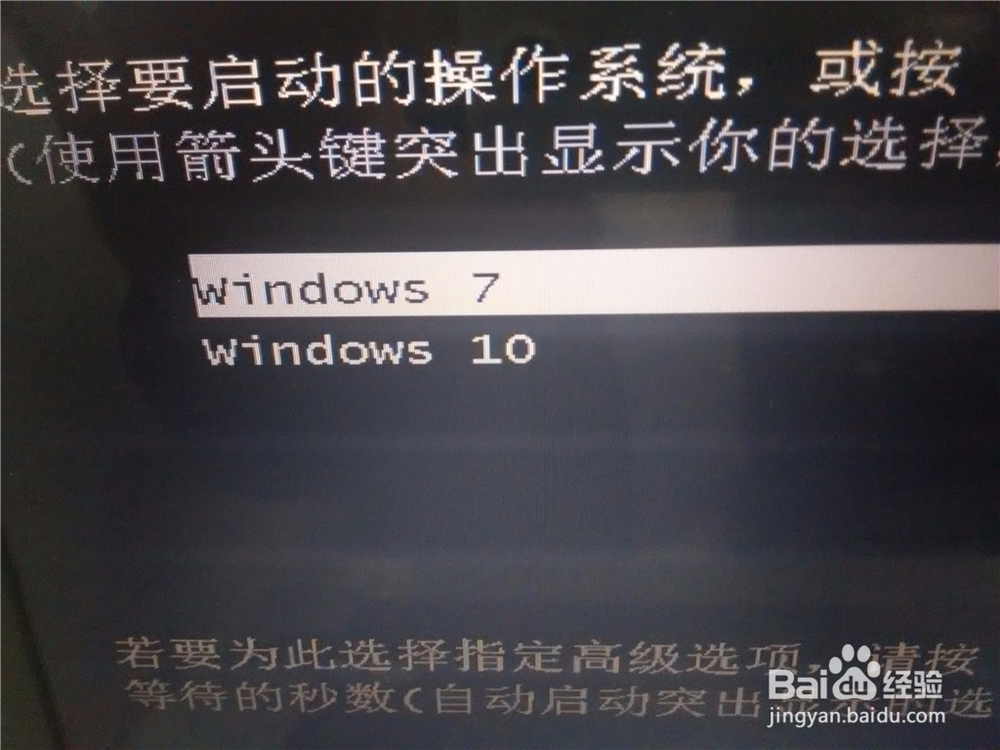
Dual Operating System at the time of installation, the two OS are installed in different partitions, and the rear installed OS doesn’t cover the previous OS. And each individual OS has its own partition format that does not cause conflicts. After installing the dual OS, there is a multi-boot selection menu at boot time, you can choose to enter that OS. In the current state, only one OS is running and cannot be switched at will. If you want to enter another one, you have to restart and re-select. Below, we will tell you how to install WIN7 under WIN10.
Key Point: When installing dual OS, it is installed from big to small, that is to install win7 on the basis of win10. If it is reversed, the win7 will be overwritten by win10.
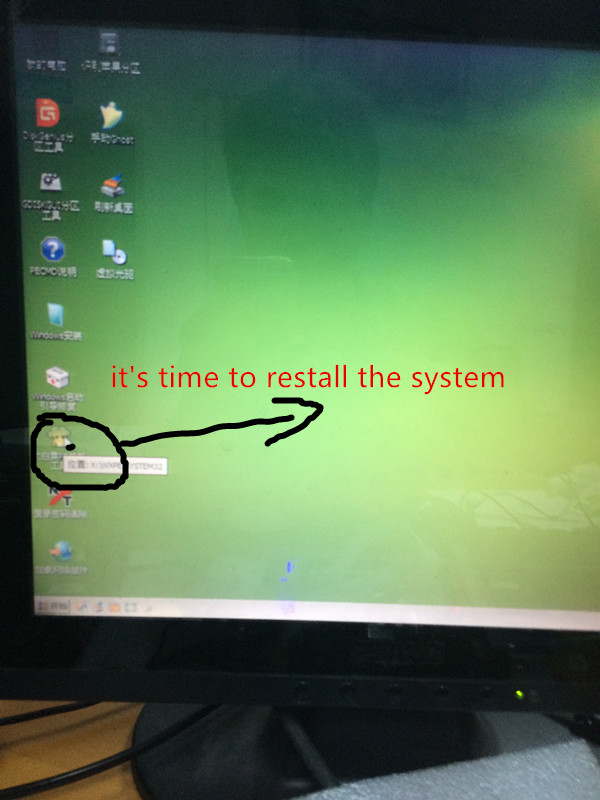
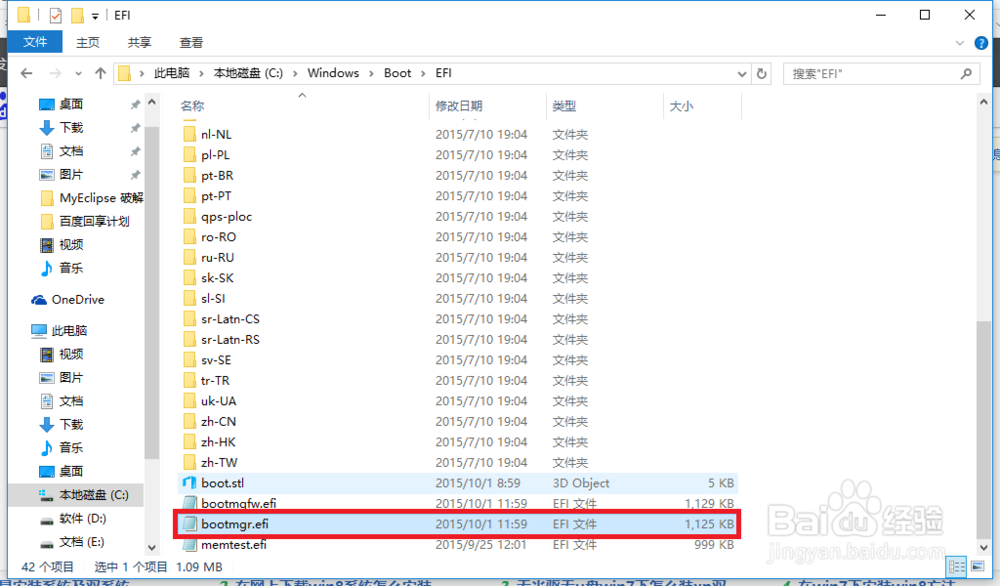
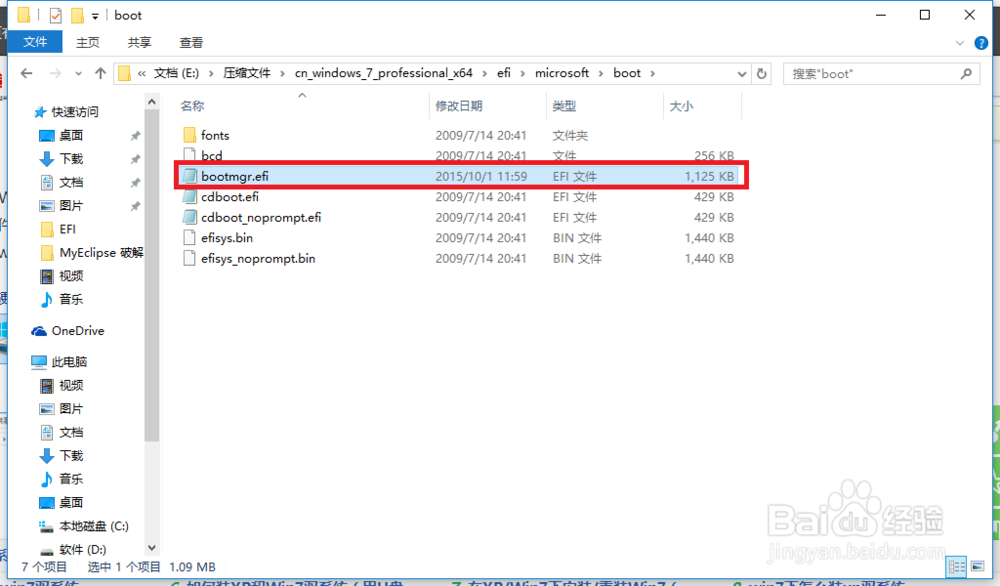
Step 1: Open your win10 OS and prepare your win7 installation package, then the system directory in win10 OS (It’s your C drive) according to: local disk C→wwindows→Boot→EFI→find bootmgr.efi Copy the file.
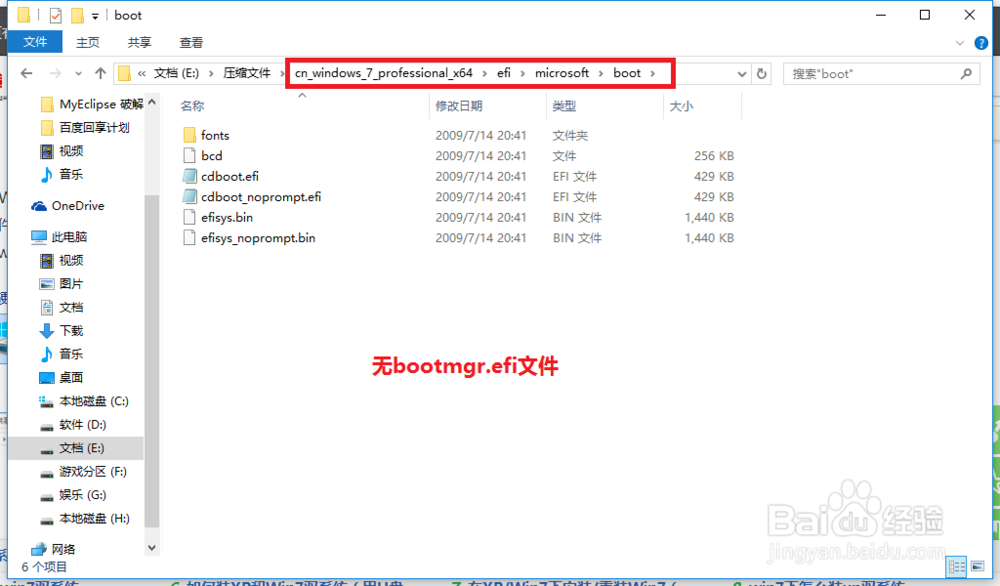
Step 2: In your win7 installation package: efi → microsoft → boot as shown below. No bootmgr.efi file in the folder.
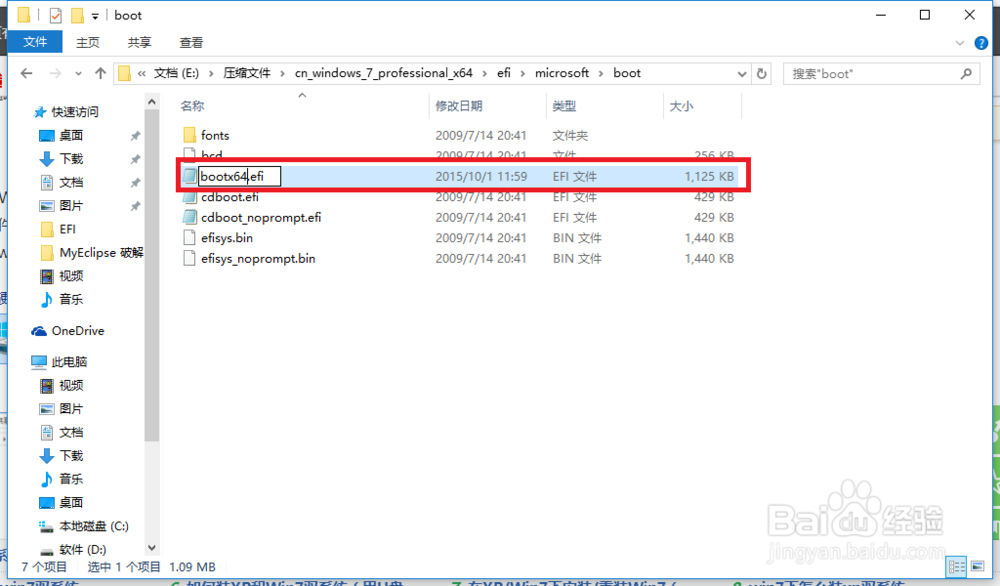
Step 3: Copy the bootmgr.efi in the second step to this directory, and then change the name to bootx64.efi, which is the pre-order step.
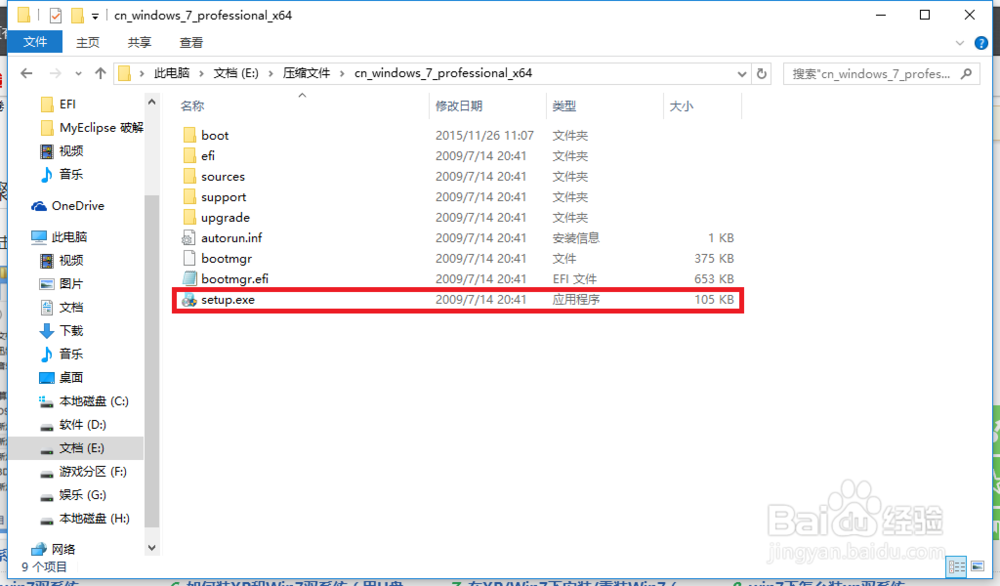
Step 4: Click setup.exe in the win7 directory to install.
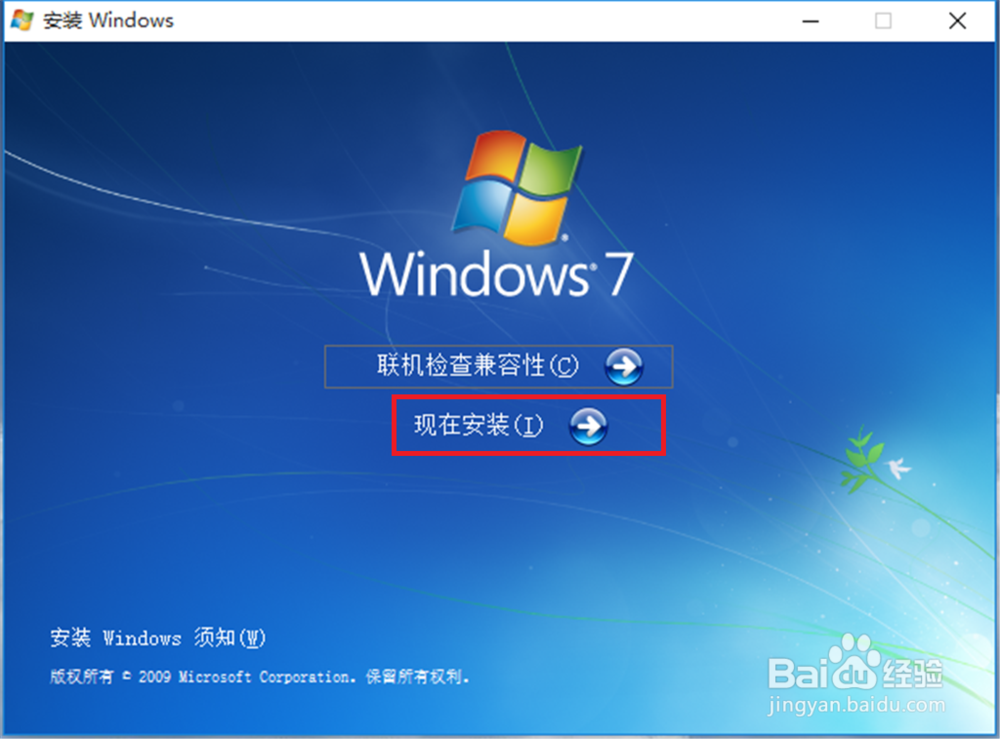
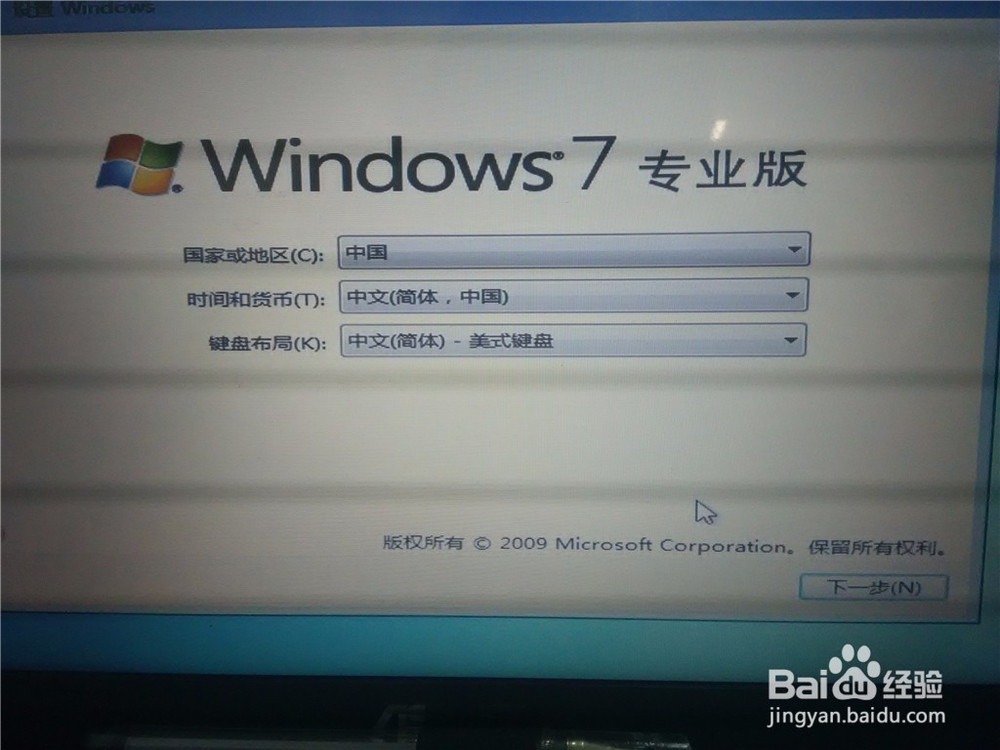
Step 5: Then pop up the following form and choose to install now.
Step 6: As shown below: enter the installation.
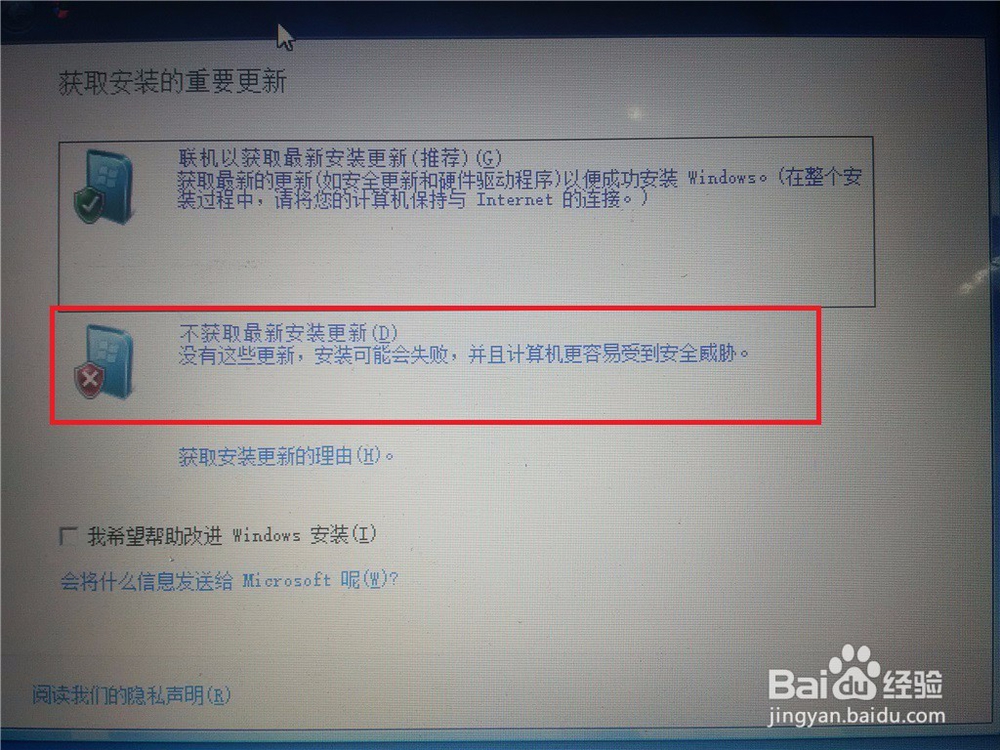
Step 7: Choose not to get the latest installation.
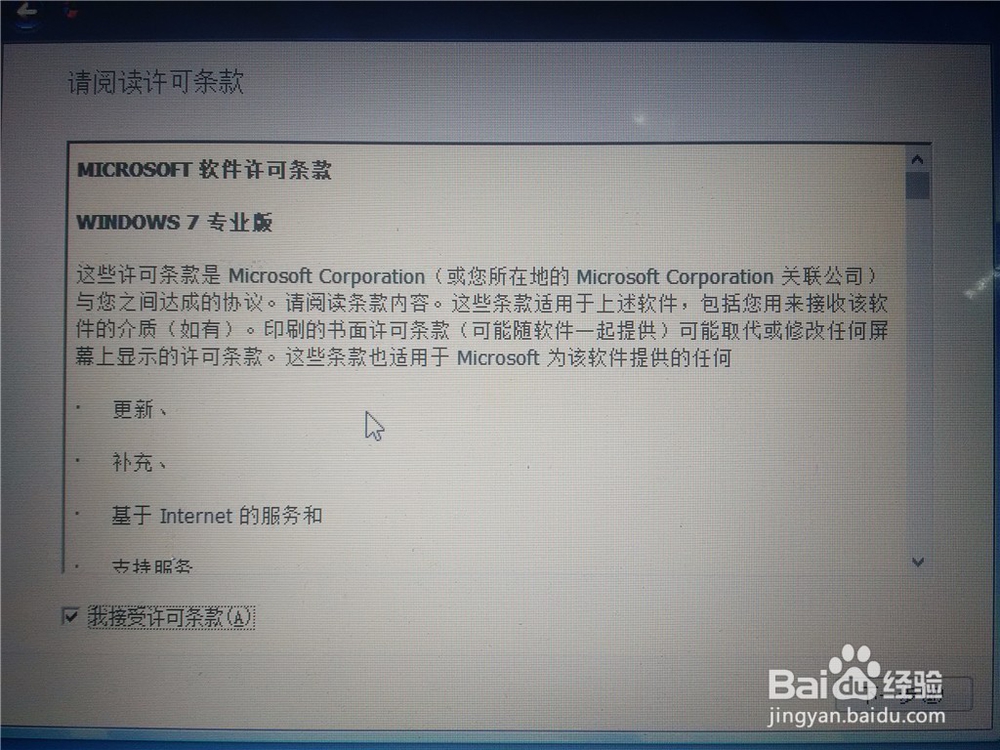
Step 8: Select Accept Terms: Click Next.
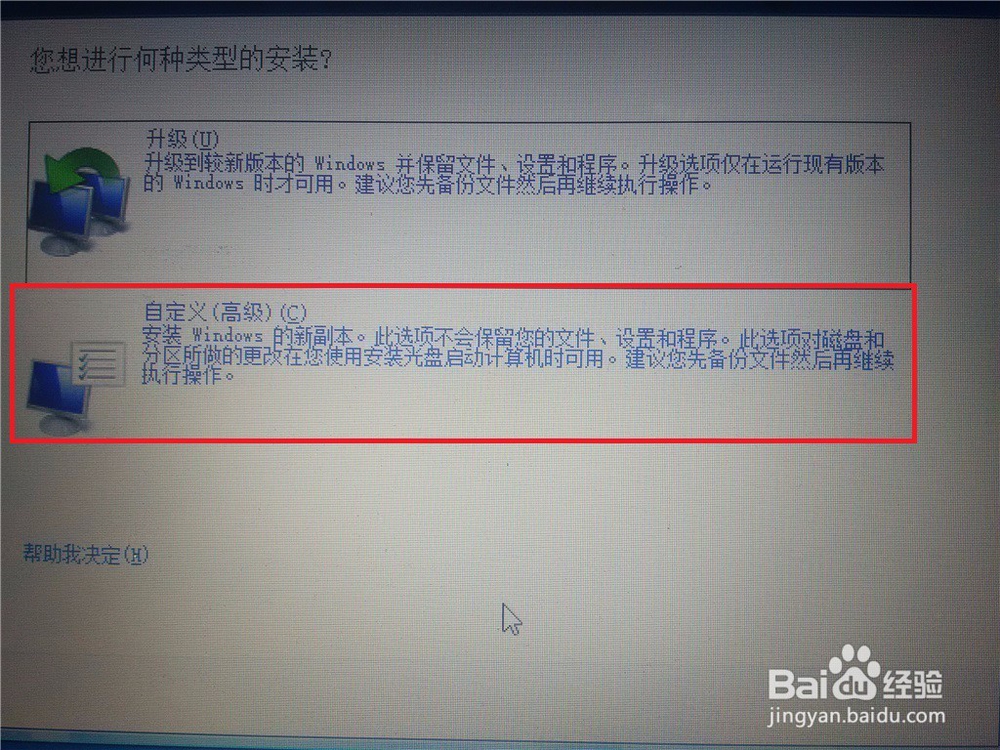
Step 9: Choose a custom installation.
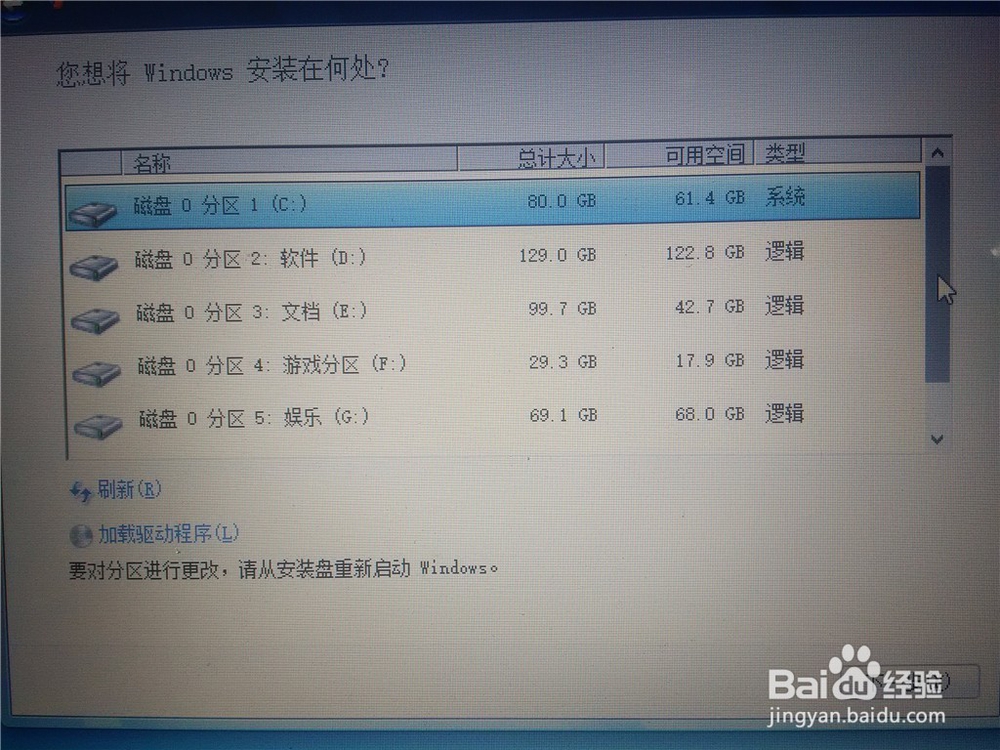
Step 10: Choose your installation directory: Click Next.
Step 11: Enter the installation, do not perform any operations on your minicomputer during this period, the system may restart several times, but it doesn’t matter.
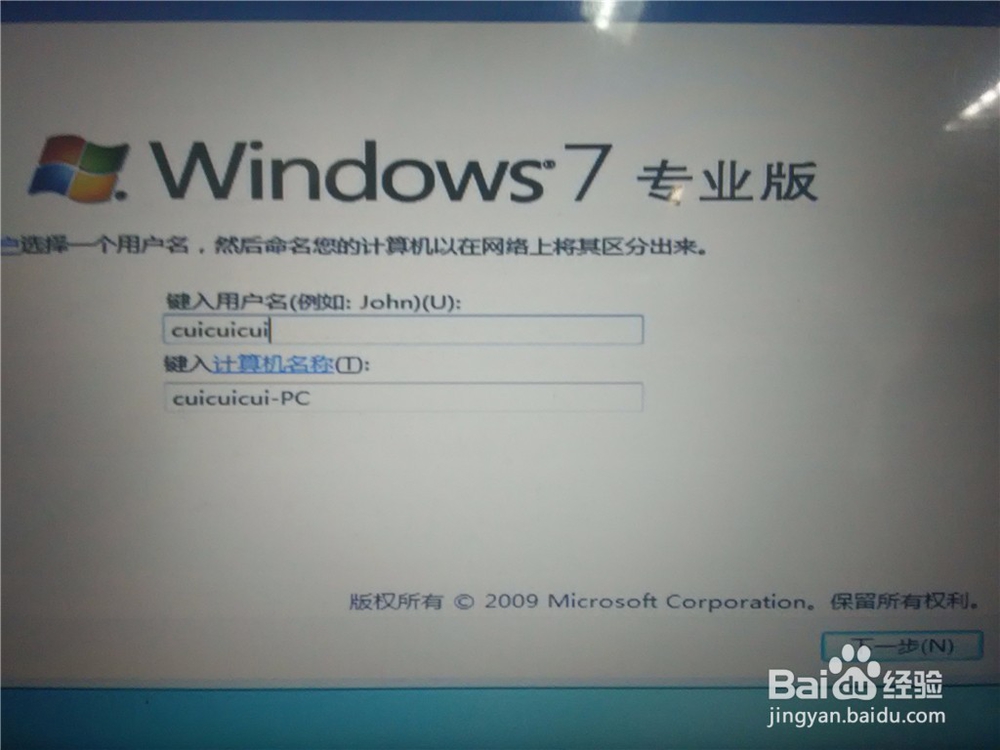
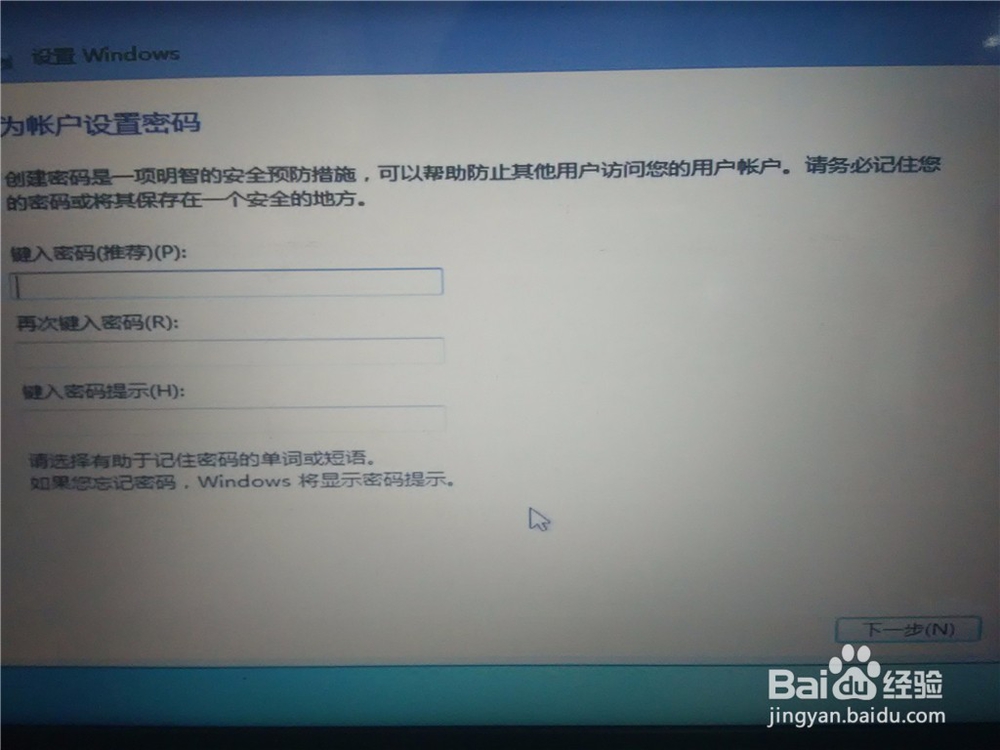
Step 12: After all the installation is completed, enter the settings of the running part of the win7 OS as shown below.
Step 13: After setting, enter win7.
Step 14: Then when your computer restarts, there will be two systems to choose to start.
The above is how to install win7 dual OS operation under win10.
In fact, a lot of cumbersome operations on the computer can only be done with just a few keystrokes. If we don’t understand these shortcuts, when the computer encounters problems, it will often make people very crazy. In this issue, I will share 10 for you. The most common use tips.
Tip 1: Quick lock screen
Quick lock screen: Win+L
Whether in the Internet cafe or office, sometimes you have to leave the computer to do other things, and do not want others to peek at your computer, may wish to hold down the windows key, then press the L button, the computer will directly lock the screen, so don’t worry The data of the computer is leaked!
Tip 2: Quick access
Quick access shortcut: Win+E
Sometimes we have a lot of icons on the desktop, it is difficult to find “this computer or computer”, and even some users have no “computer or this computer” icon on the desktop. At this time, we can press the key on the keyboard and then press the E key to open the resource manager of the computer directly.
Tip 3: Display the desktop
Show desktop shortcuts: Win+D
Sometimes the computer gets stuck or opens a lot of things. If you want to quickly return to the desktop, we can press the windows button on the keyboard and press the D button to display the desktop directly.
Tip 4: Cancel
Undo shortcut: Ctrl+Z
There is no regret in life, but computer operation can regret it. The shortcut key Ctrl+Z can help you undo the previous step, which can be used in many applications.
Tip 5: Refresh button
Refresh shortcut: F5
F5 is the refresh key used to refresh the contents of the current window in the IE or Explorer. This is a very convenient shortcut!
Tip 6: Quick start
Quick start shortcut: Win+R
This shortcut is a native feature of Windows that comes with everything from XP to Windows 10. After using this shortcut key, you can open the system search, which is a relatively quick command input method. The system will pop up a small window for you to enter the command. After the carriage return, the command will be executed immediately and the run window will be closed.
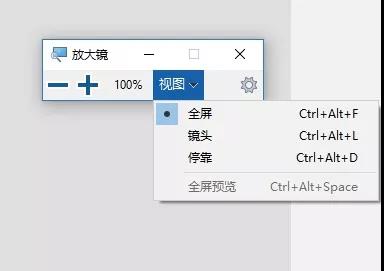
Tip 7: Magnifying glass
Shortcut: Win + +
If you can’t see the text on the display then you definitely need an amplifier. The shortcut key windows++ enlarges, whether it is a browser or word, ppt, excel can use this shortcut to zoom in. You can also use the CTRL+ mouse wheel.
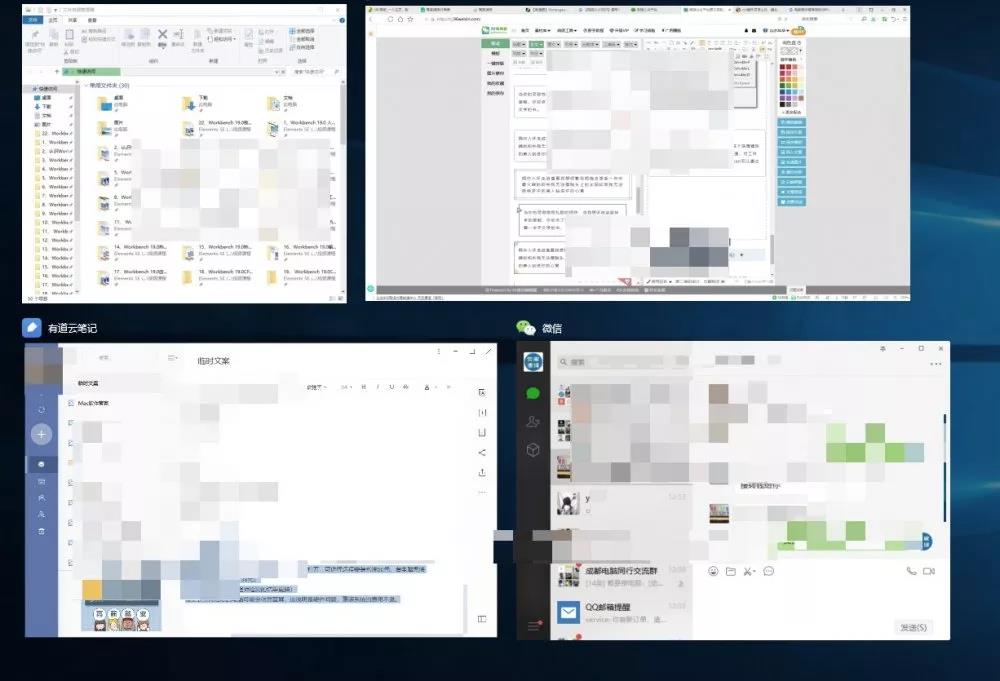
Tip 8: Switching tasks
Shortcut: Win+tab
This shortcut key is similar to alt+tab. After using this shortcut key, you can switch tasks, making the switching task faster and more efficient, and win+tab can click the task compared to alt+tab. Choose the task you want to do faster.
Tip 9: Quick Screen Recording
Press Win+R, type psr.exe and click “OK” to open the recording function that comes with Windows, and then you can start recording. After the recording is completed, a save dialog box will pop up, where we can save the recorded file as a zip archive. After extracting the zip file, we see that the recorded file is not a video file, but an MHTML report file. Open the file, we see that we have a screenshot of each step on the screen, and highlight the mouse click area, and support to view as a slide, and finally generate a compressed MHTML report file to send to the help object Recorded issues can support slide shows.
Tip 10: Permanently delete
Permanently delete: shift + delete
Shift + delete delete is unable to restore deleted files using the restore operation, that is, the files deleted by this method are not through the recycle bin.
It is a very common problem that the minicomputer is booting slowly. When the computer is turned on, some default software will be started. There are many factors that affect the speed of computer booting. In this issue, we will explain how to speed up the minicomputer booting.
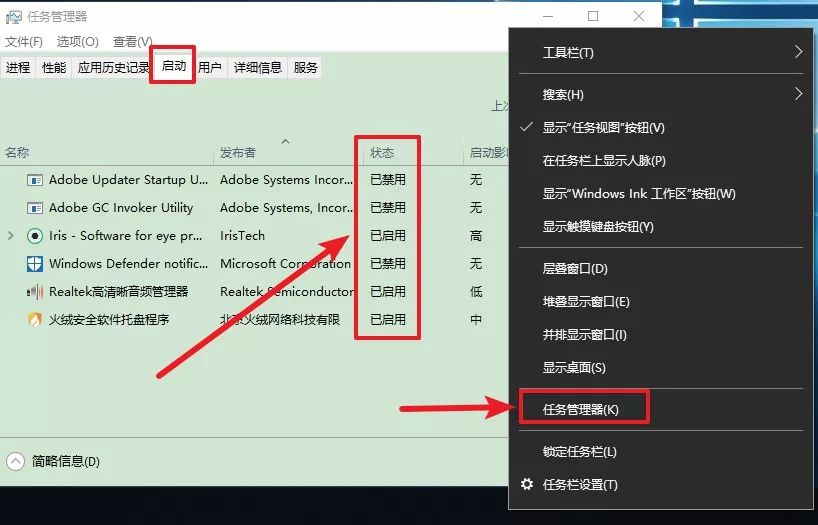
First, disable the useless start-up items:
Disable the programs that are not needed or rarely used, which can
effectively speed up the boot.
Operation method: Right click [task bar] to select [Task Manager], click [Start], and select the corresponding program.
Second, modify the registry to reduce boot pre-read items:
Super pre-reading is very intelligent, can improve system performance, speed up program startup, and is essentially to improve memory utilization, make full use of memory to improve system performance without affecting the operation of other programs.
Operation method:
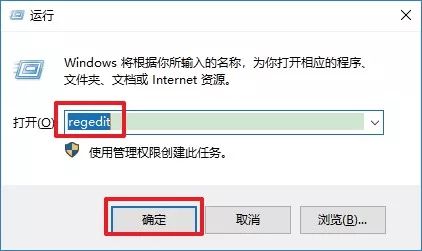
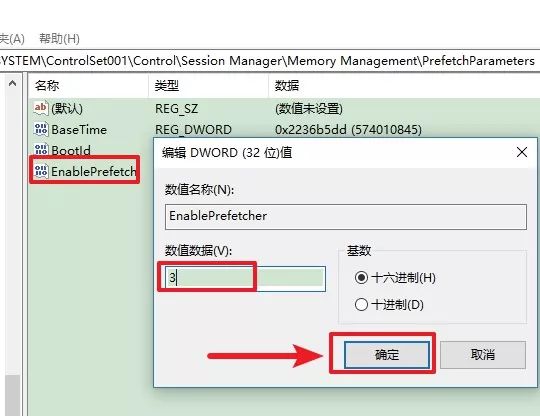
1. Press the [Win+R] key on the keyboard, enter [regedit] and click [OK].
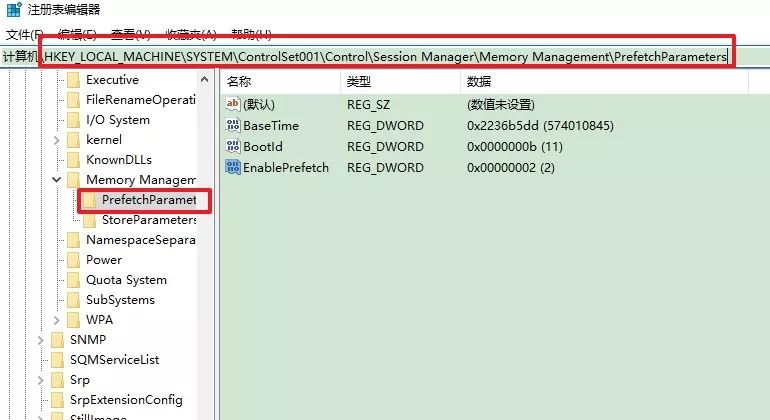
2. Expand step by step in the registry to the following directory location: HKEY_LOCAL_MACHINE\SYSTEM\ControlSet001\Control\Session Manager\Memory Management\PrefetchParameters
3. Double-click “EnableSuperfetch” and modify its value to “3”, which can effectively speed up the boot.
Third, through the installation of third-party tool software to help us optimize the boot project:
The computer is equipped with security software such as “XX Computer Manager” or “XX Security Guard”, and these third-party security software basically have the function of boot acceleration. Therefore, we can use them to help us optimize the computer boot items to save the boot time.
Key points: This kind of third-party software itself is also the boot-up item, which will take up the computer boot time. And the more such software is installed, the more cards are stuck, the slower the boot is, and it is enough to install at most one.
Fourth, computer cleaning:
Dust in the computer can easily accelerate the aging of the components, resulting in slow operation of the hardware, and even some of the poor contact can not be started properly. For example, if the fan is not cleaned in time, the temperature of the computer is too high, and it is easy to start the computer slowly. It is also necessary to clean the computer in time.
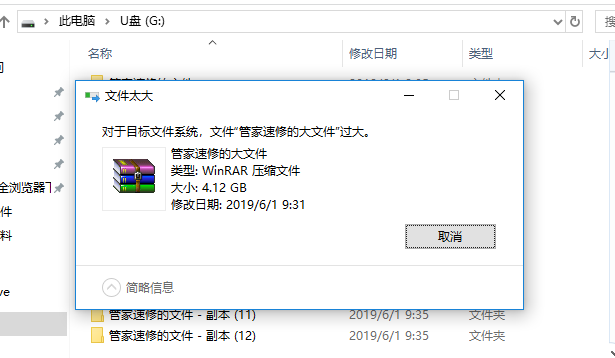
Do you have such an experience? I want to copy a large file to a USB flash drive. It is obvious that there is a considerable capacity in the USB flash drive. When copying, it always prompts that the file is too large to be transmitted. Today I will teach you how to copy large files into a USB flash drive. Two methods are introduced. The first method will lose the data in the USB flash drive. The second method will not lose the data in the USB flash drive.
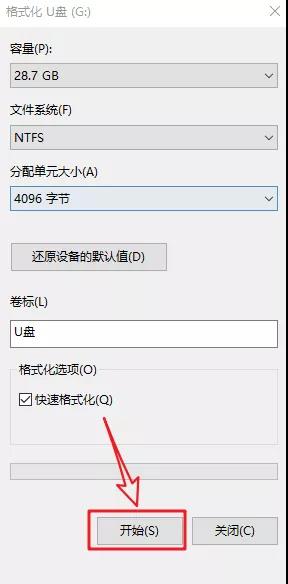
Key points: The format of U disk is commonly FAT, FAT32, NTFS and exFAT. The default format of the USB flash drive is FAT32, and the FAT32 format does not support storing a single file larger than 4G, so we only need to convert the format of the USB flash drive to NTFS.
The operation method is as follows
Method 1
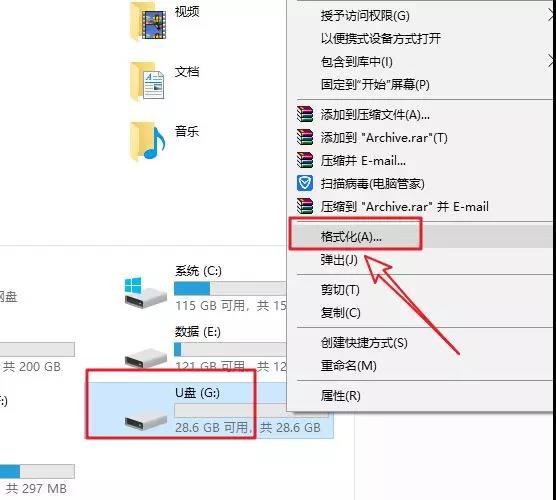
1. Right click on the U disk and select “Format”
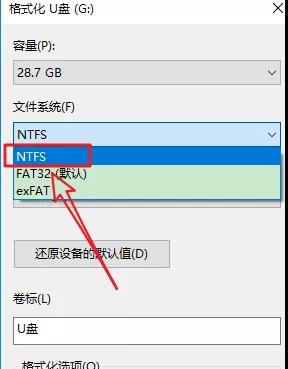
2. Select “NTFS” at the file system.
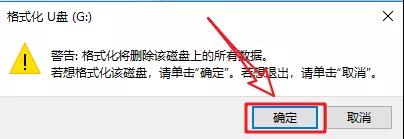
3. Click on “Start”
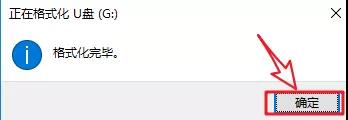
4. Click “OK”.
5. Click “OK”.
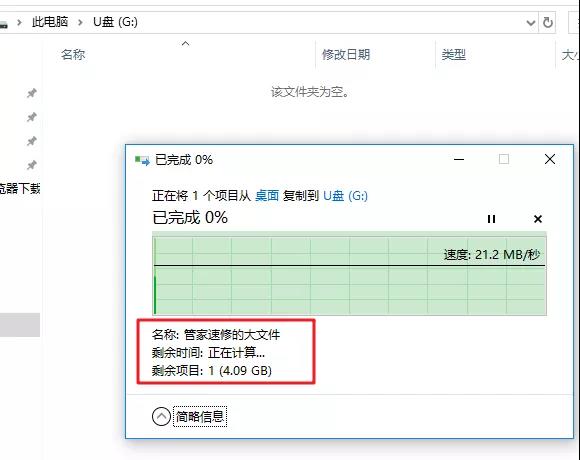
6. Copy large files to the U disk now.
Key points: This method is easy to operate, but all the contents of the USB flash drive will be cleared when formatting.
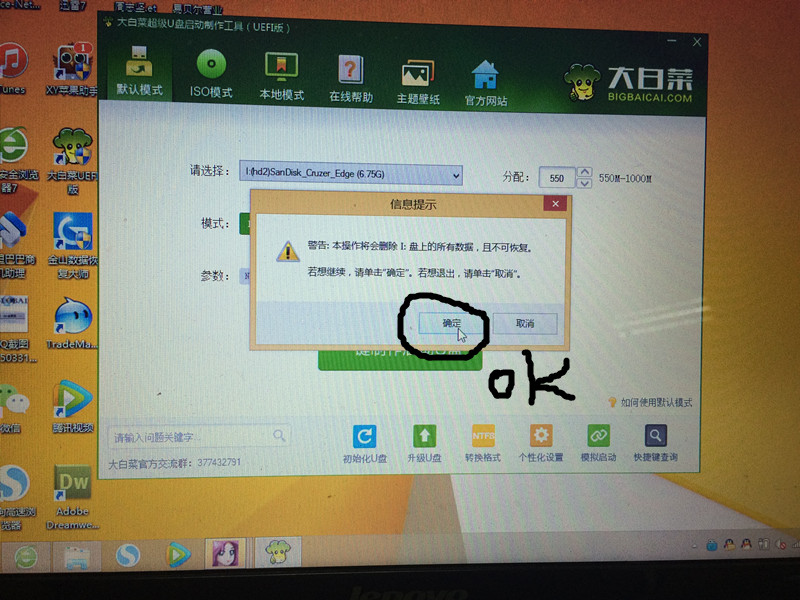
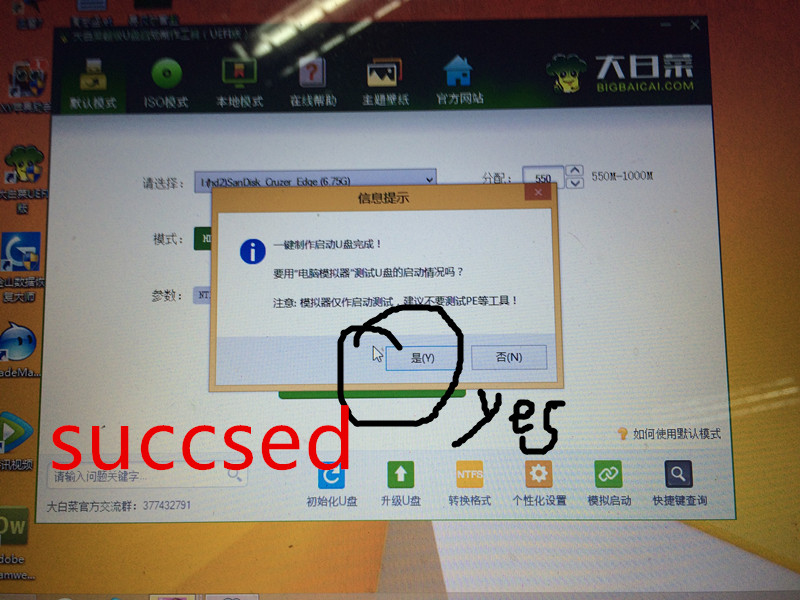
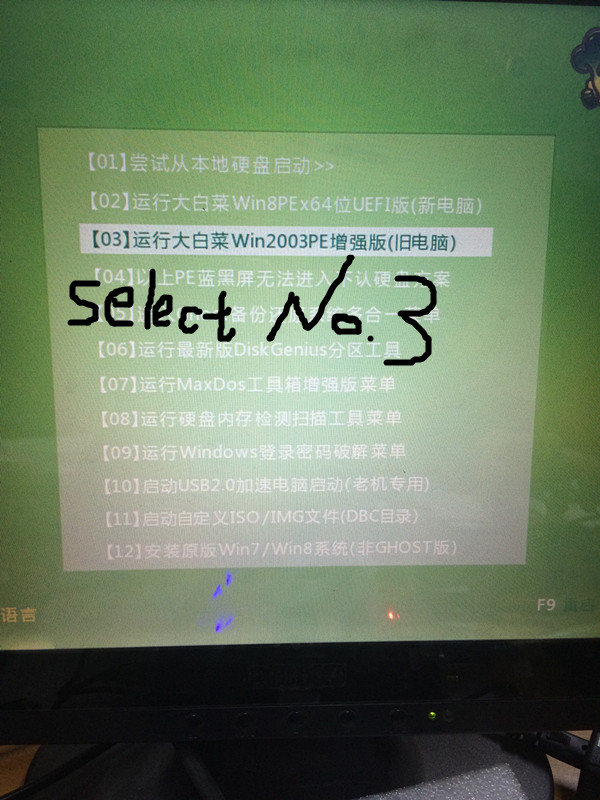
_02.jpg)